




This post is brought to you by Perfect Wiki, a tool that helps you create a database of your company resources right in Microsoft Teams. Try us out for FREE today, no sign-in or credit card required.
We are back with another post that will hopefully bring you a bit closer to your 2022 remote collaboration goals. This post is all about Microsoft Teams Meetings—and whether you just installed MS Teams last night or you’ve been using the workspace for years, we’re sure you will learn something new about Meetings.
Without further ado, let’s jump in.
Note:
Most of the tips in this post are intended for MS Teams users with an
admin
account.
What are Microsoft Teams Meetings?
If you’ve used virtual meeting spaces in the past couple of years (and at this point who hasn’t, right?), then MS Teams Meetings will be a familiar concept to you.
If you’re new to remote collaboration, here’s the gist: Meetings is a video call service integrated in Microsoft Teams. You and your team can use it for quick check-in calls between two people or for org-wide meetings.
Microsoft Teams Meetings let you gather the team no matter where you are without having to use an external virtual meeting service.
How to Change Meeting Settings in the Microsoft Teams Admin Center
If you are in a management position in your company, you might want to tweak Meetings settings and permissions. For example, you may want to restrict who in your company can start and schedule meetings.
To change Meeting permissions, you will need access to the Microsoft Teams Admin Center. Here’s how to get there:
- Open your browser and go to https://admin.microsoft.com
- Enter your admin credentials (they are the same as your login and password for Microsoft Teams)
- The Microsoft Teams Admin Center has its own workspace—scroll down to “Admin centers” and hit “Teams”.
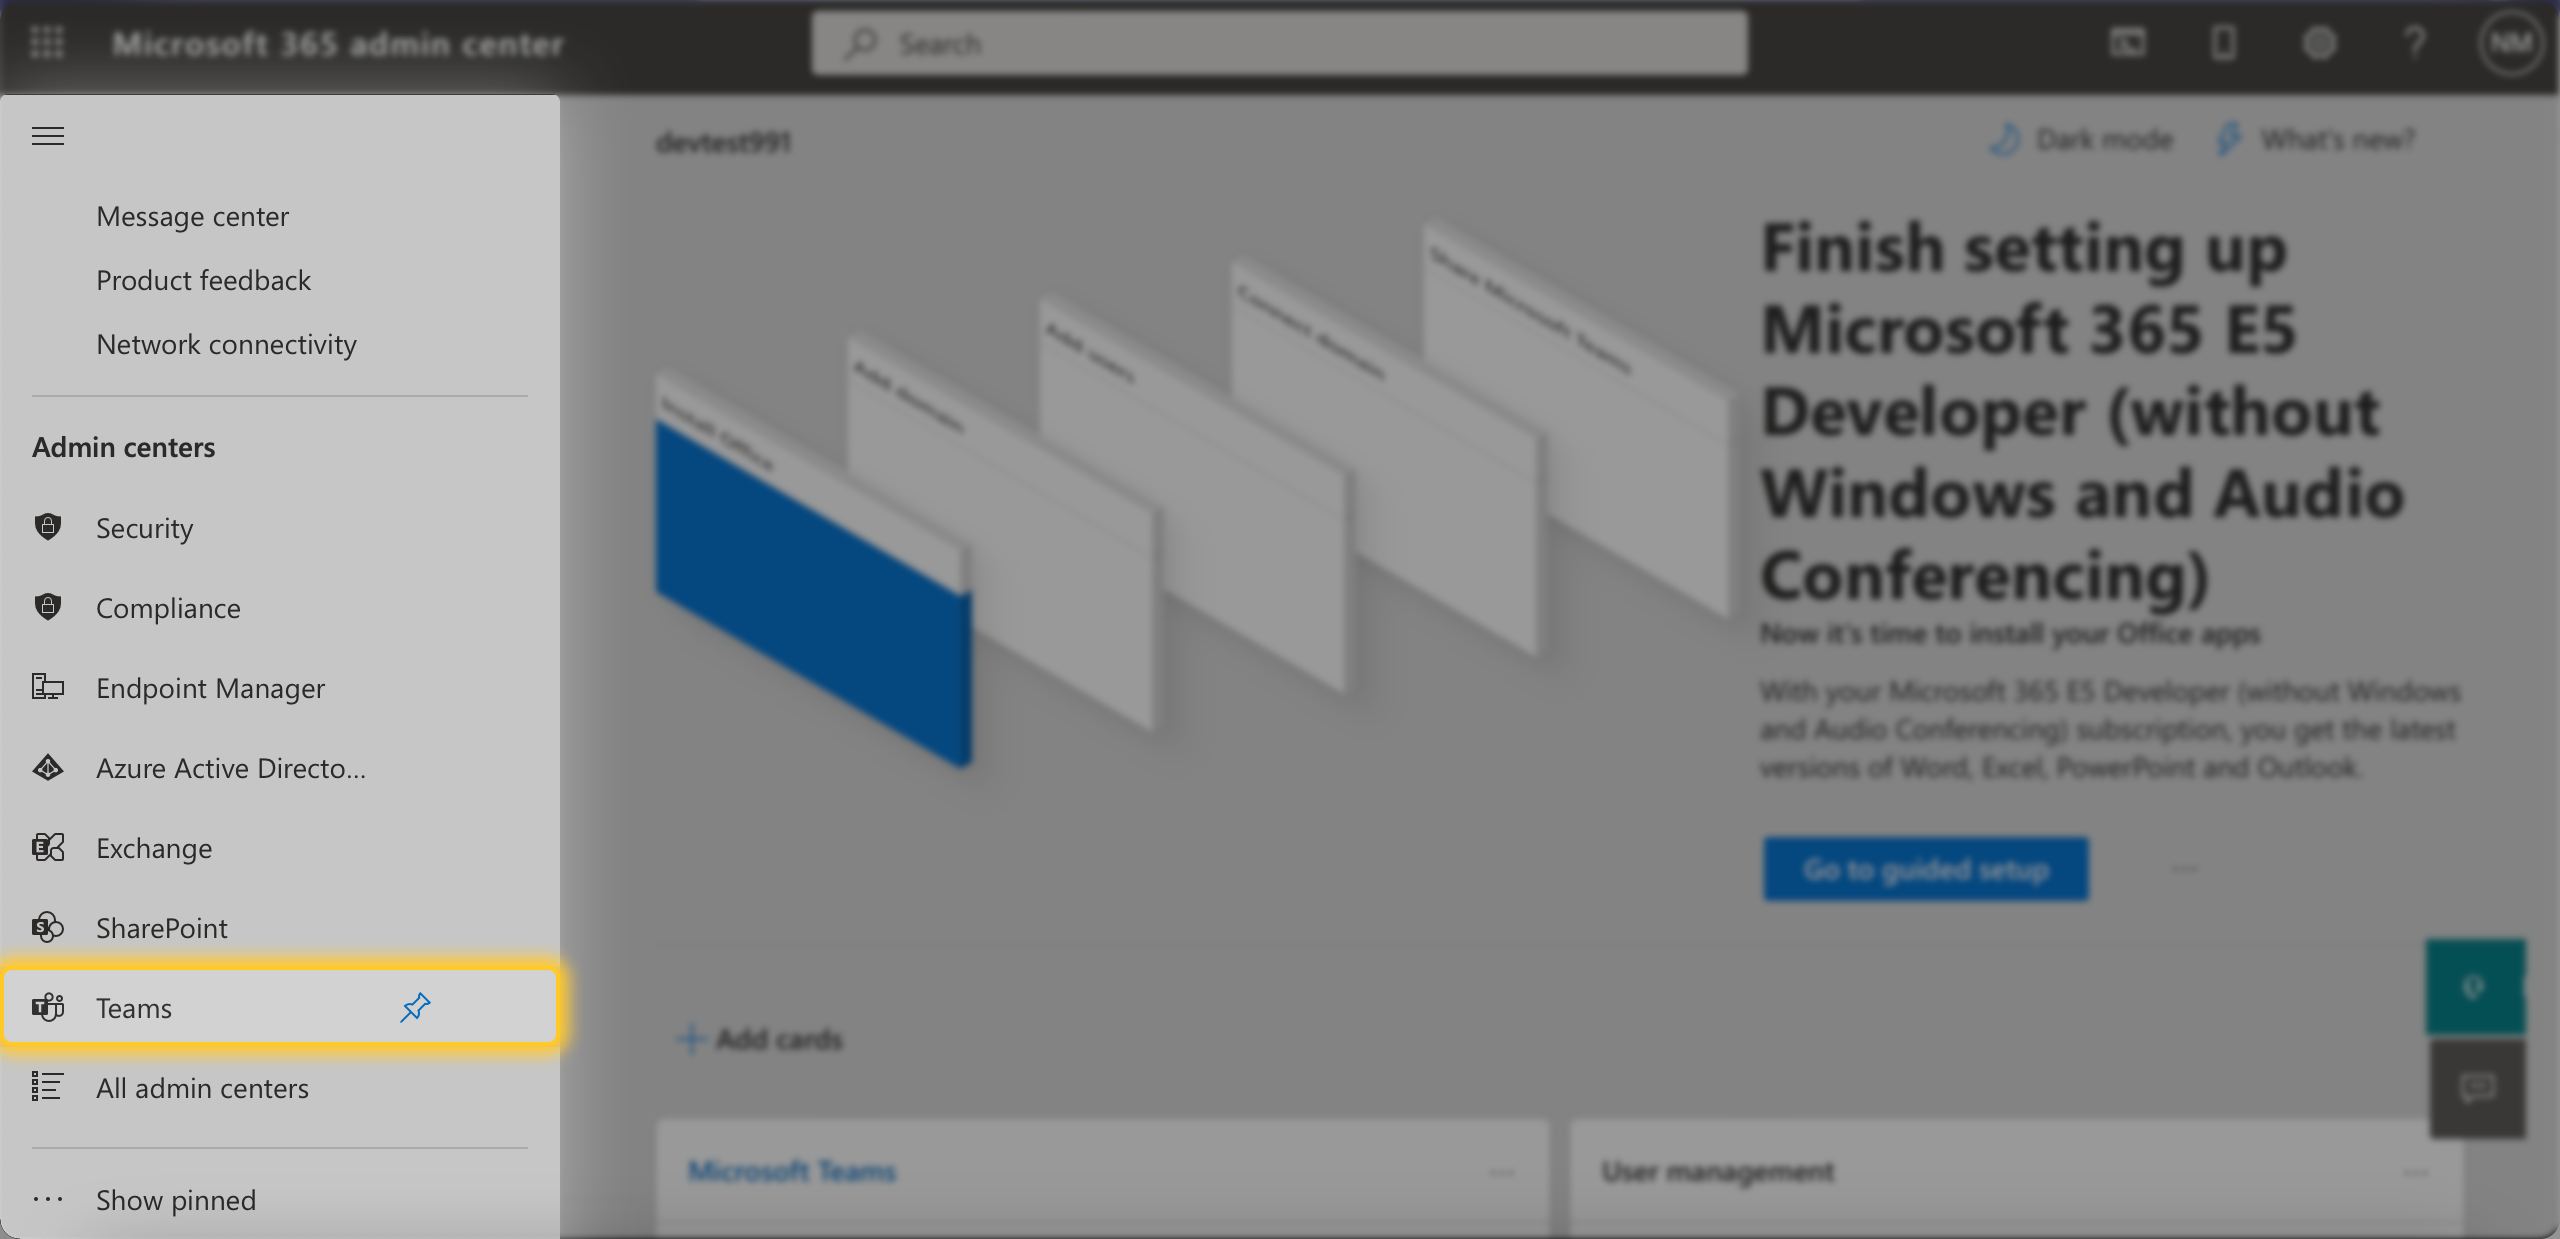
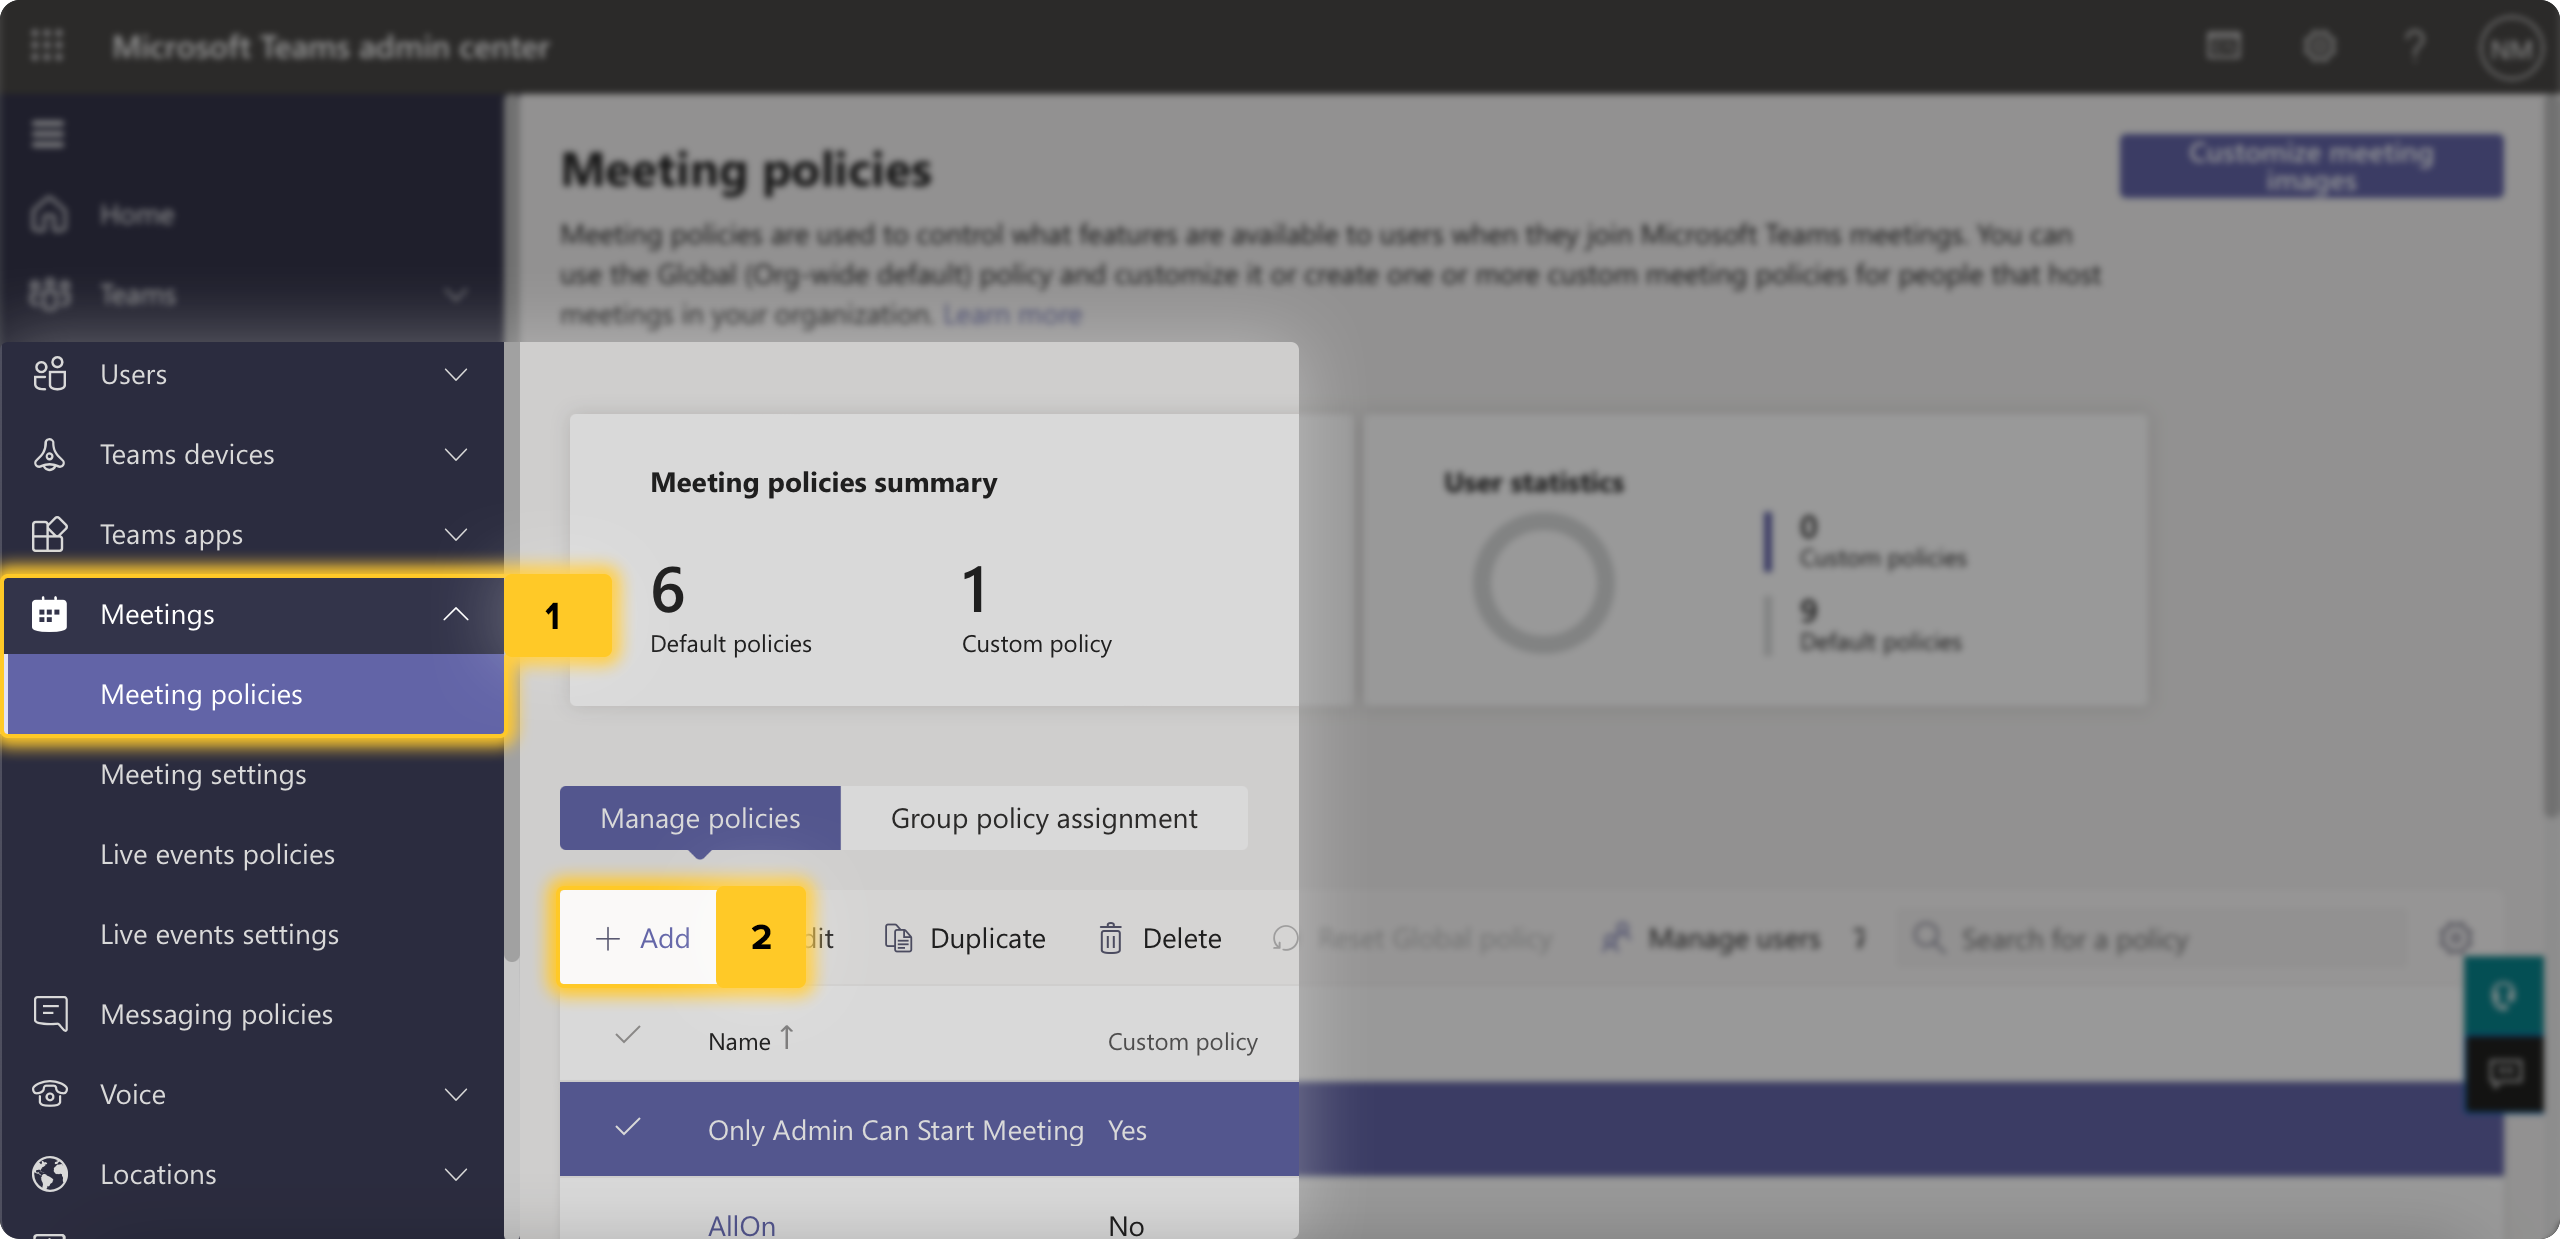
Now that you’re in the Microsoft Teams headquarters, you can add or create Meeting Policies that will apply to your whole organization or to specific users.
Let’s say you want only admin on your team to create and schedule meetings in your Microsoft Teams channels (not too familiar with channels yet? Read our complete guide to Teams channels here). You can create a policy that will restrict all regular and guest users from starting their own meetings:
- In the MS Teams Admin Center, go to “Meetings” > “Meeting policies”
- Hit “Add” to make your own policy.
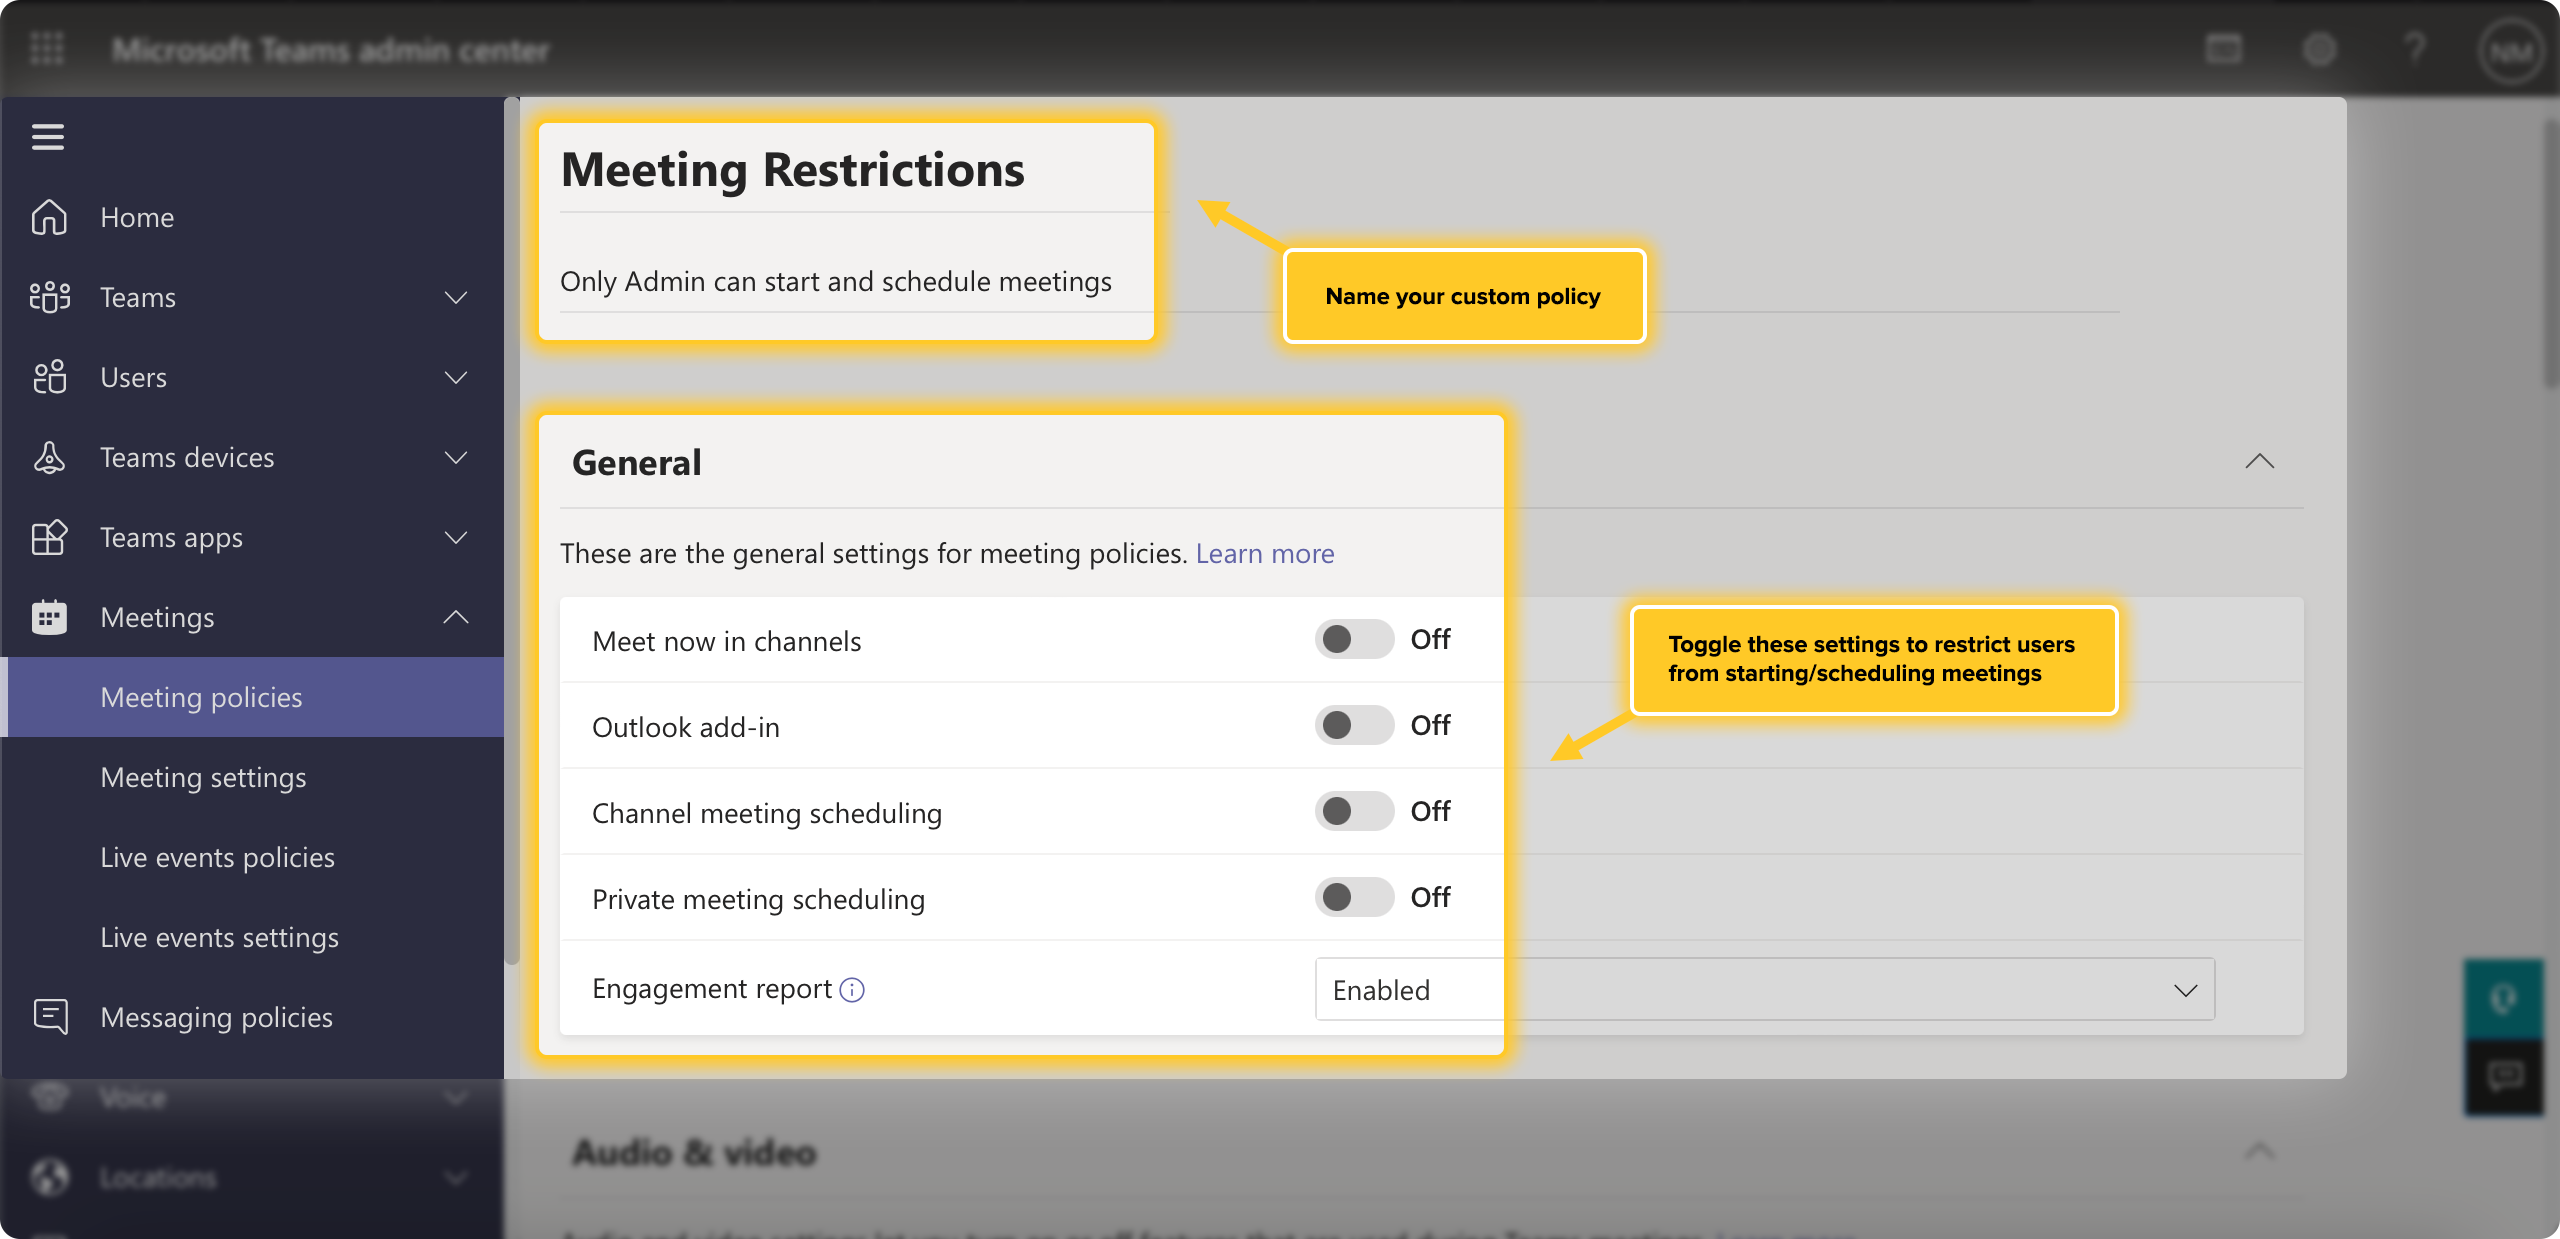
You will land in a window that lets you name the policy, provide a brief description for other admin, and choose which restrictions to add to this policy.
The “General” settings are the ones that let you turn off meeting creation and sharing for team members (including starting meetings in private channels).
Once you are happy with your new policy, scroll down to the bottom of the window and hit “Save”. Now that policy will apply to all your regular users.
Pro tip:
If you want to create a Meeting Policy for
specific users
, first make the policy as you would for all users, then once you see it in the
“Policies”
list, select it and hit
“Manage users”
in the top toolbar of your policies list.
Now Meeting Policies are a great way to get set up for how you want all your meetings to go, but what if you want to make changes to a specific meeting’s permissions before or during the meeting?
By default, when you start or schedule an MS Teams Meeting, the meeting organizer, presenters, and regular attendees will have certain permissions:
| Capability | Organizer | Presenter | Attendee |
|---|---|---|---|
| Use mic and video | ✅ | ✅ | ✅ |
| Use the meeting chat | ✅ | ✅ | ✅ |
| Share screen | ✅ | ✅ | ❌ |
| Make someone else a presenter | ✅ | ✅ | ❌ |
| Remove attendees | ✅ | ✅ | ❌ |
| Manage breakout rooms | ✅ | ❌ | ❌ |
| Record the meeting | ✅ | ✅ | ❌ |
If the default settings don’t fit your needs (for example, you want your designer to present their project by sharing their screen), you change their role to “presenter” both before the meeting and during a meeting:
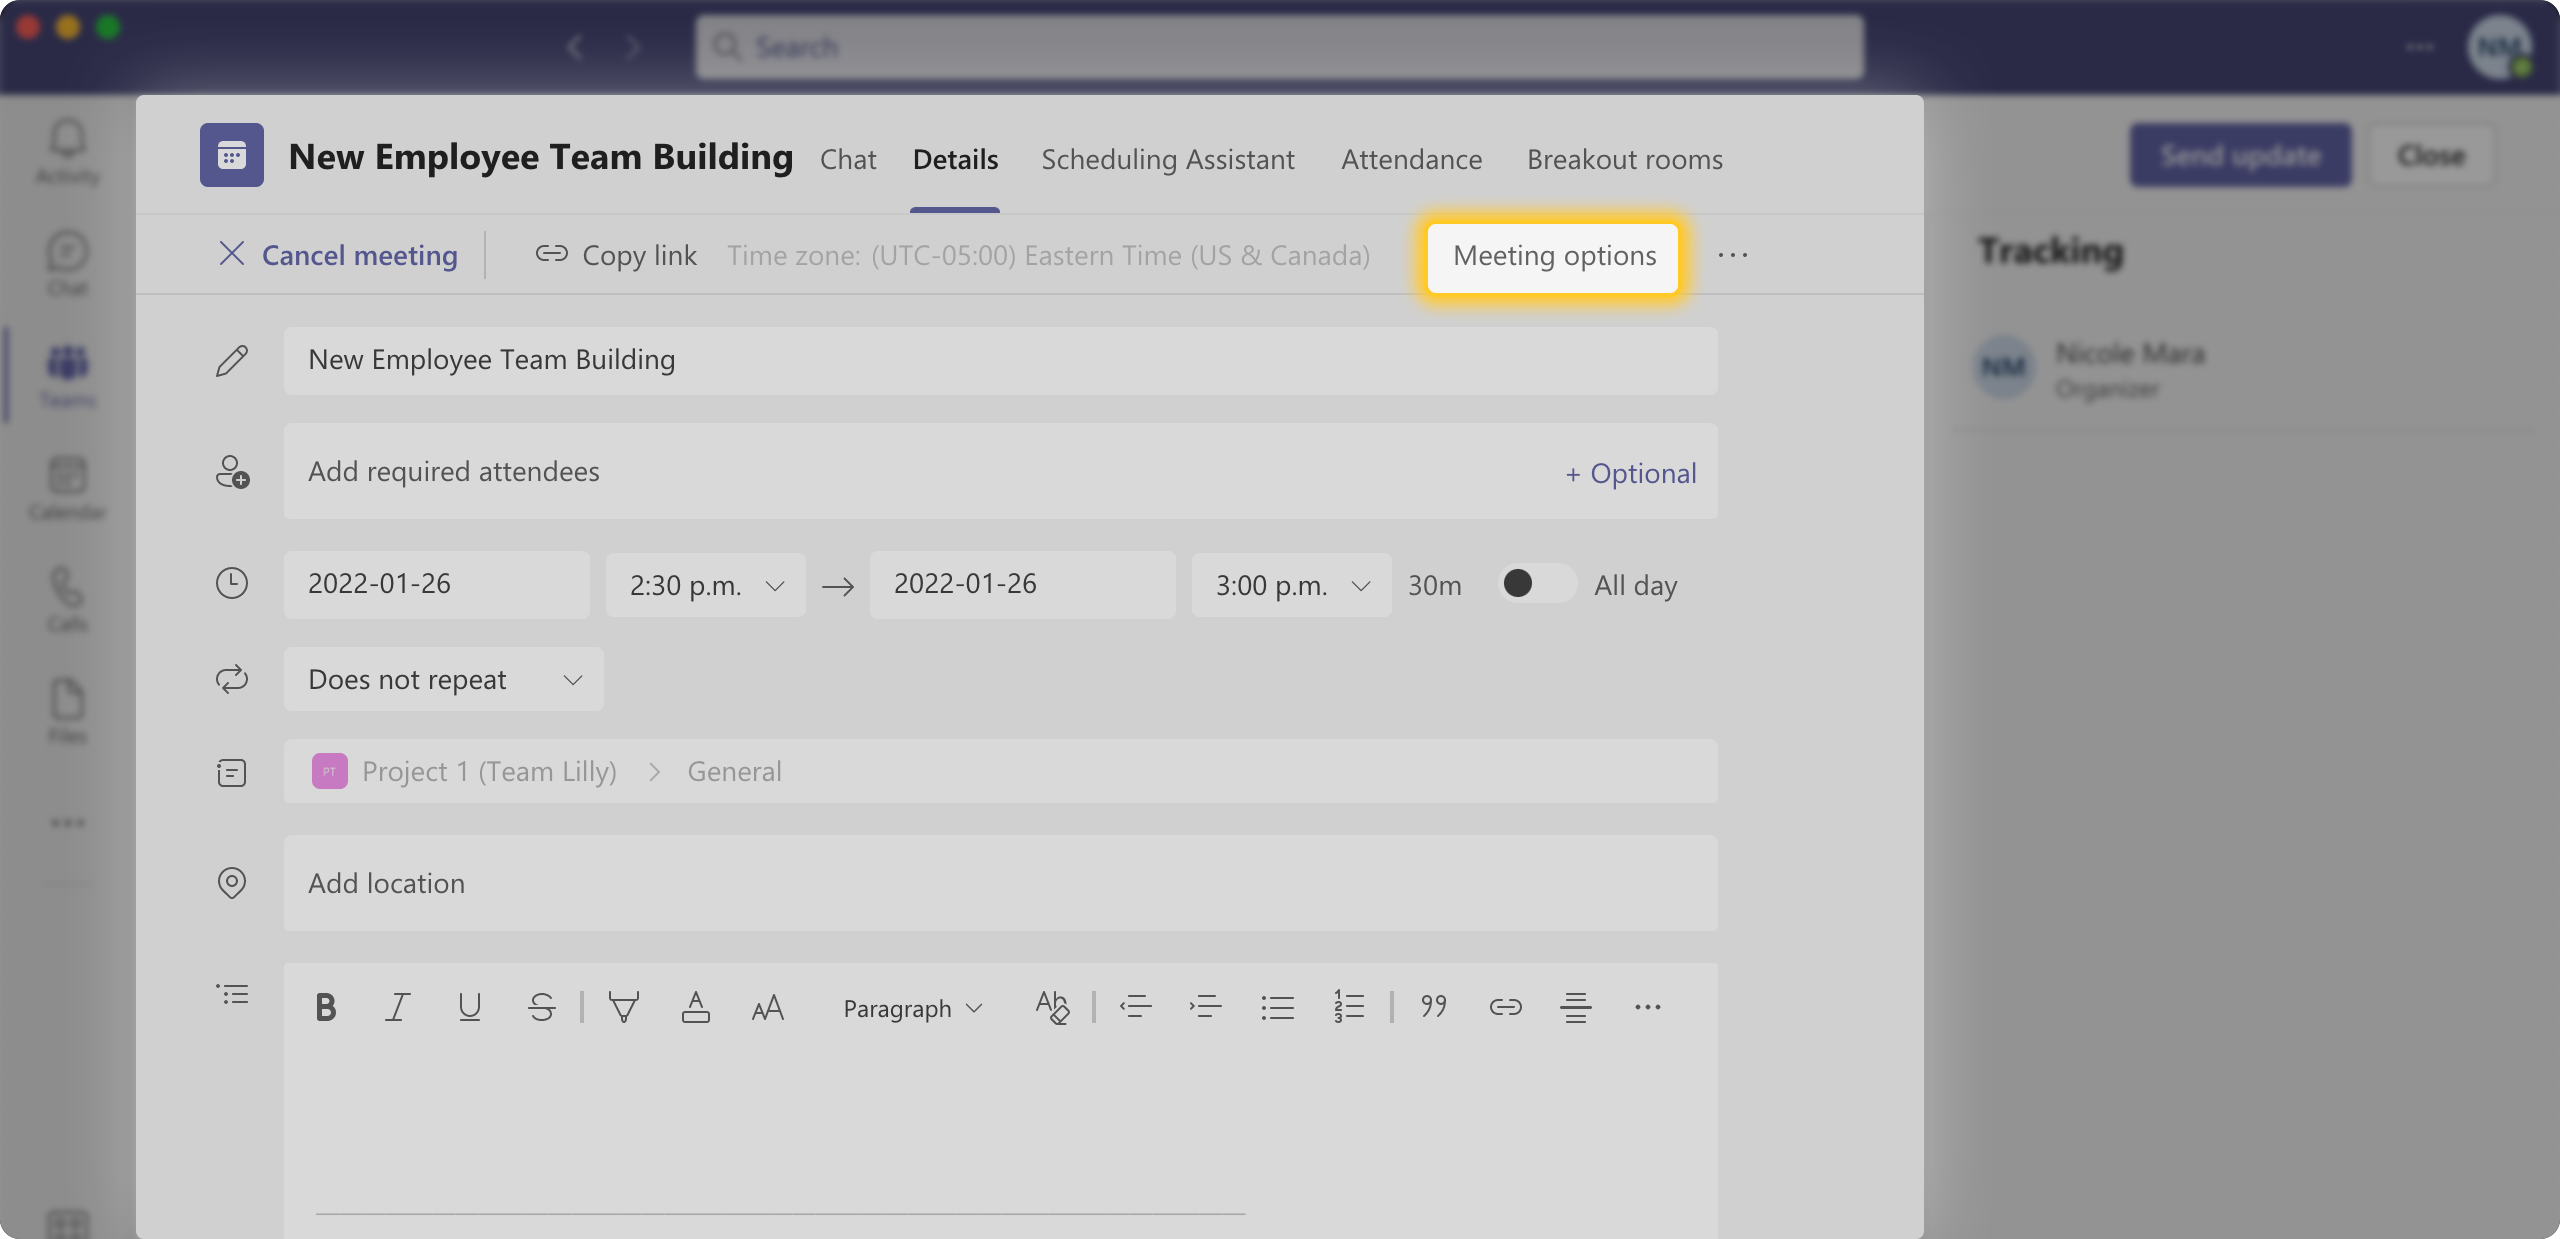
- Before a scheduled meeting:
- Go to “Calendar” in Microsoft Teams
- Click the meeting notice in your calendar
- Hit “Meeting options” in the top toolbar.
You will be redirected to a window in your browser where you can add presenters and organizers to your meeting:
- Go to the “Who can present?” Menu and select “Specific people”
- Add the specific users by their email or their name as it appears in Microsoft Teams, and they will become presenters.
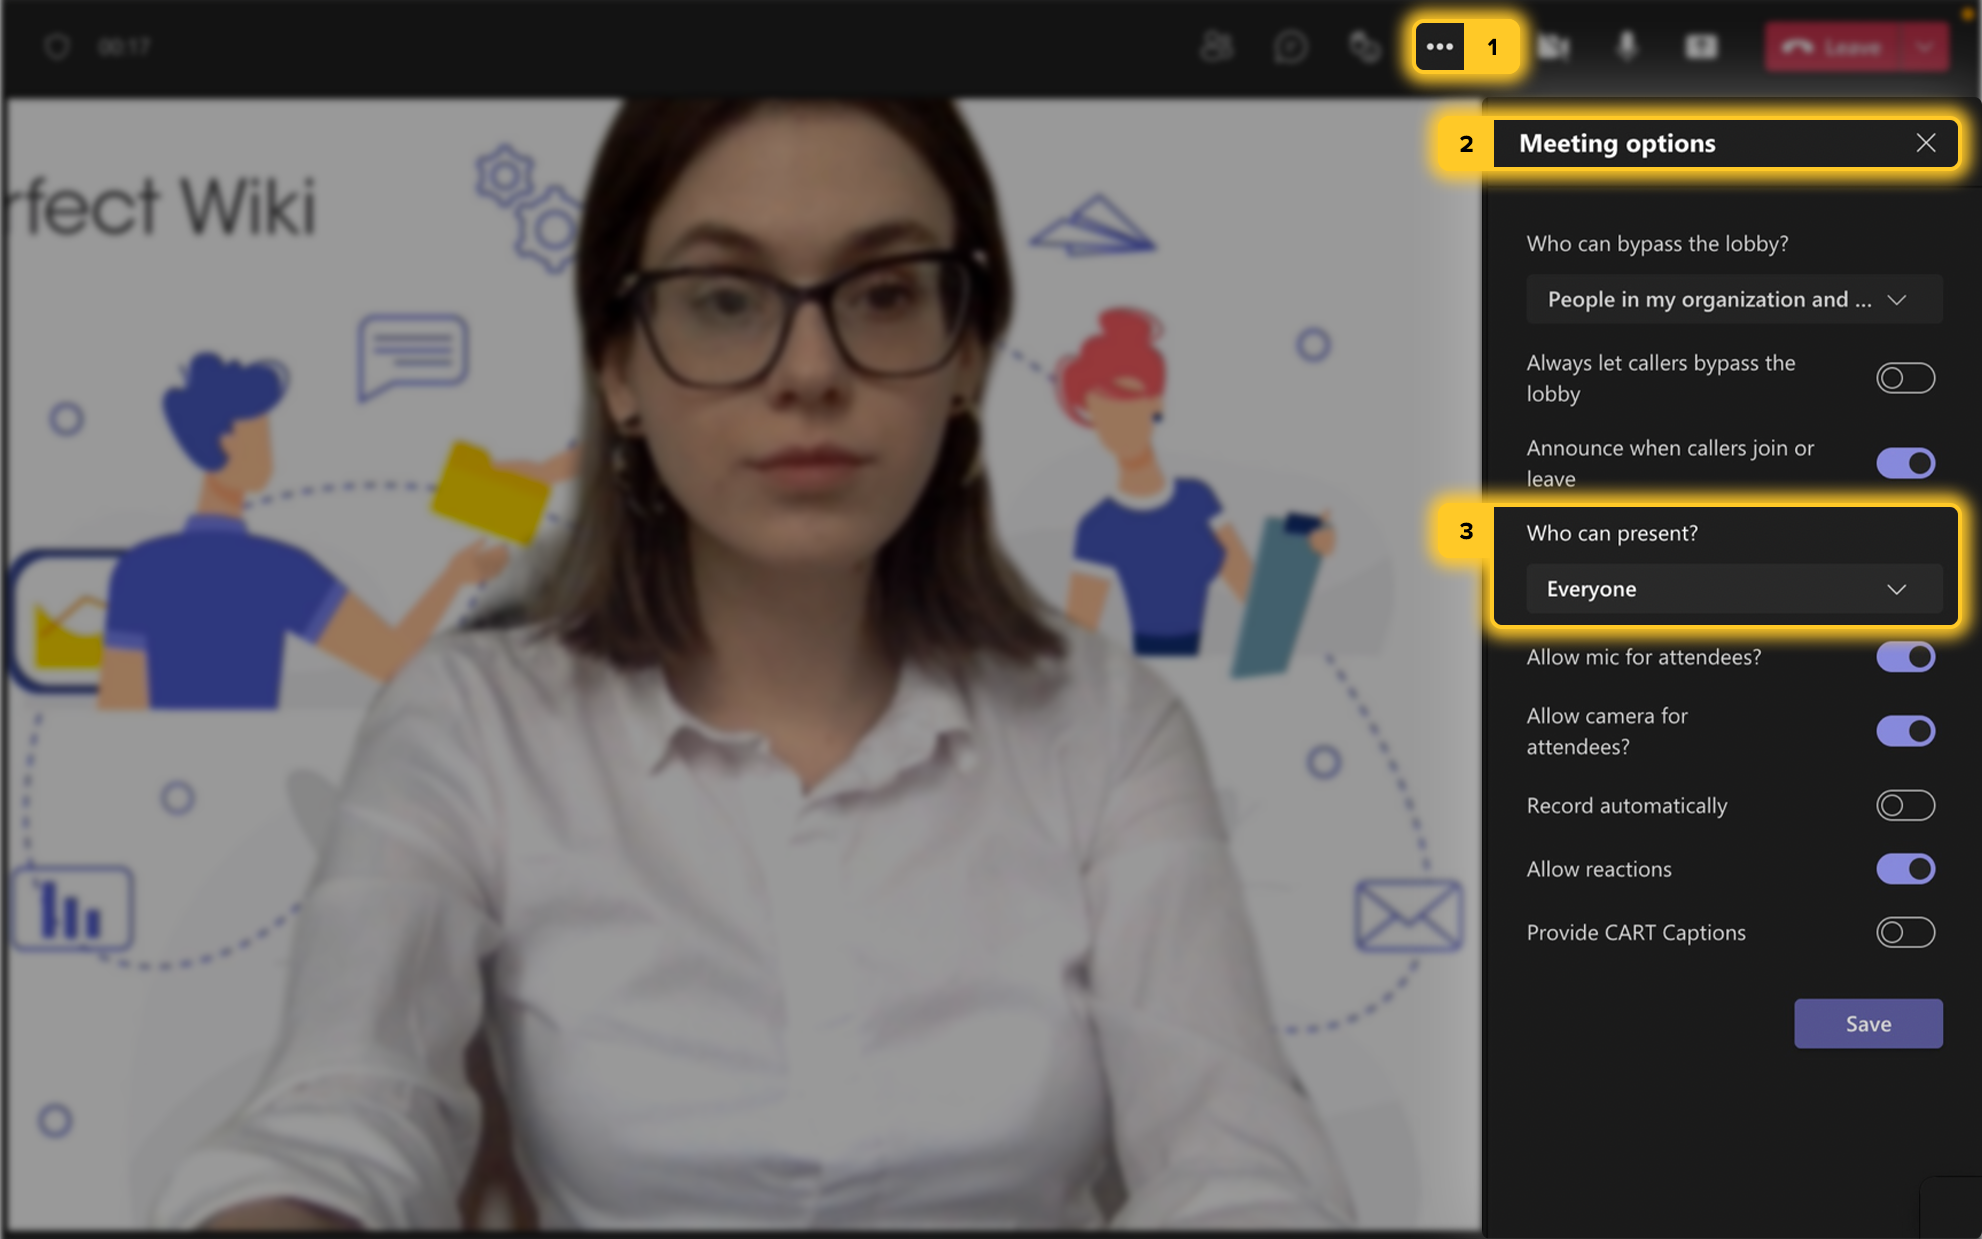
- During a meeting (scheduled or impromptu):
- Go to the “More actions” ellipses in your top toolbar
- Hit “Meeting options".
- Go to “Who can present?” > “Specific people”
- Add the specific users by their email or their name as it appears in Microsoft Teams, and they will become presenters.
Note:
These settings will only apply to the current meeting.
How to Start and Schedule a Meeting in Microsoft Teams
Now that we’ve gotten the more technical stuff out of the way, let’s get into the trenches: creating and scheduling meetings.
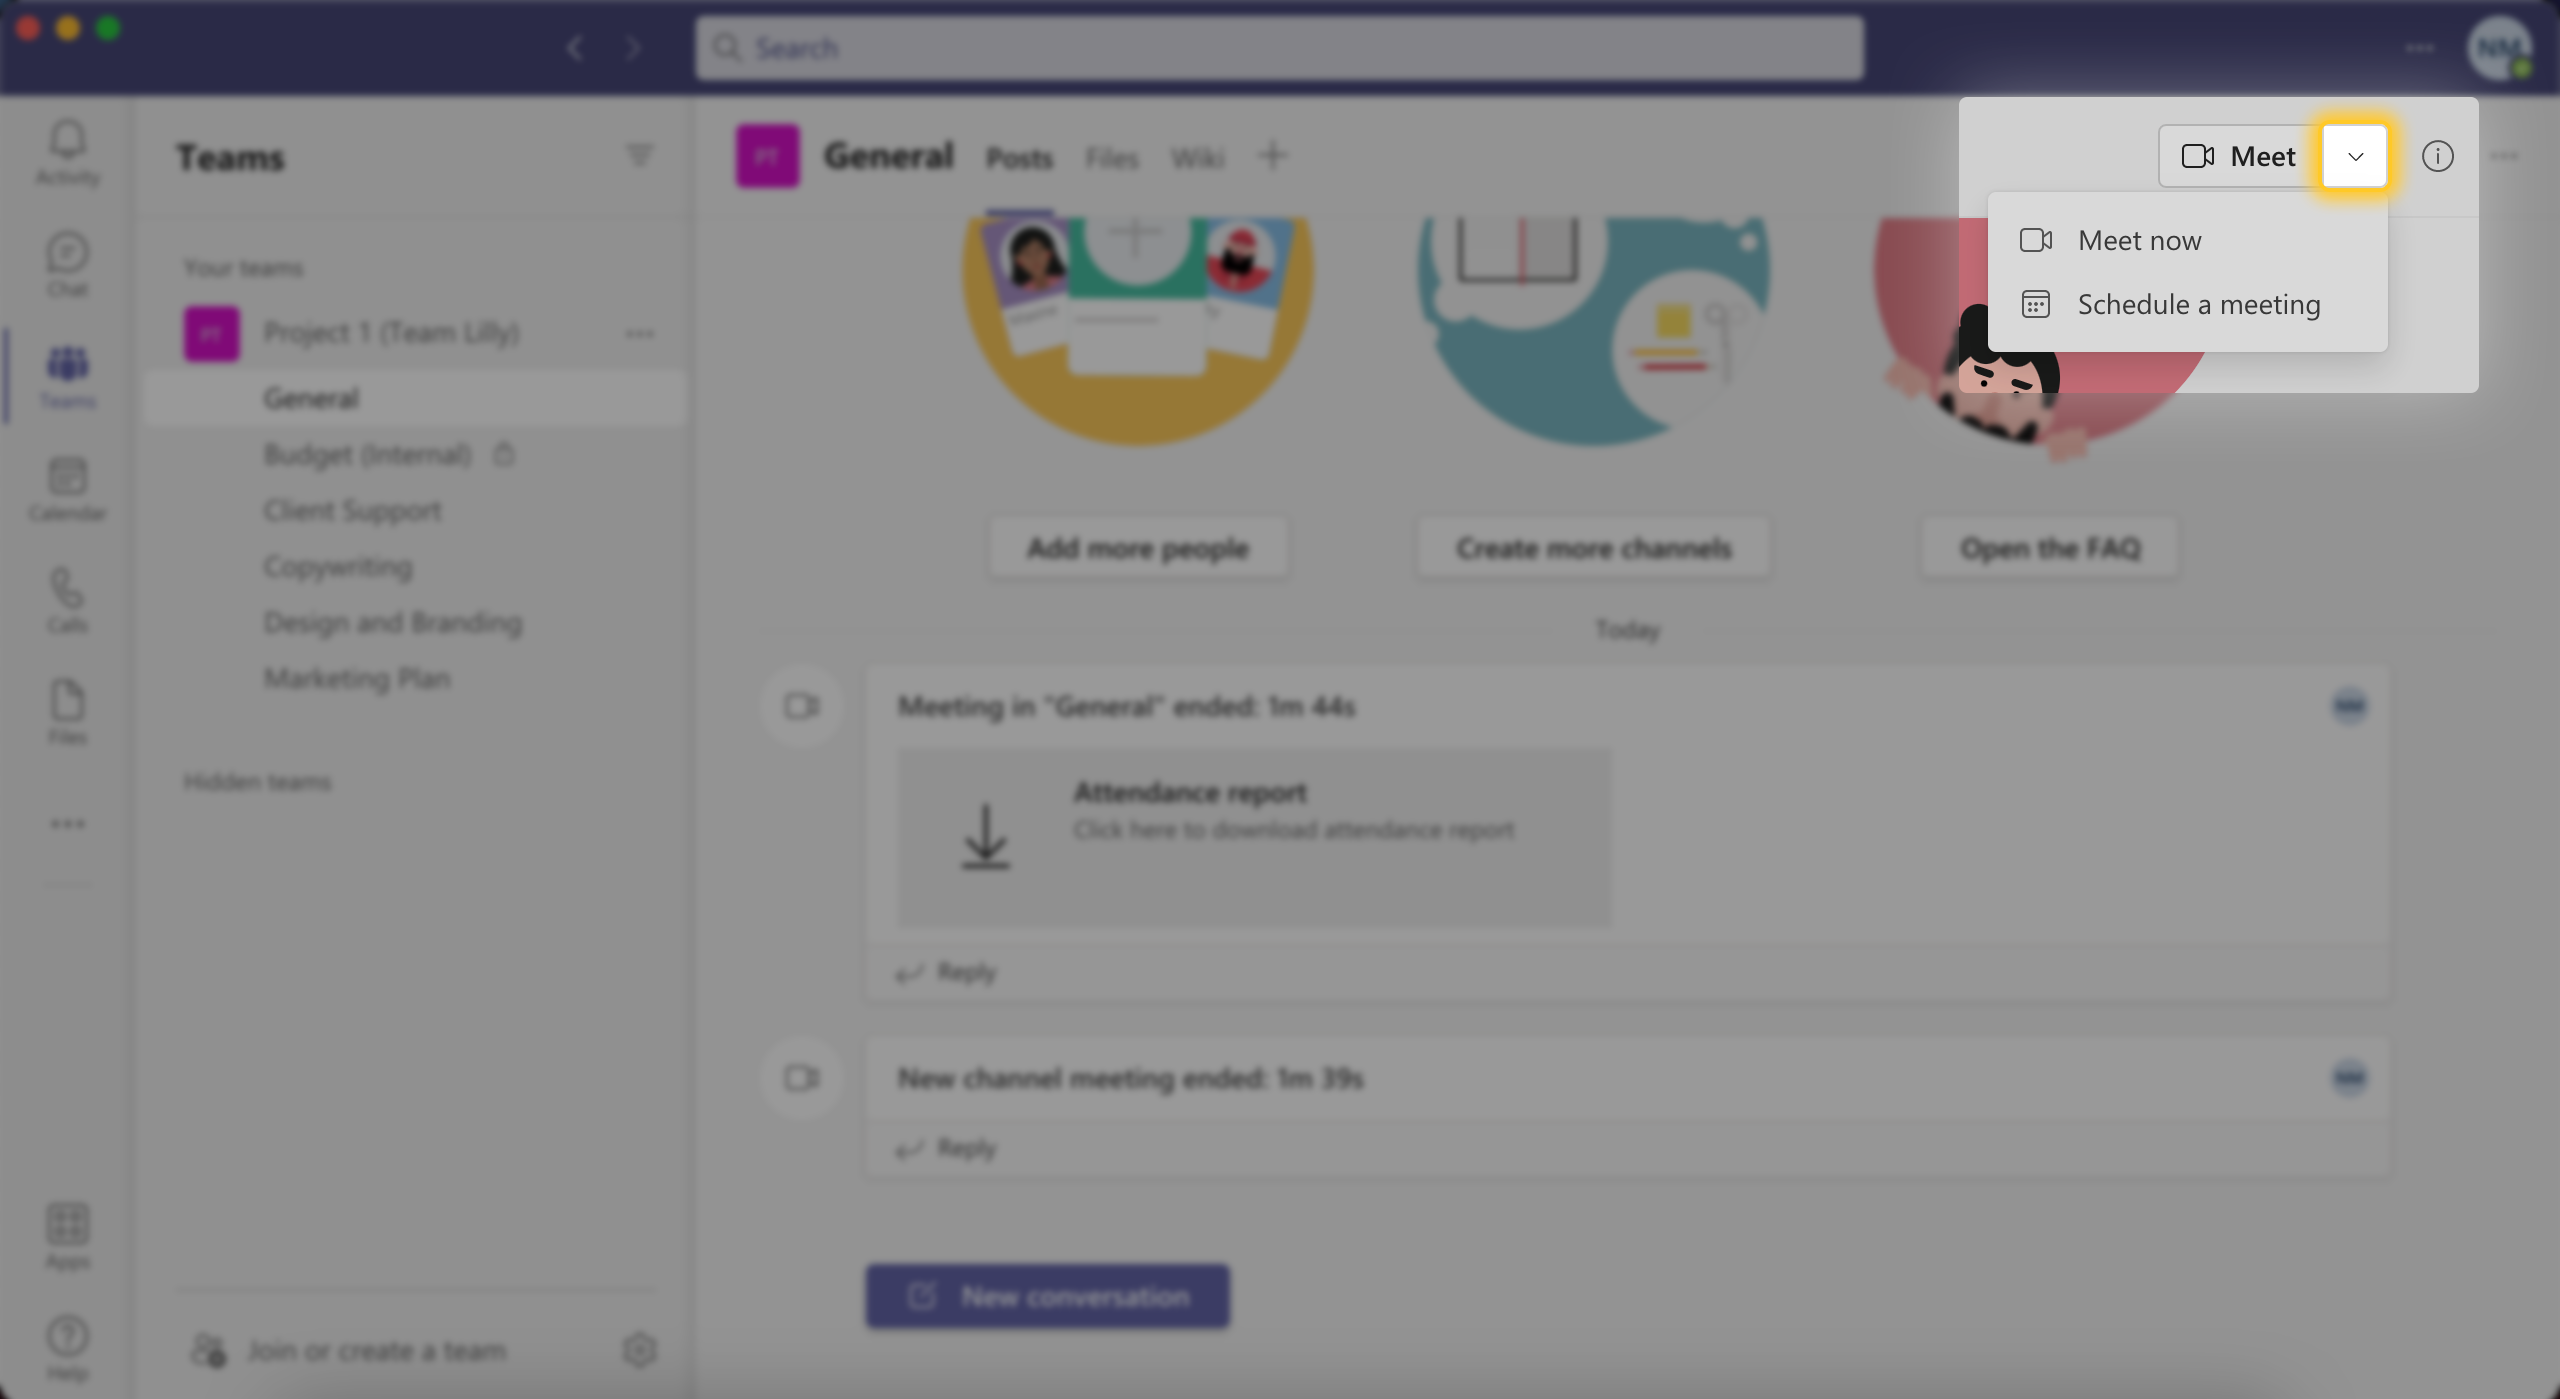
You can start a meeting on the spot with anyone in your MS Teams workspace 2 ways:
- Open any channel and hit “Meet” > “Meet now” in the top toolbar
- Go to your Calendar app on the left of your MS Teams workspace and hit “Meet now” in the top toolbar. From here you can get a meeting link to send to specific users, or invite them individually after the meeting has started.
Note:
Meetings in
private
channels can’t include anyone outside that channel.
Most of the time you will probably be scheduling meetings ahead of time, and there’s a couple ways to do that with MS Teams:
- To schedule a meeting within a channel, go to “Meet” > “Schedule a meeting” in the top toolbar of that channel
- To schedule a meeting for any users in your workspace, go to your Calendar app and hit “New meeting” > “Schedule meeting” in the top toolbar, or move your cursor over a specific time slot that you want to schedule the meeting for.
In both cases, MS Teams will redirect you to a “Details” window that will let you customize the meeting’s settings:
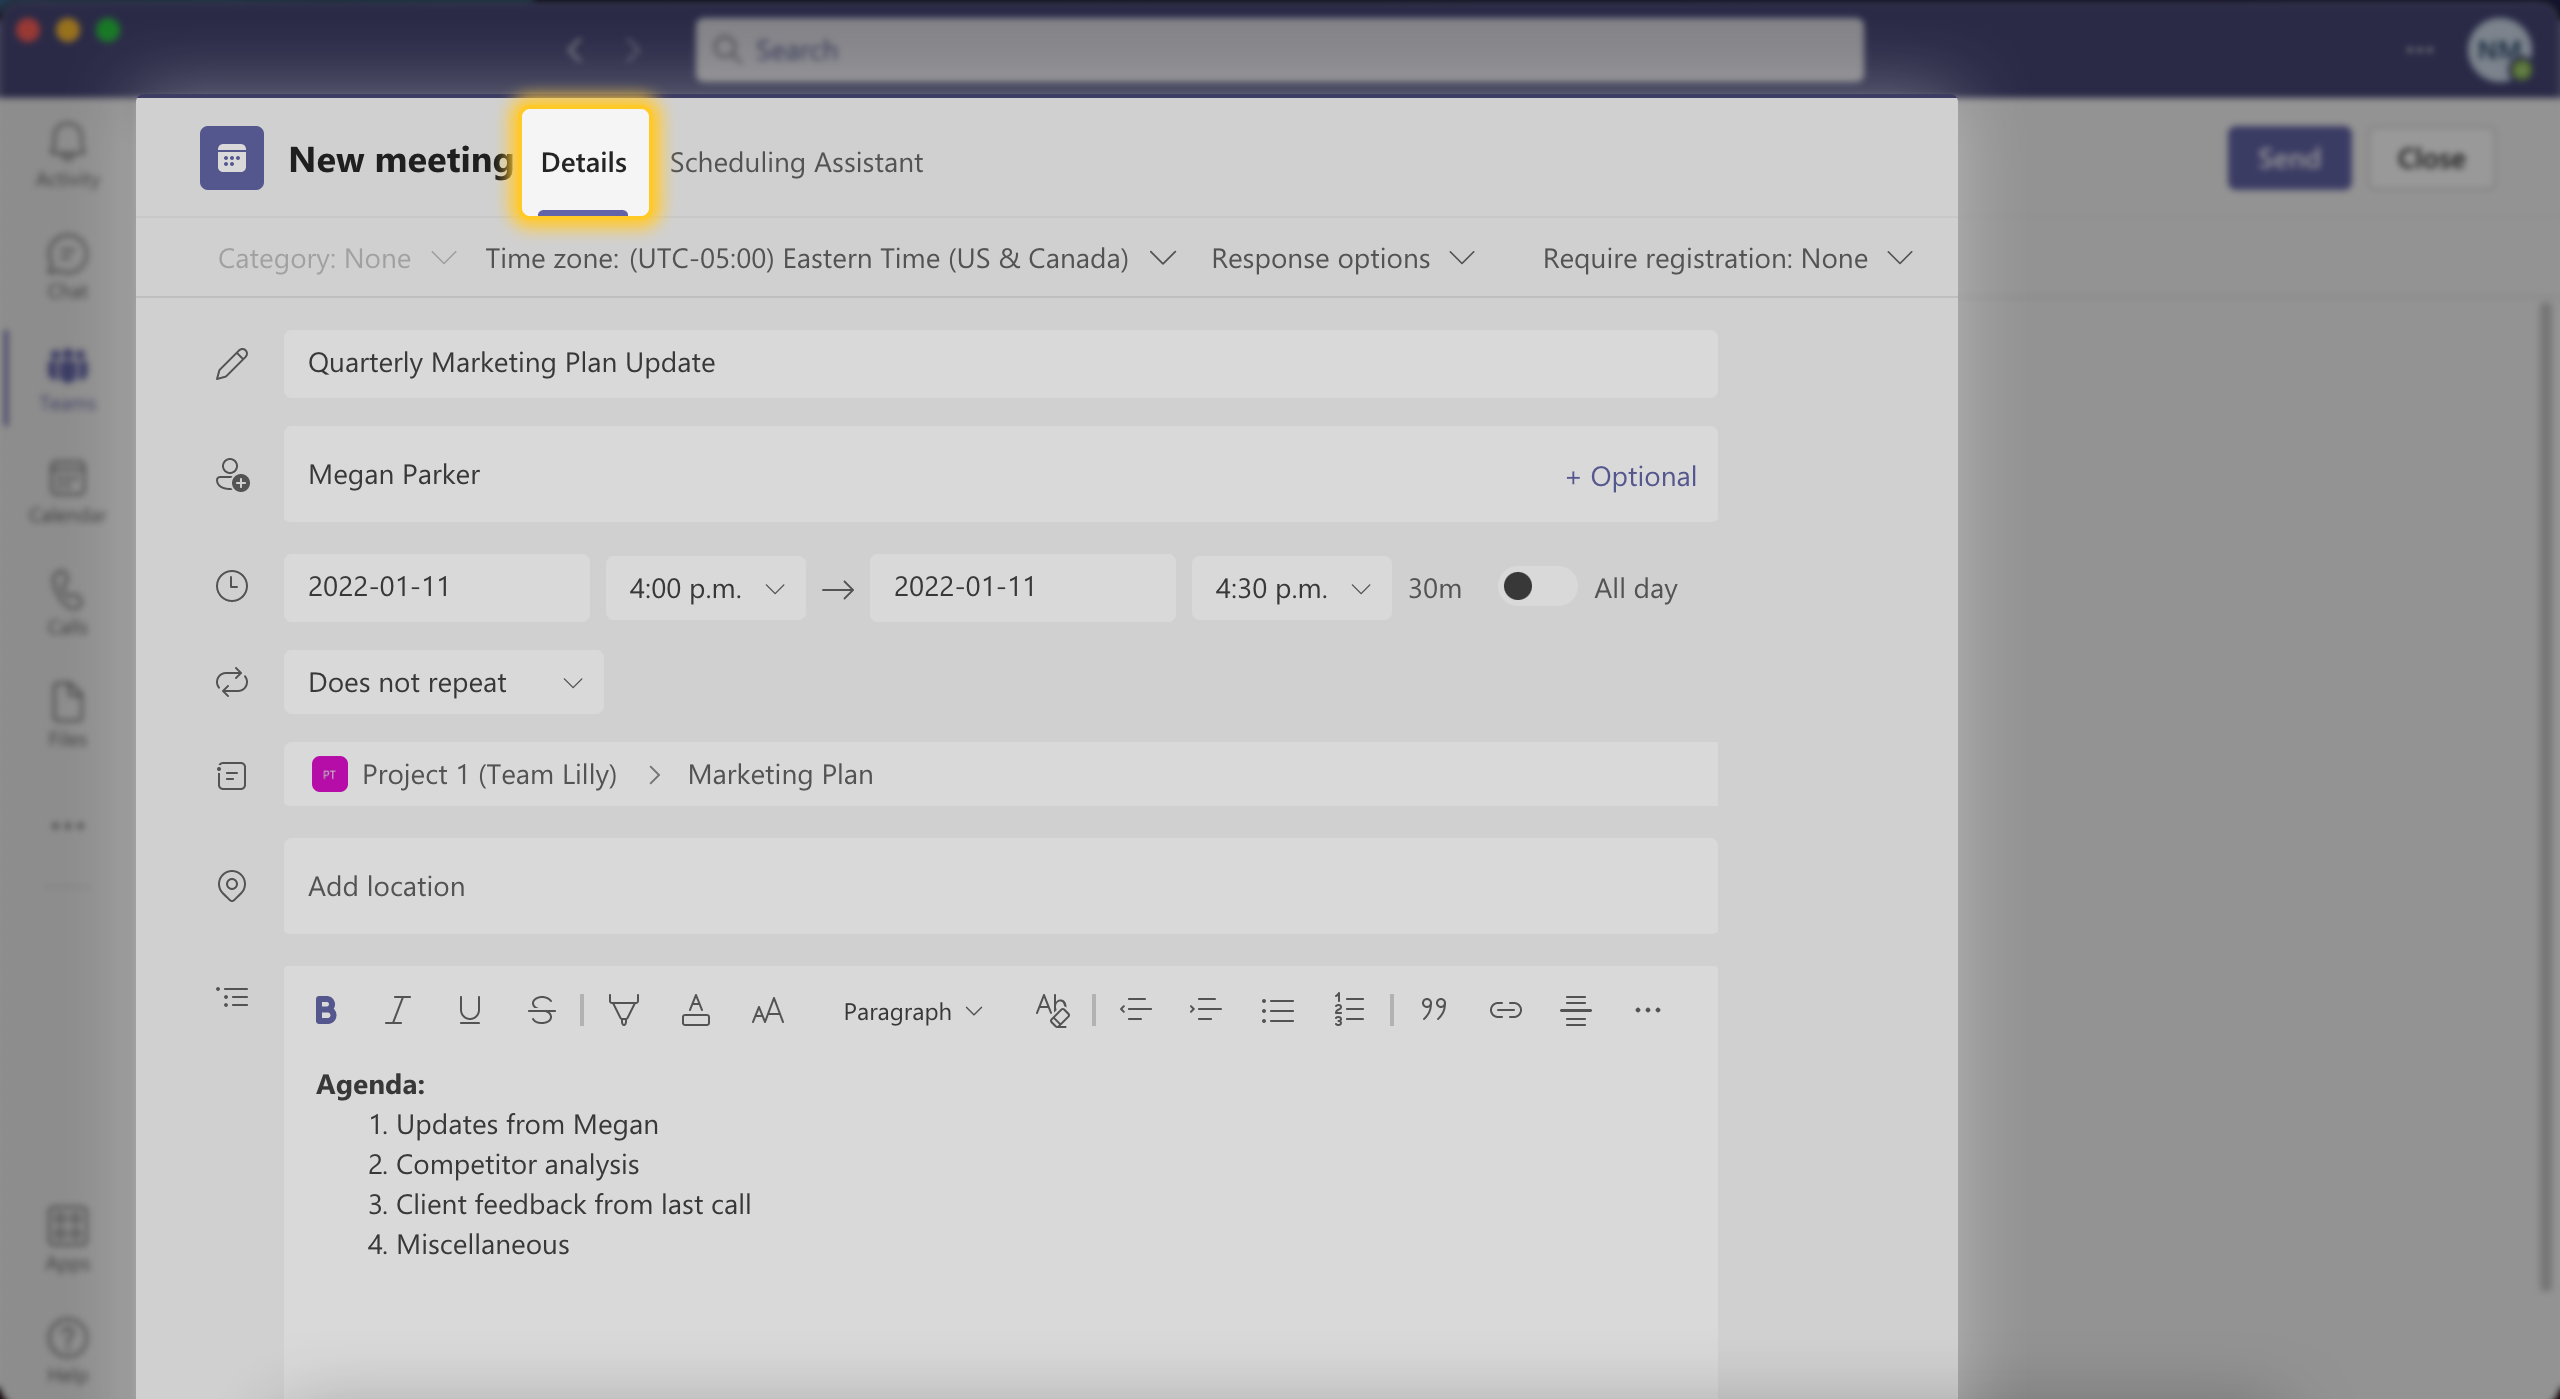
Here you can add required attendees, add more than one channel to the meeting, or even jot down an agenda for your attendees to look at beforehand. And you can always make changes to your scheduled meeting settings by clicking on the meeting in your Calendar and hitting “Edit”.
How to Join a Microsoft Teams Meeting
Now that the meeting is scheduled, your team members can join the meeting a few different ways:
- From their channel where the meeting was scheduled by clicking the meeting Calendar notification in the channel’s chat tab
- From their Calendar app in Microsoft Teams by clicking the meeting in their schedule
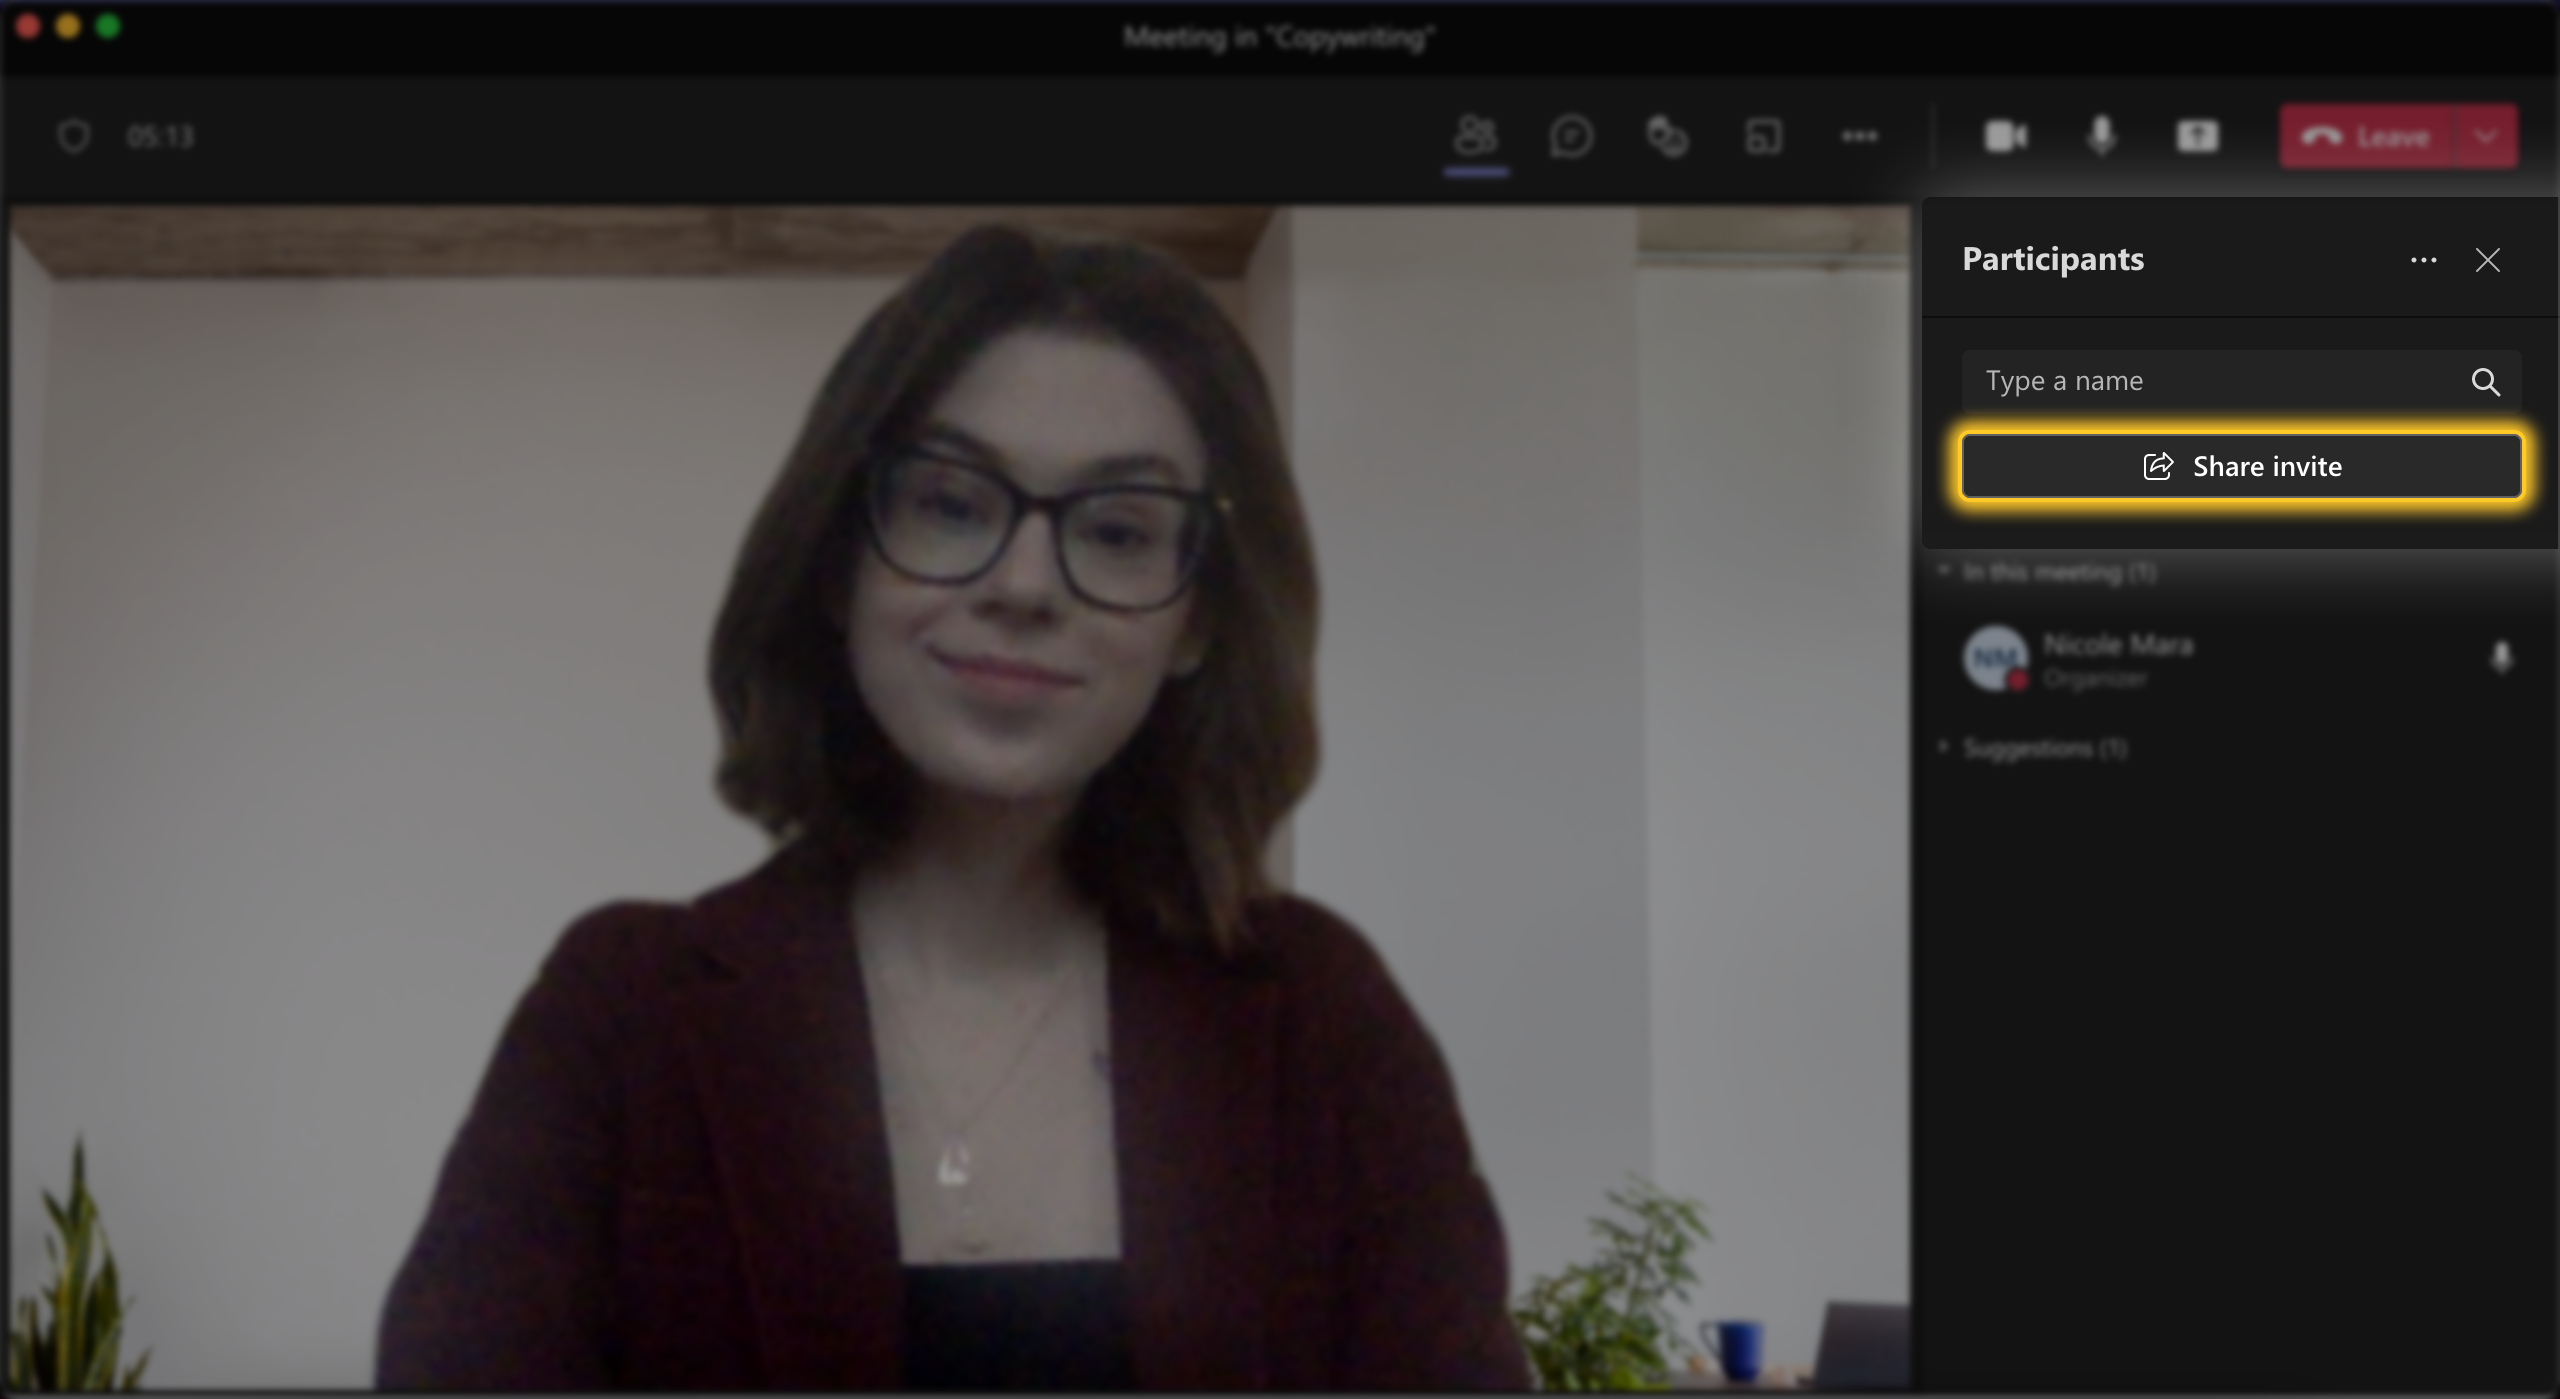
- By invite link—you can send one to specific users by hitting “Participants” > “Share invite” for a meeting in progress, and by clicking “Copy link” in the “Details” menu of a scheduled meeting that’s yet to take place.
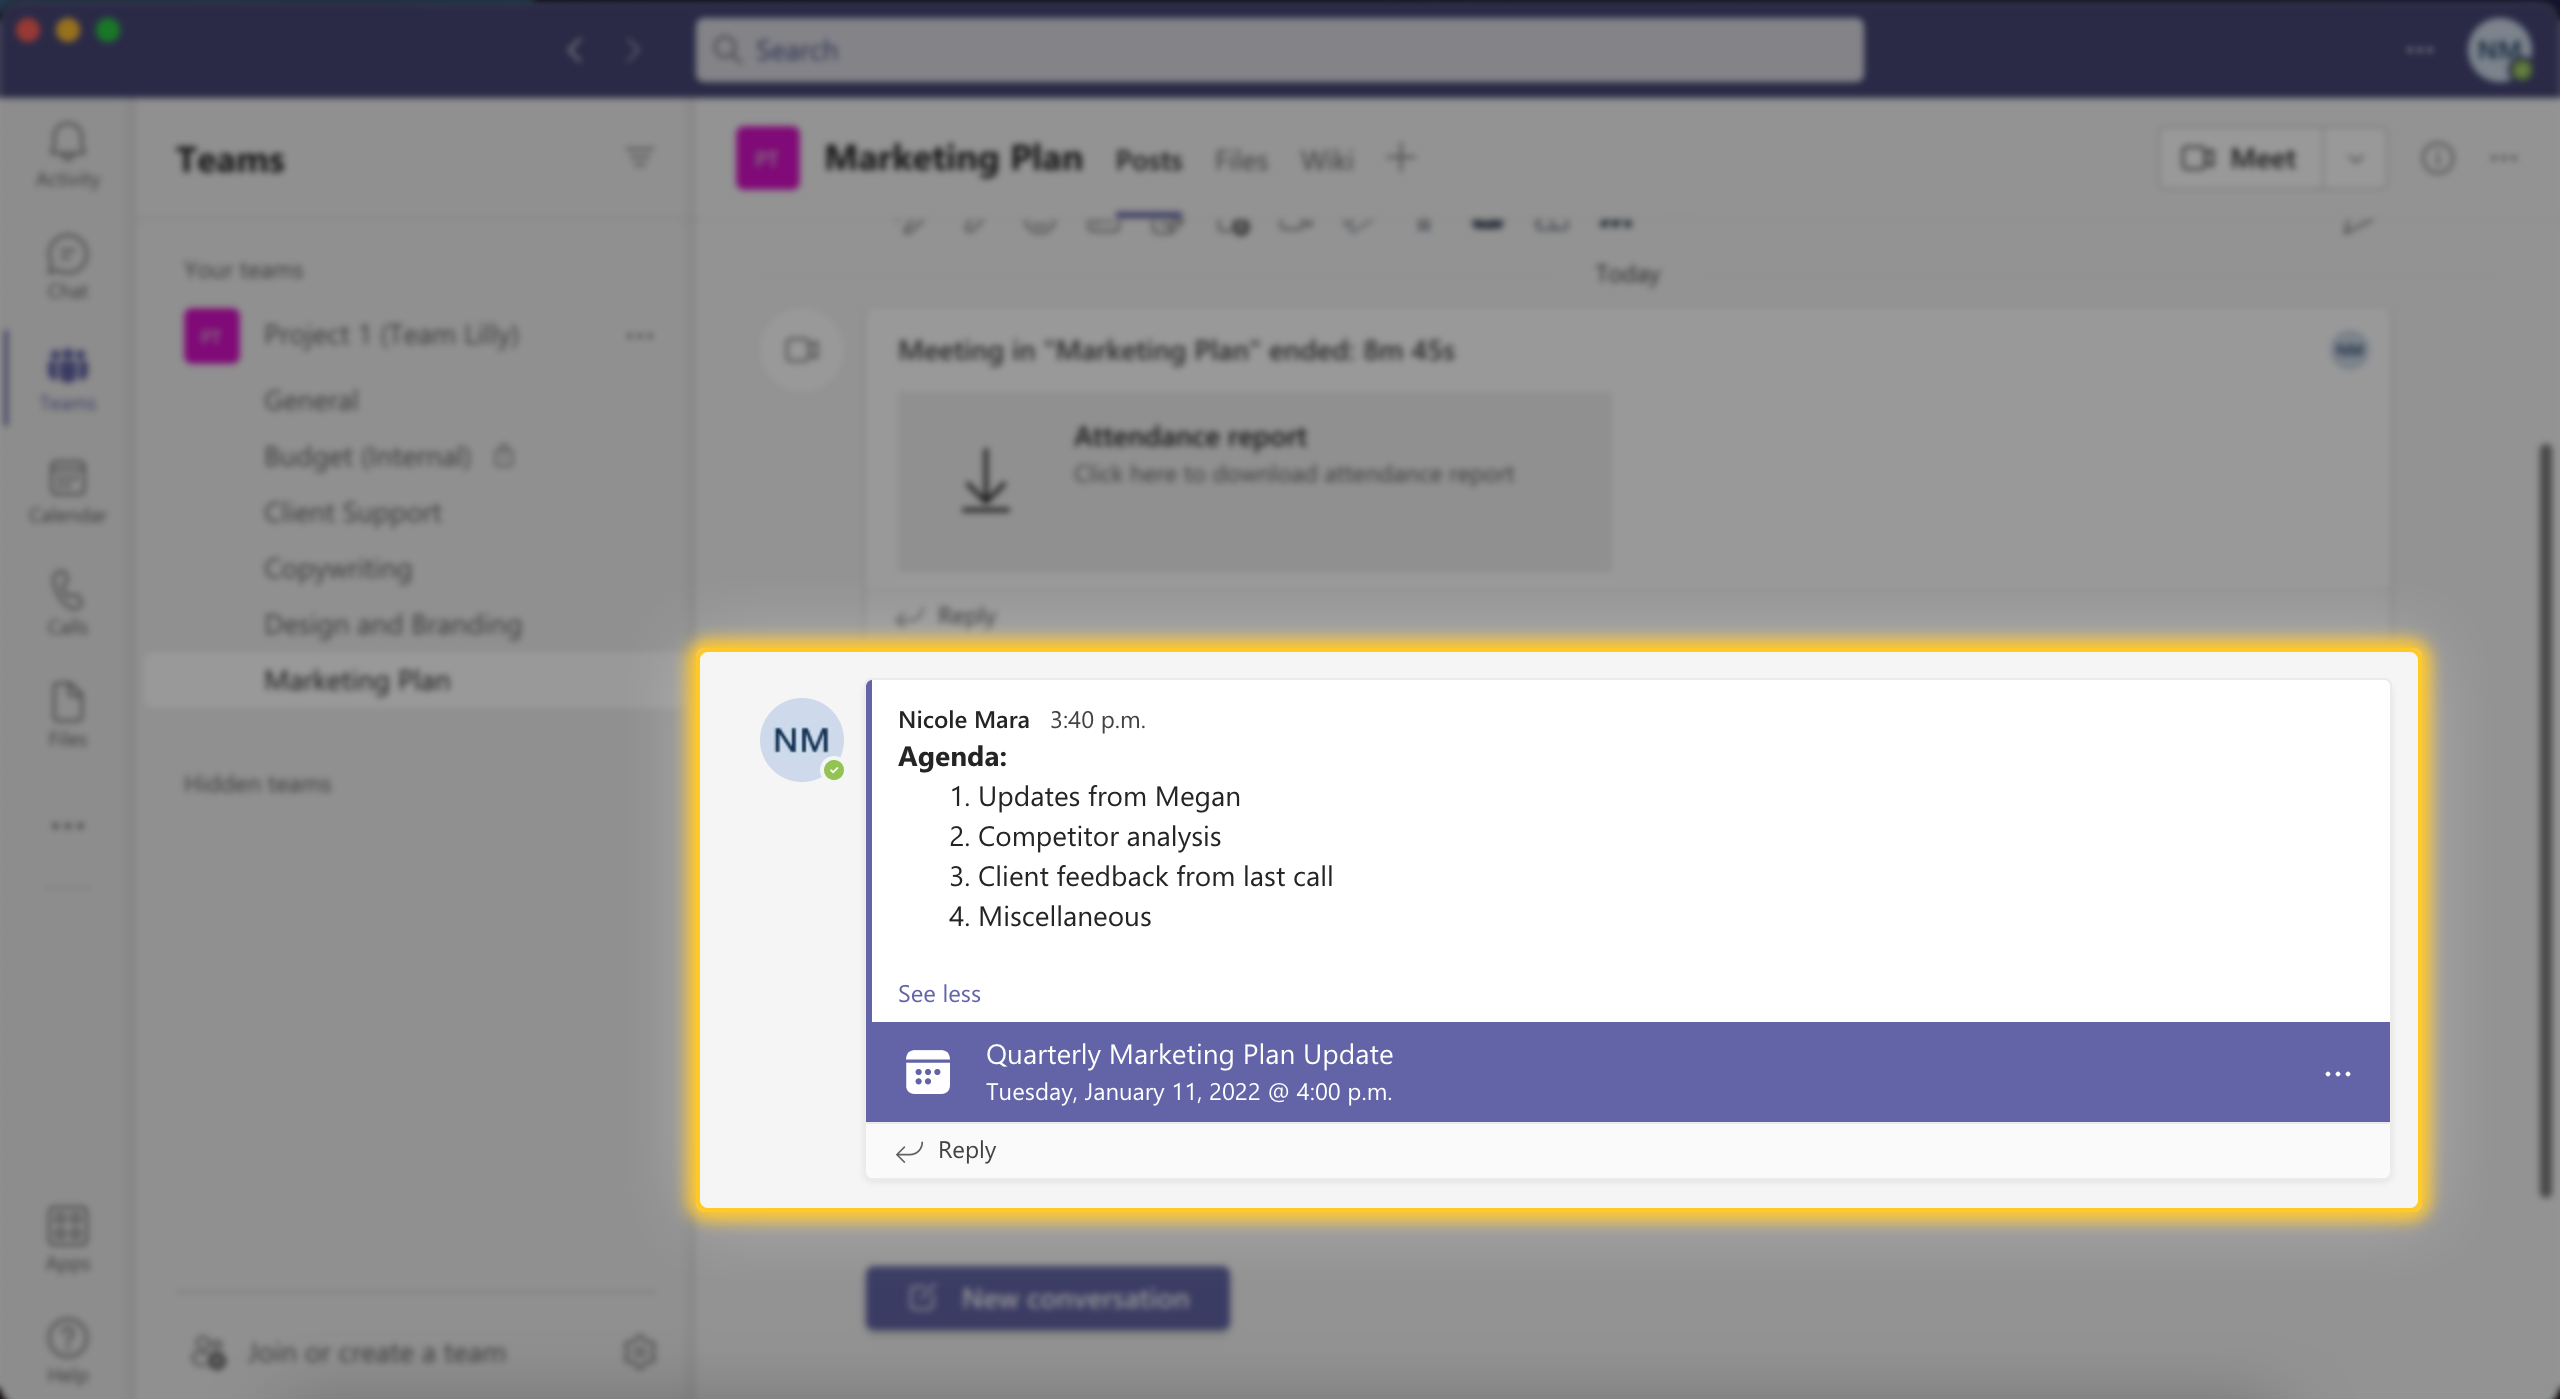
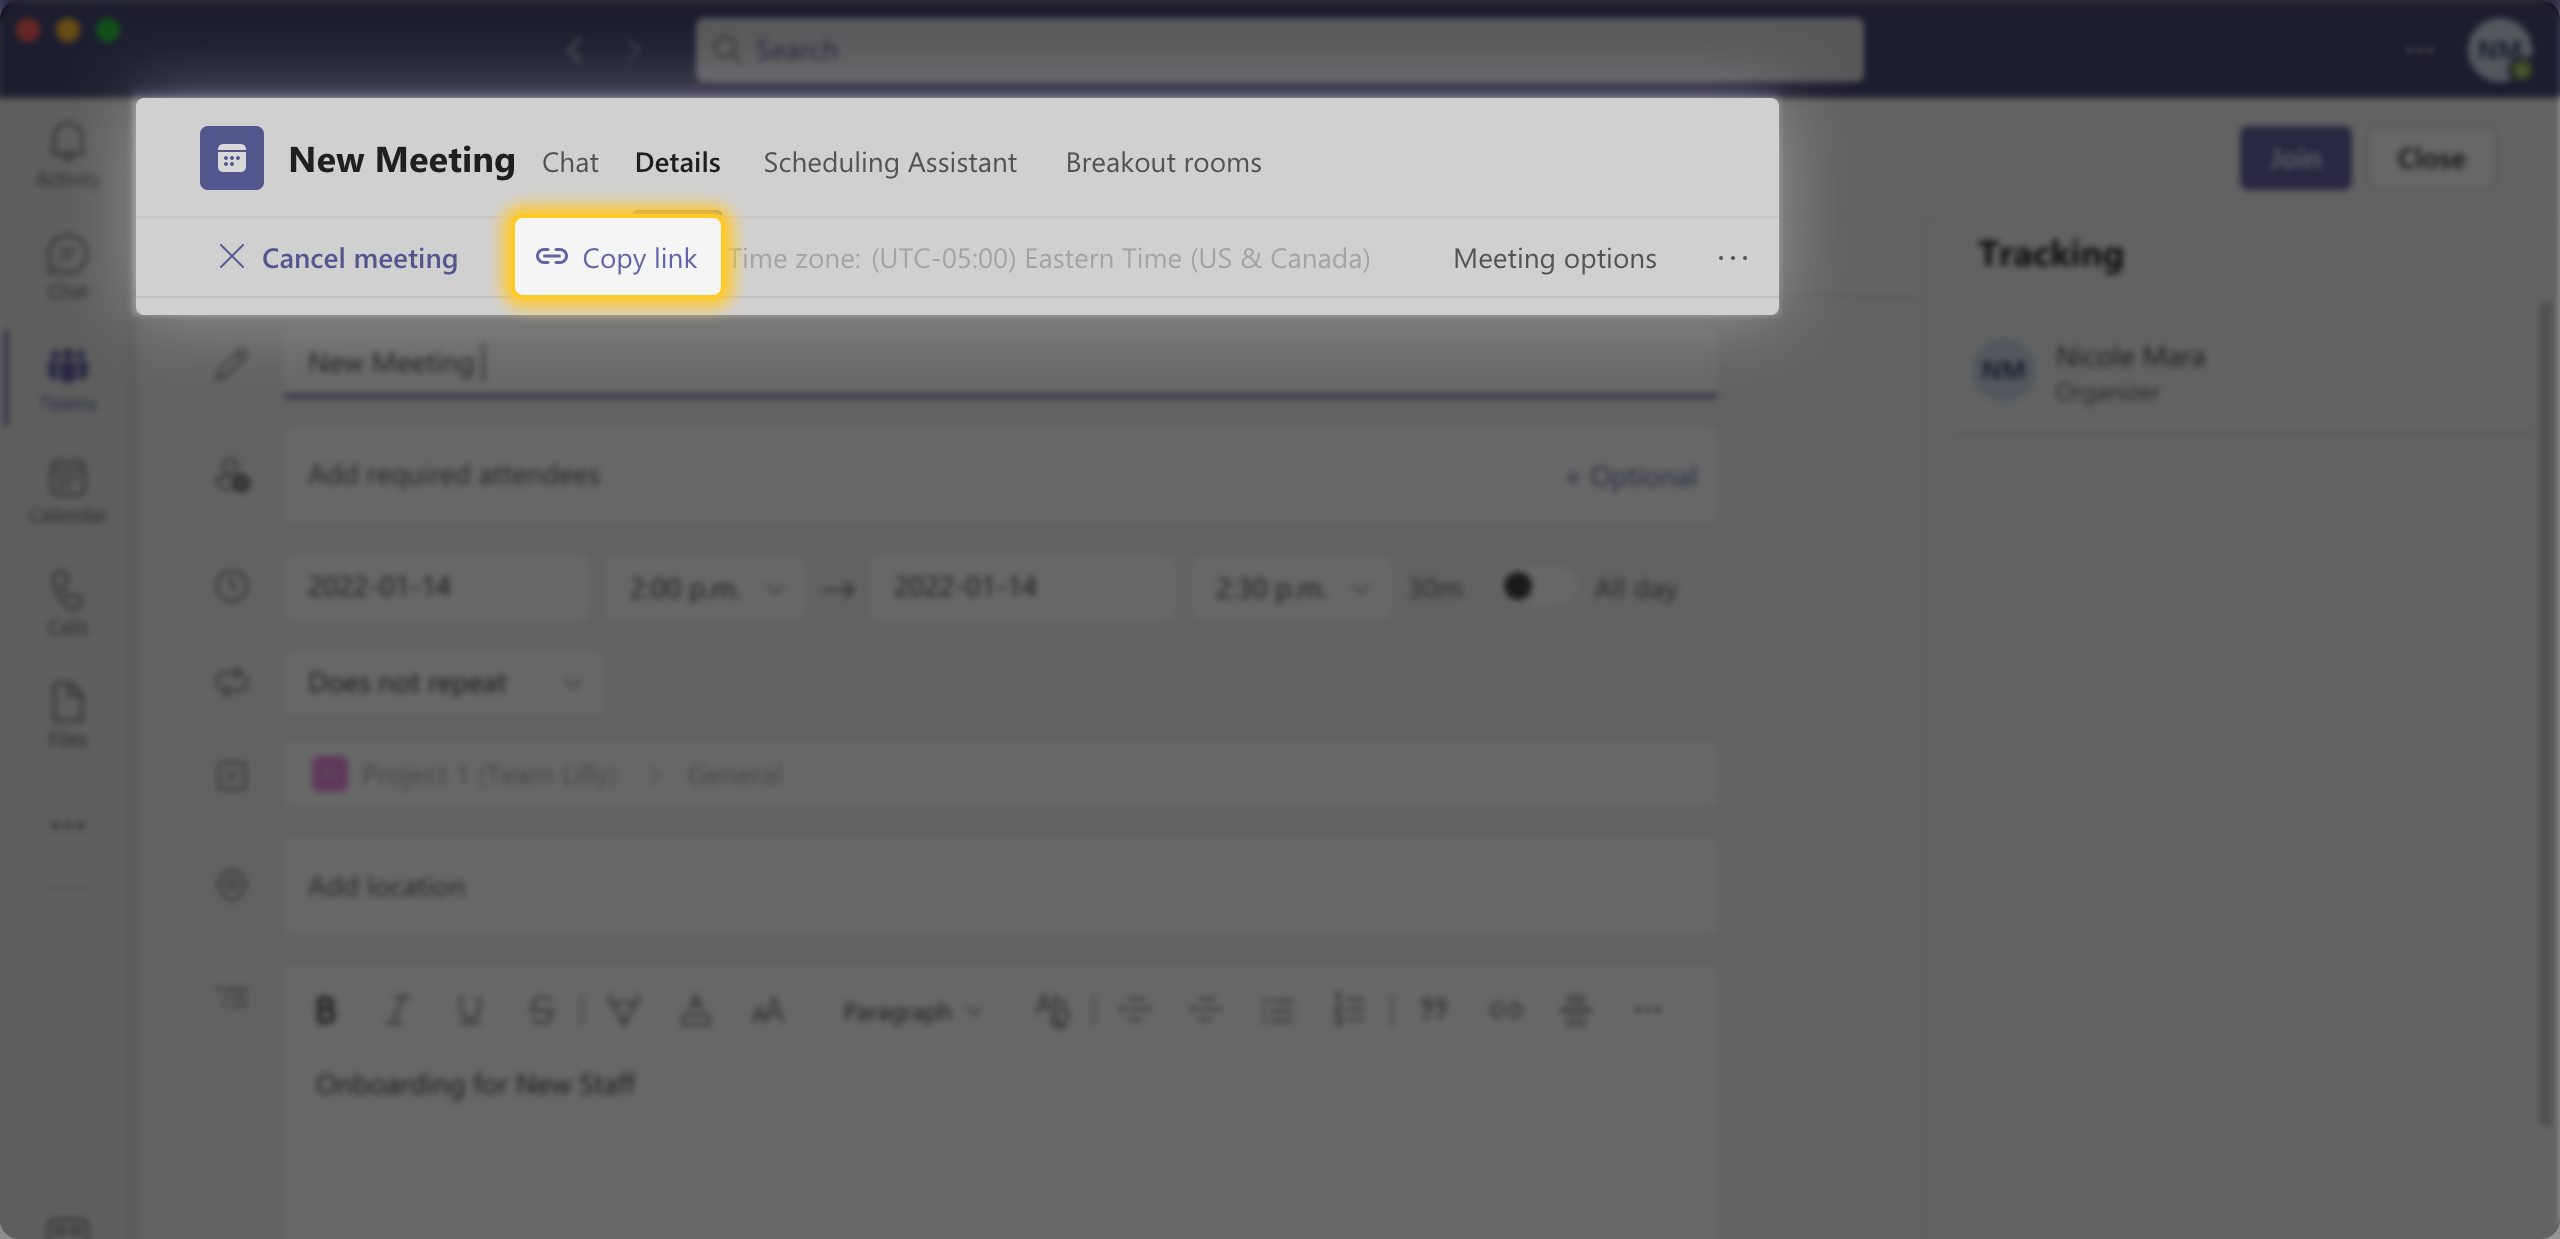
If you send an invite link from a meeting in progress or a scheduled meeting to anyone in your MS Teams workspace, they will receive a personal notification. If you schedule a meeting for a channel, all the channel members will also be notified—so you can be sure no one will get away with the excuse that they “didn’t see anything about a meeting.”
How to Invite External Users and Guests to a Microsoft Teams Meeting
In a perfect world, everyone you need to connect with has a Microsoft Teams account. However, since that’s not the case, you will probably have to meet with external users from time to time (vendors and clients, for example).
Fret not, anyone with access to the World Wide Web and an email address can join a Microsoft Teams meeting!
To add someone as a guest user to a Microsoft Teams meeting:
- Go to the scheduled meeting “Details” from your Calendar app in Teams
- In “Attendees”, enter their email and hit “Save” (or “Send update” if you are editing a meeting that was scheduled beforehand).
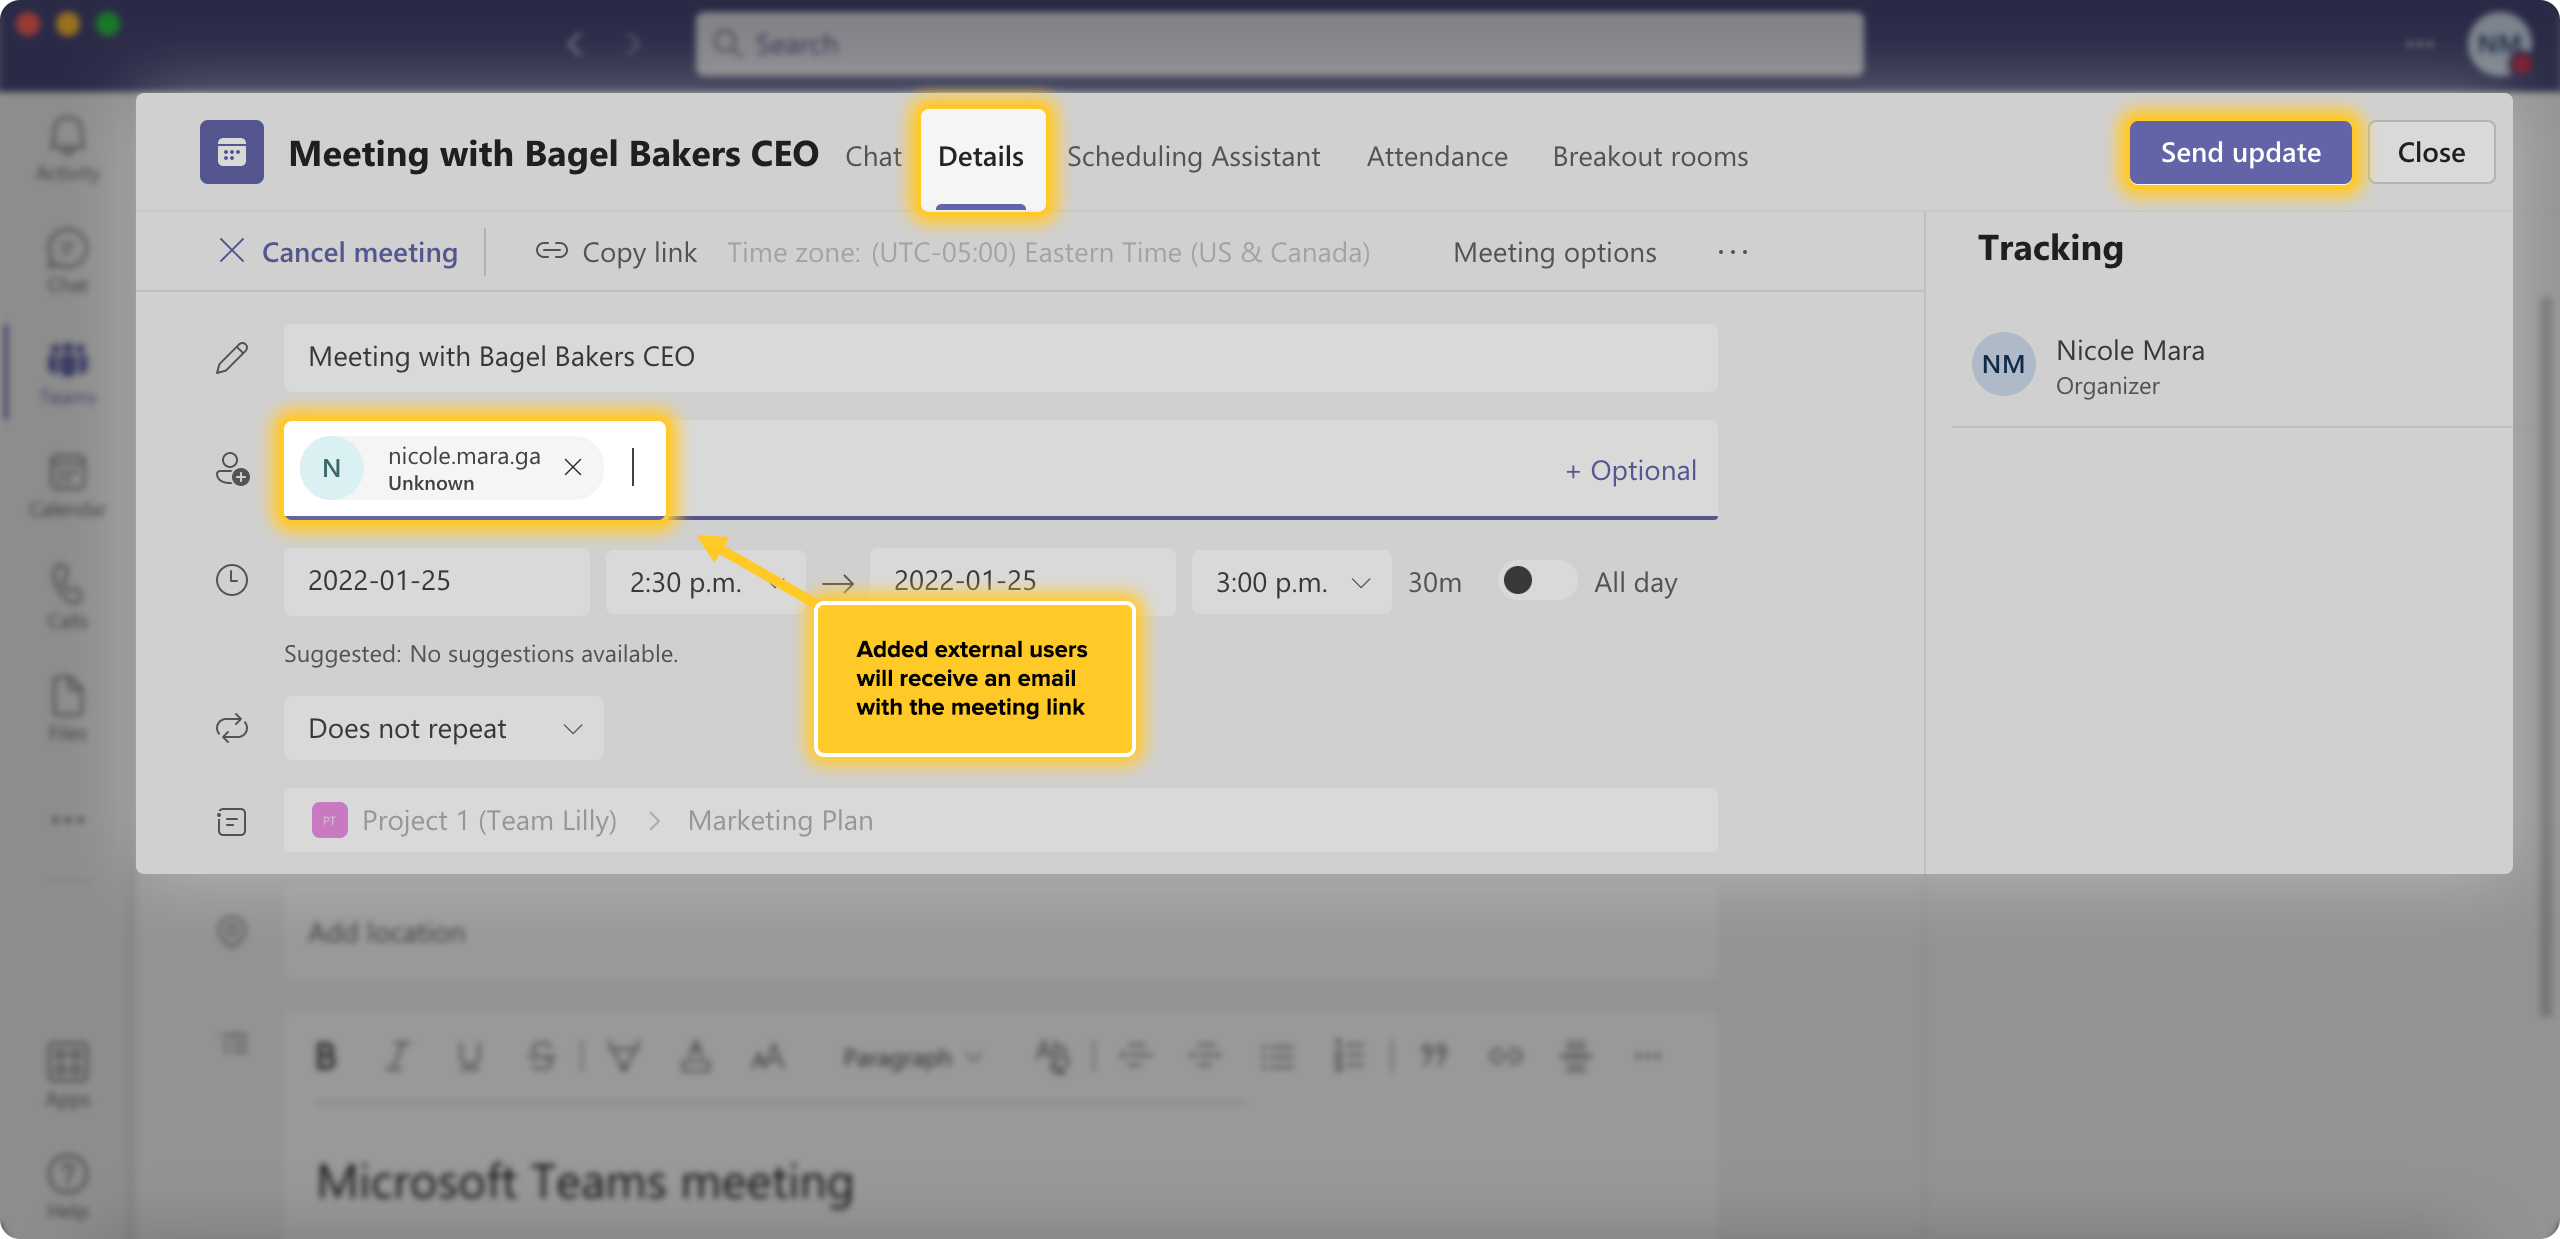
The added external users will receive an email with the link to your meeting!
Now what if your external attendees are not familiar with virtual meetings at all and need help joining the meeting?
We’ve got you covered. To join a meeting as a guest, your attendees will need to:
- Check their email and find the Teams meeting invite from you
- Hit “Click here to join the meeting” at the bottom of the email.
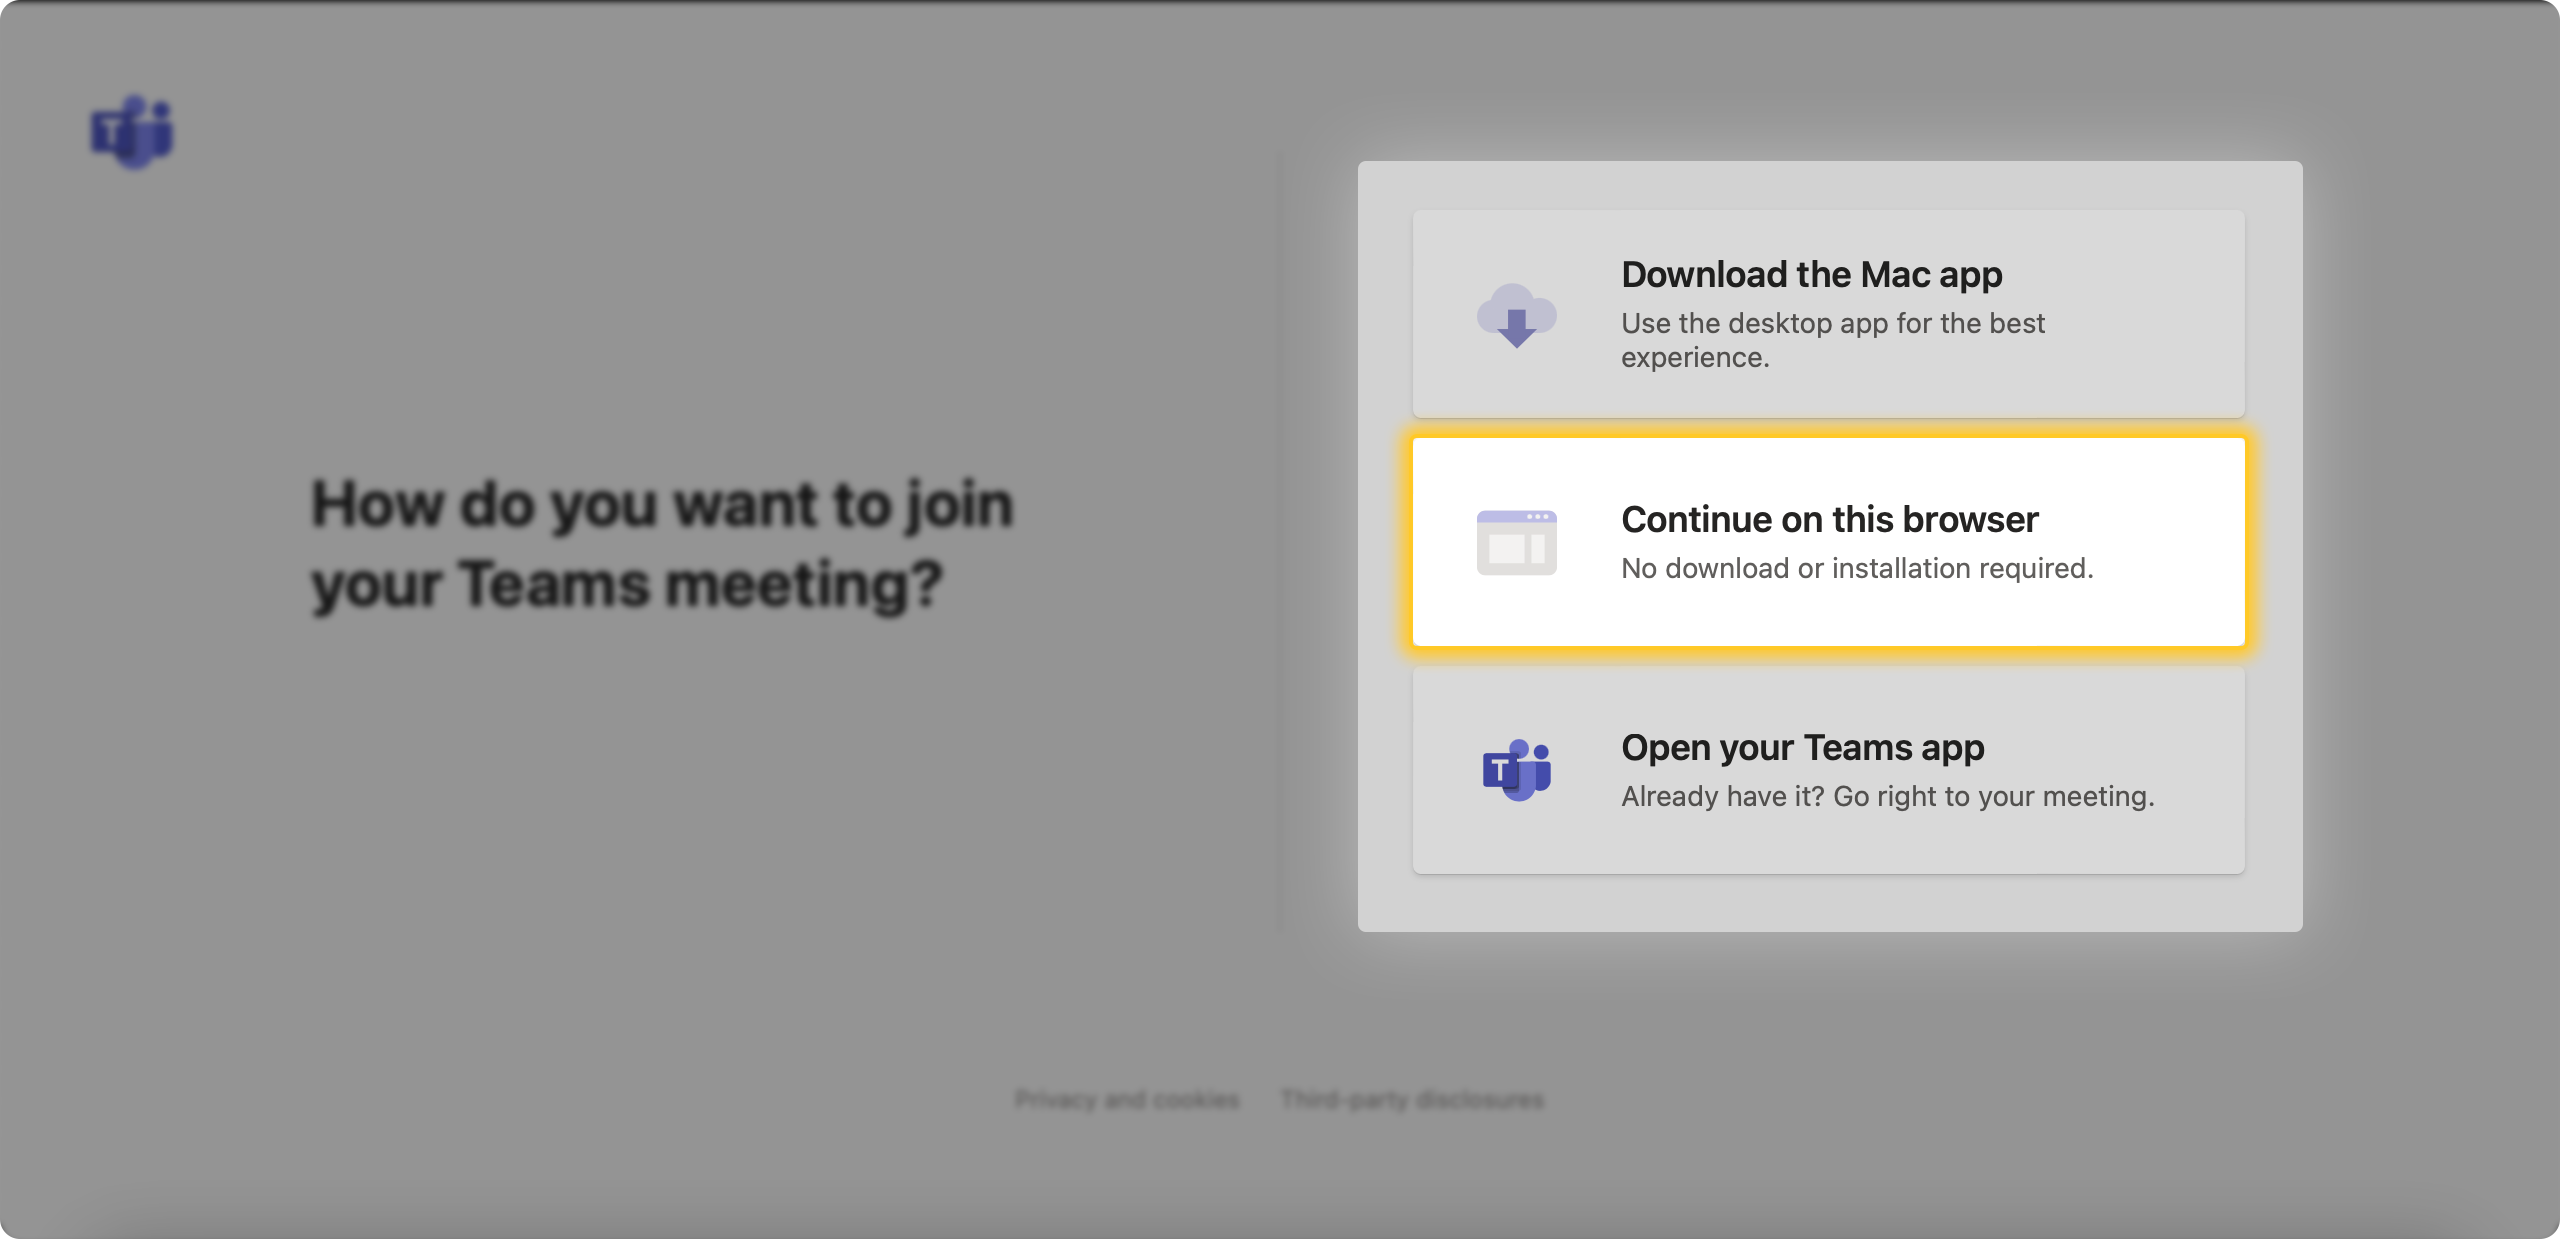
Once they do that, they will be redirected to a screen that will let them enter the meeting from the web by hitting “Continue on this browser” (since these are users that don’t have a Microsoft Teams account.)
How to Start Microsoft Teams Meetings in Your Mobile App
The MS Teams app is honestly just as convenient as the PC Microsoft Teams workspace when it comes to Meetings—it may even be a bit easier to use.
To start a meeting on the spot from your mobile device, find the video camera icon in one of two places:
- A channel
- Your Calendar app.
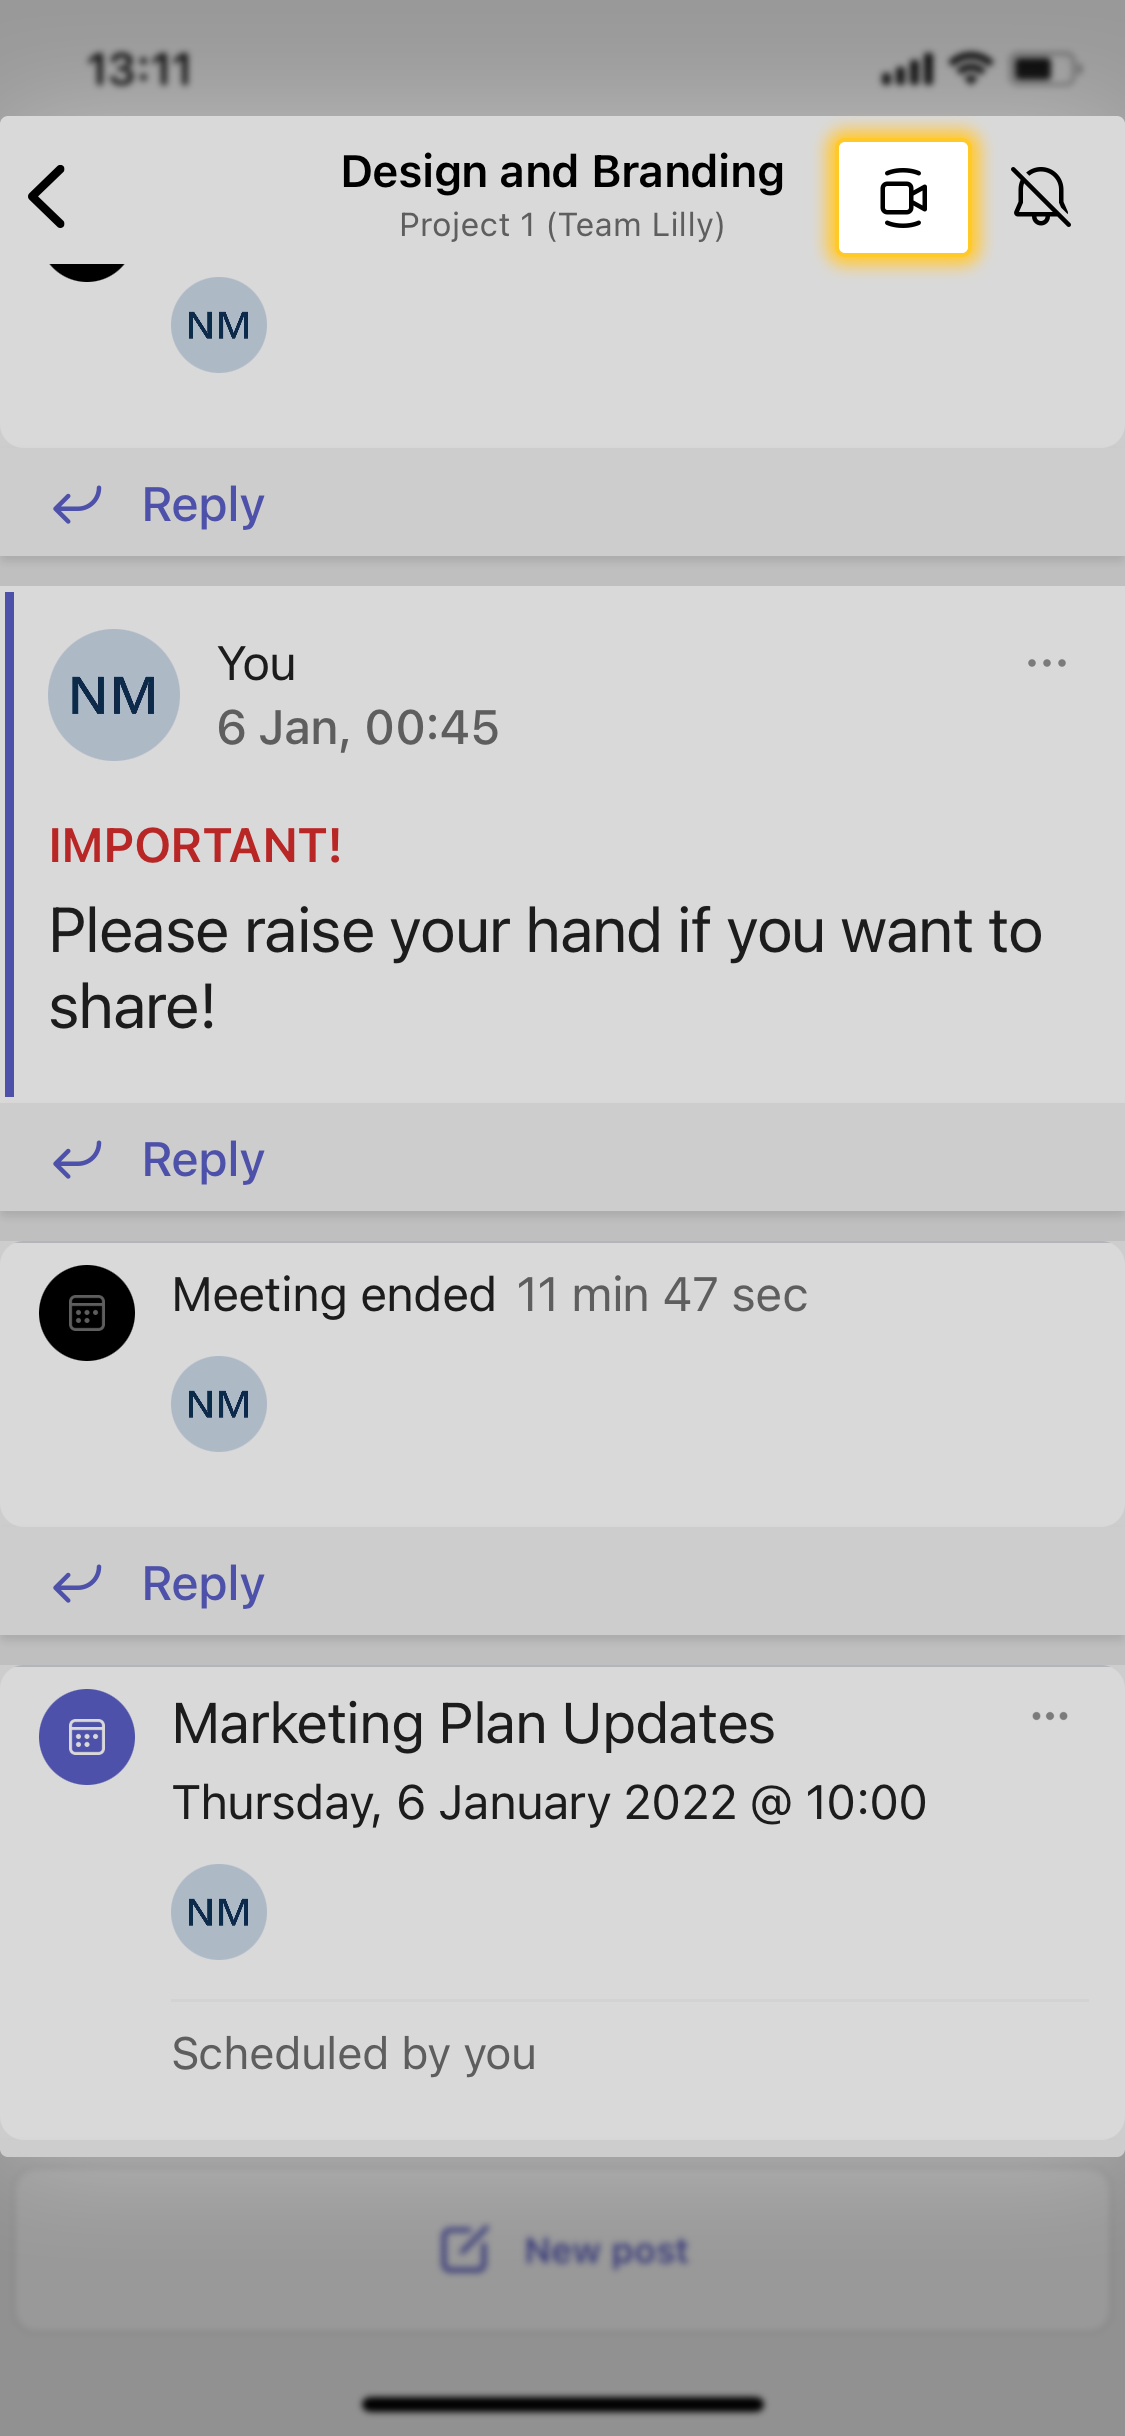
To schedule a Microsoft Teams meeting from your mobile device:
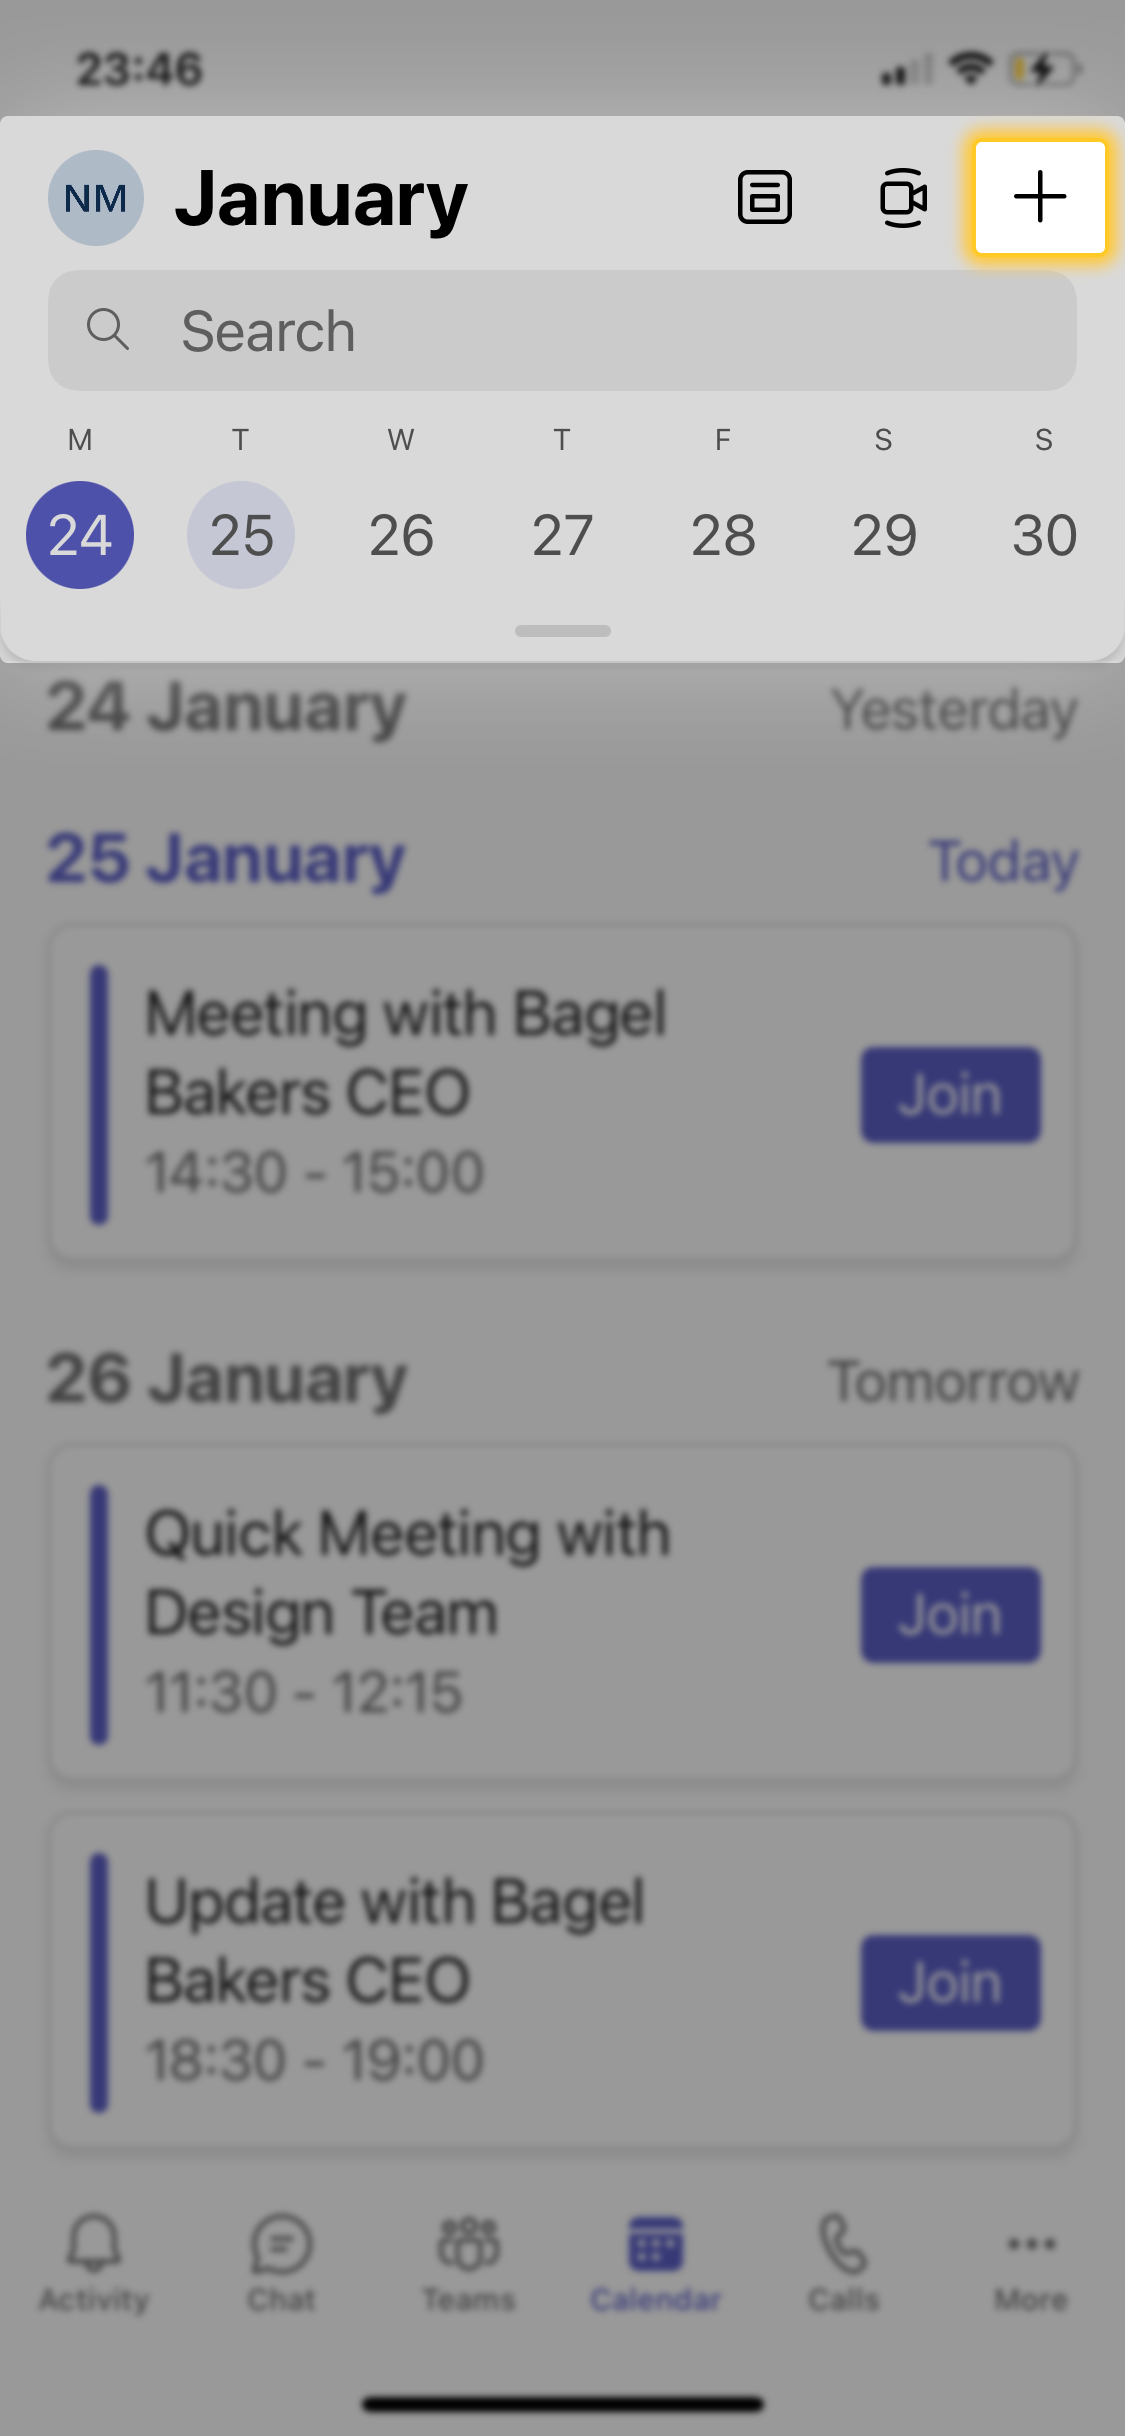
- Go to the “Calendar” tab at the bottom of your screen
- Hit the “+” sign in the top toolbar and go about your usual scheduling, such as setting a time slot and adding required attendees.
And guess what—adding presenters to your meeting is WAY easier on your mobile app. To change who can share their screen, as well as manage other meeting settings, follow these steps:
- Go to the scheduled meeting in your Calendar on the mobile MS Teams app
- Go to “Details” > “Meeting options”
- To make someone a presenter, go to “Who can present?” > “Specific people” and add your selected users.
Basically, if you have to step away from the office and conduct a meeting from your phone, you can do all the same things you could from your computer or laptop. You can even transfer a meeting in progress from your computer to your phone—find out how at the end of this post.
Top Features in Microsoft Teams Meetings
Now that we’ve given you the general tour of MS Teams Meetings, we’d like to introduce you to some of its key features that will really take your virtual collaboration to a new level.
MS Teams Meetings have a whole host of great tools embedded in the top toolbar to help you make the most of your meeting time:
- Add attendees during meeting
- Use the channel chat and communicate right in the meeting
- Show your support with emojis or raise your hand
- Create and manage breakout rooms
- Access more advanced settings
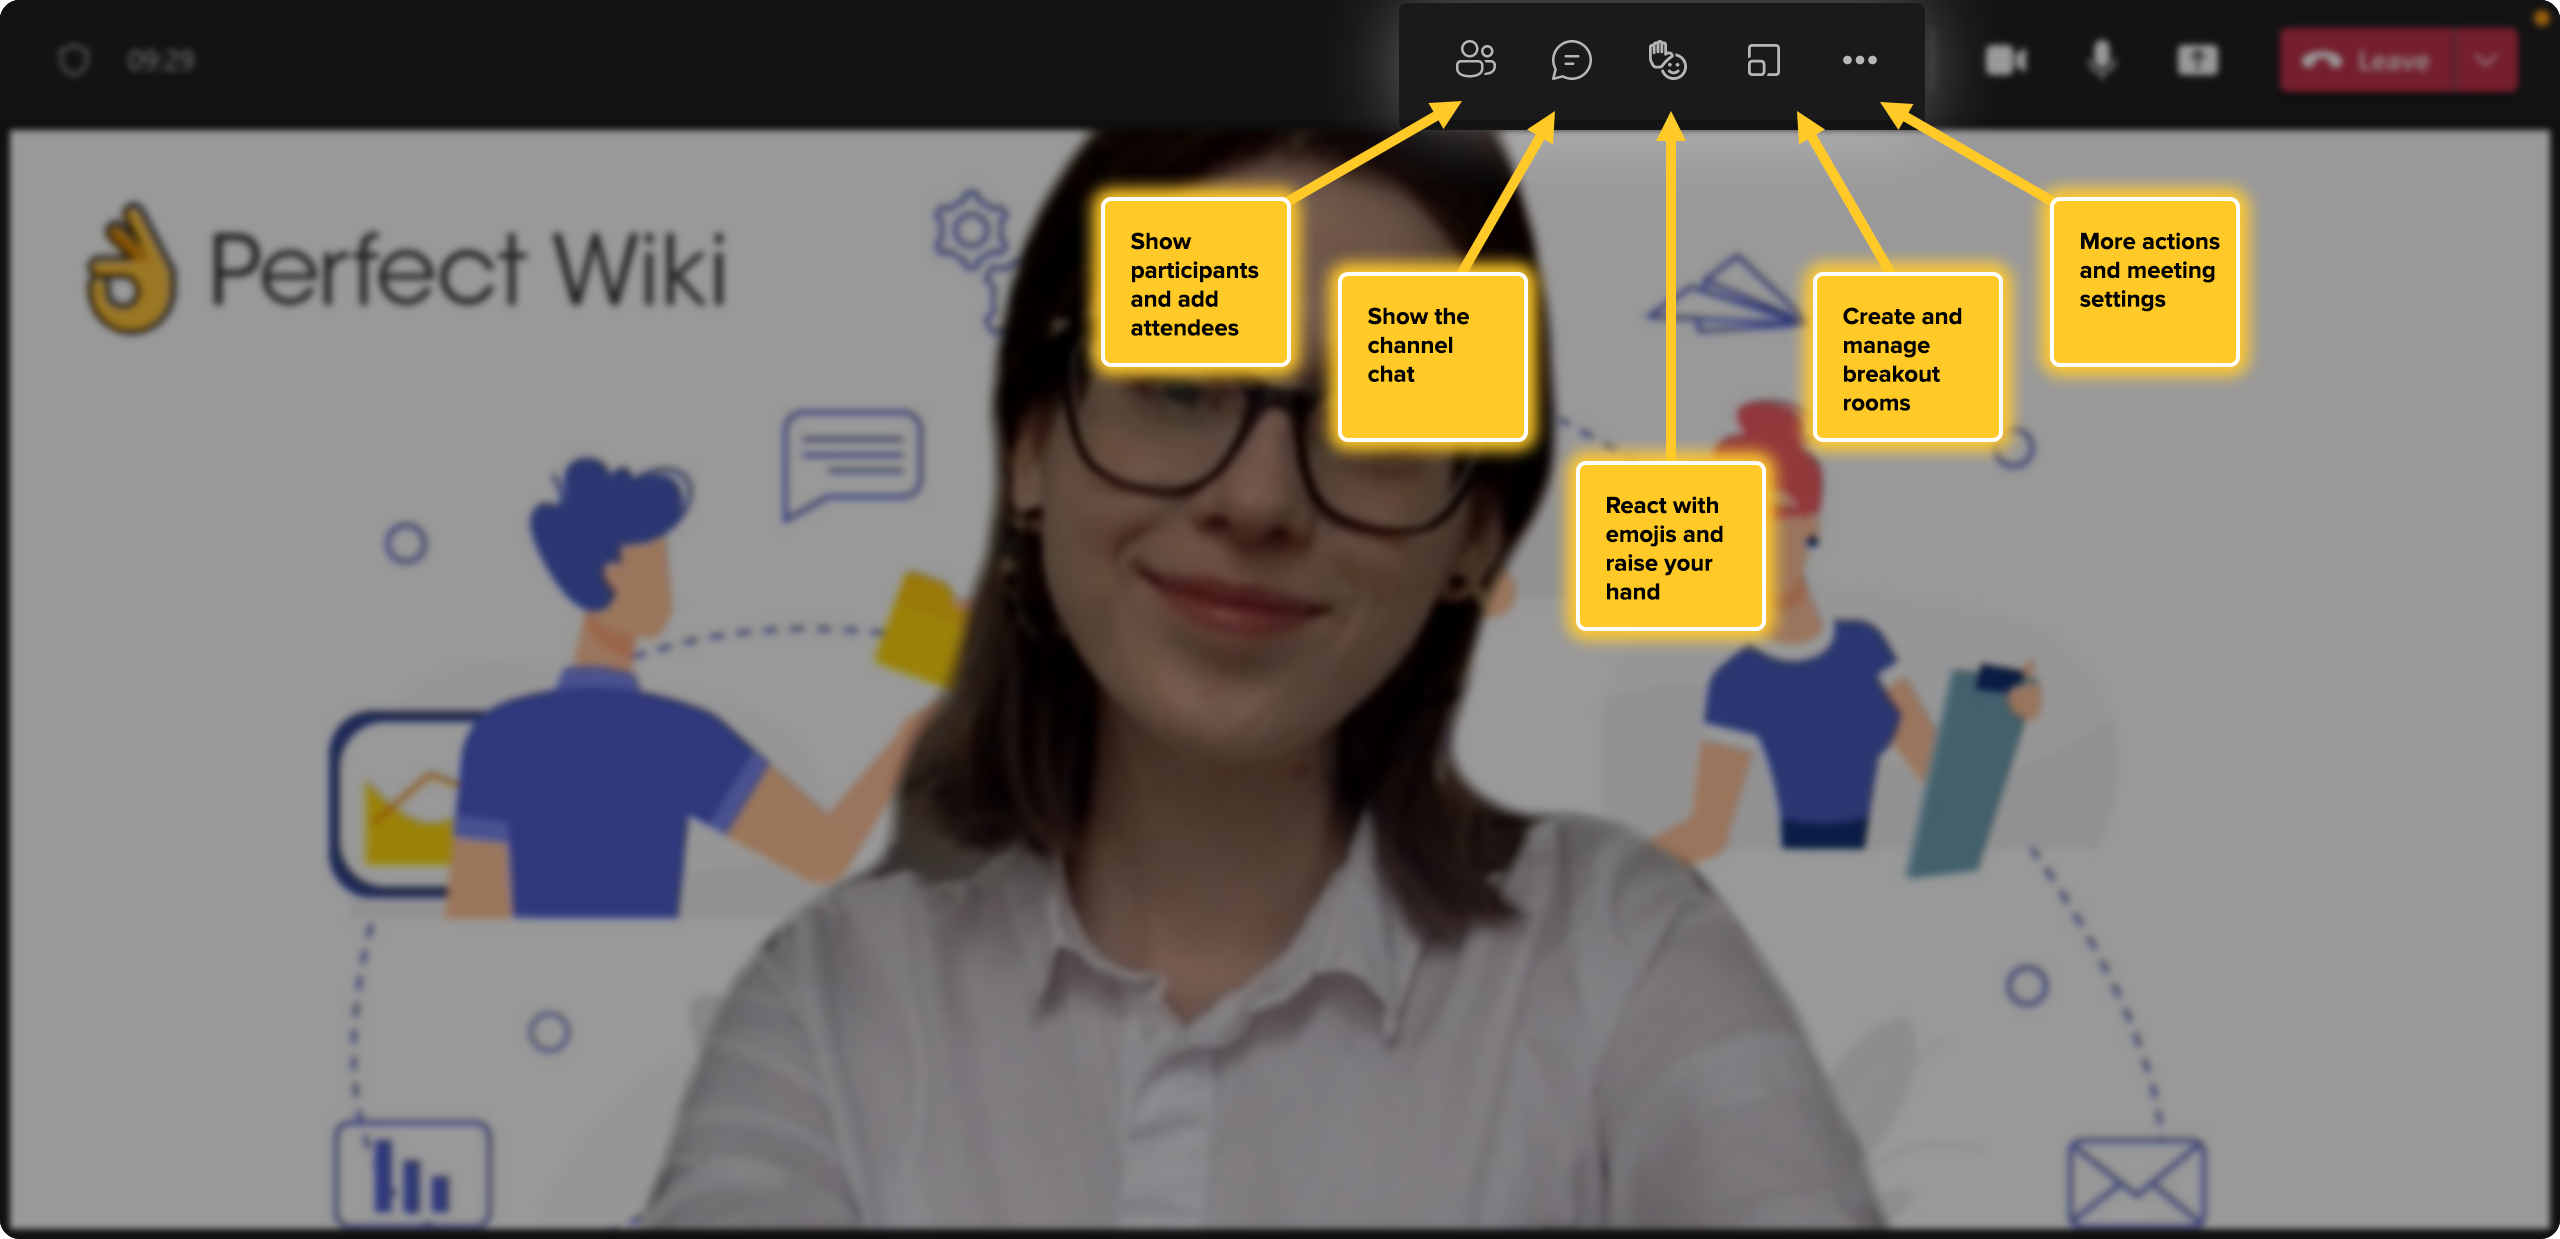
We’ll guide you through all these cool features in the next section of this post.
And hey, if you are an administrator that values thoughtfully crafted and feature-rich collaboration with your team, Perfect Wiki has everything you need to create a shared body of company knowledge right in Microsoft Teams. Install our collaboration workspace right to your MS teams channels in less than a minute for FREE, no credit card required.
How to Share Your Screen in Microsoft Teams Meetings
If your remote meetings are going to be a substitute for in-person collaboration, you will without a doubt need to share presentations and documents with the team.
Microsoft Teams has a feature for that—you can share your screen with your attendees, or grant other users the permission to share theirs (refer to the first part of the article to find out how).
To share your screen with the rest of the meeting members, follow these steps:
- Hit “Share content” in the left part of your meeting toolbar
- Choose between sharing your screen (which allows you to flip between windows while sharing) or a specific window (your screen will stop sharing when you change to a different window).
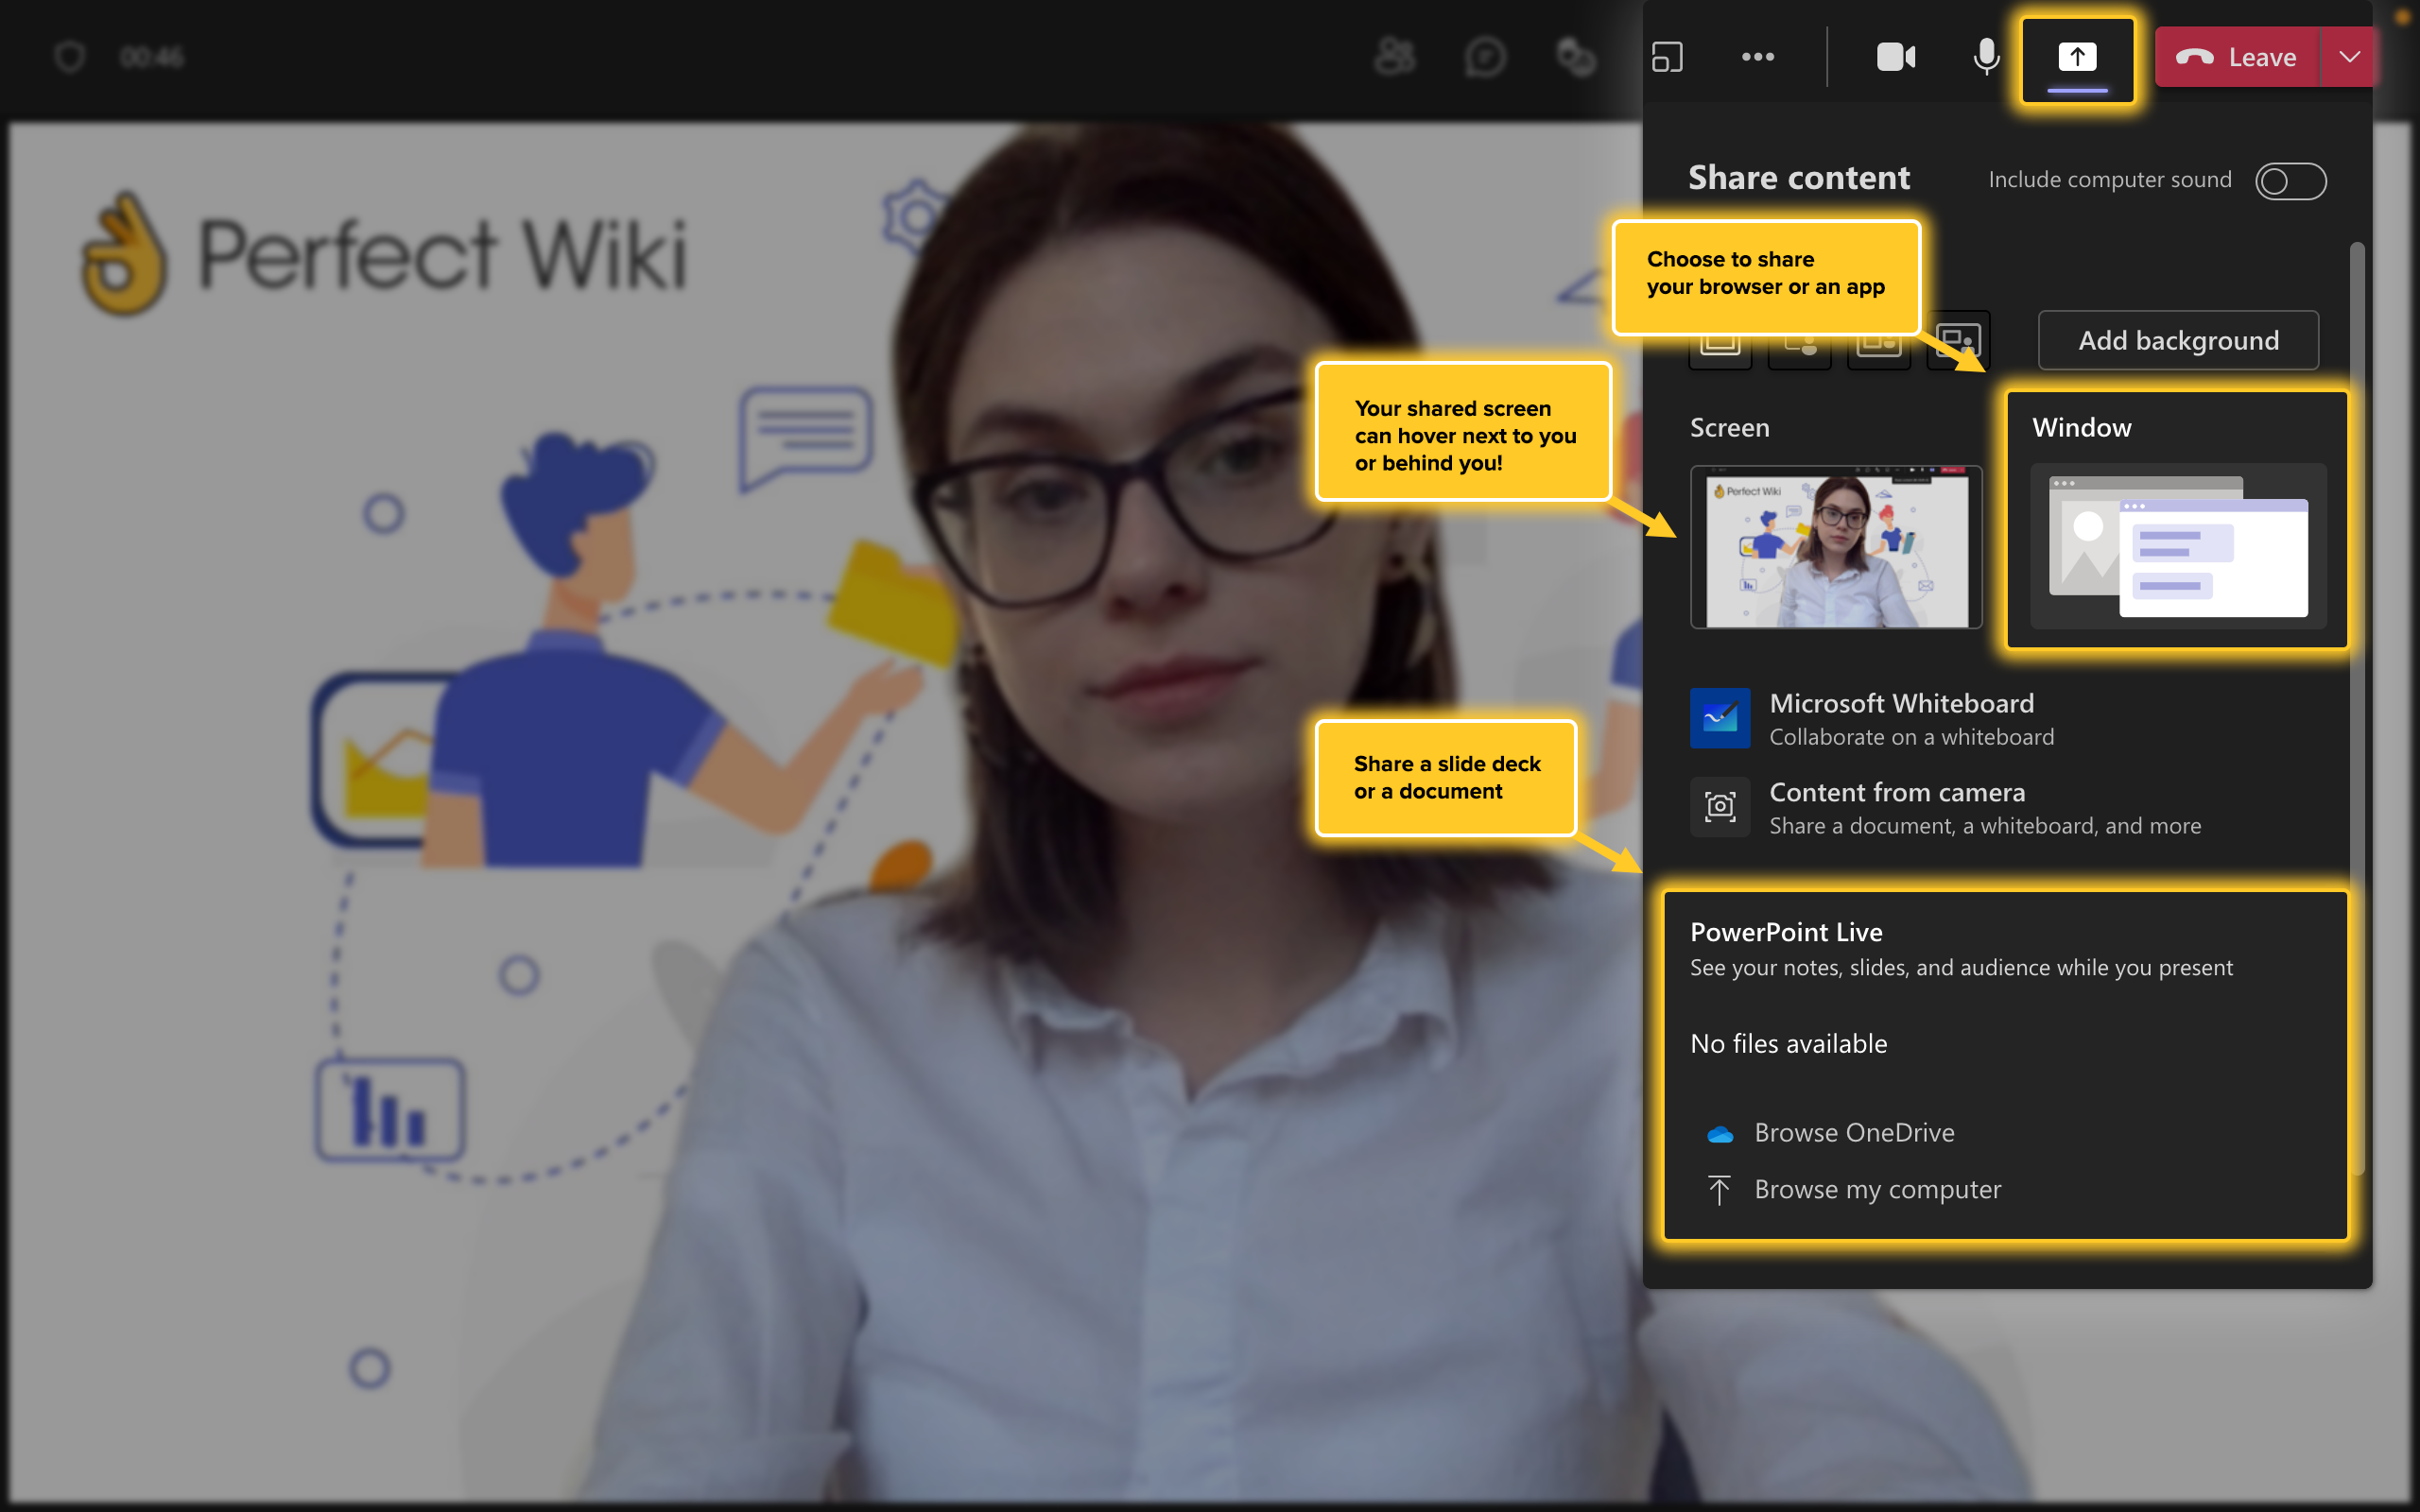
You can share a lot more than just a slide deck—with Microsoft Teams you can share files, apps on your PC, or browser windows for all attendees to see.
Want to earn your company’s “Most Engaging Presenter” badge? We’ve got you, all you need to do is go from simple screen sharing to advanced presenter modes. For example, if you choose the “Reporter” screen in “Presenter mode” options, your screen or window will appear as a floating banner with you next to it. It looks incredible, but don’t take our word for it—try it out in your next meeting!
How to Record Microsoft Teams Meetings
Not all Microsoft Teams meetings need to be recorded (especially those quick check-ins and confidential meetings), but if someone on your team couldn’t make it to an important meeting, you can record it and save it for later.
Here’s how:
- Once the meeting has started, go to “More actions” > “Start recording”
- After a 5-7 second delay, your meeting will start recording.
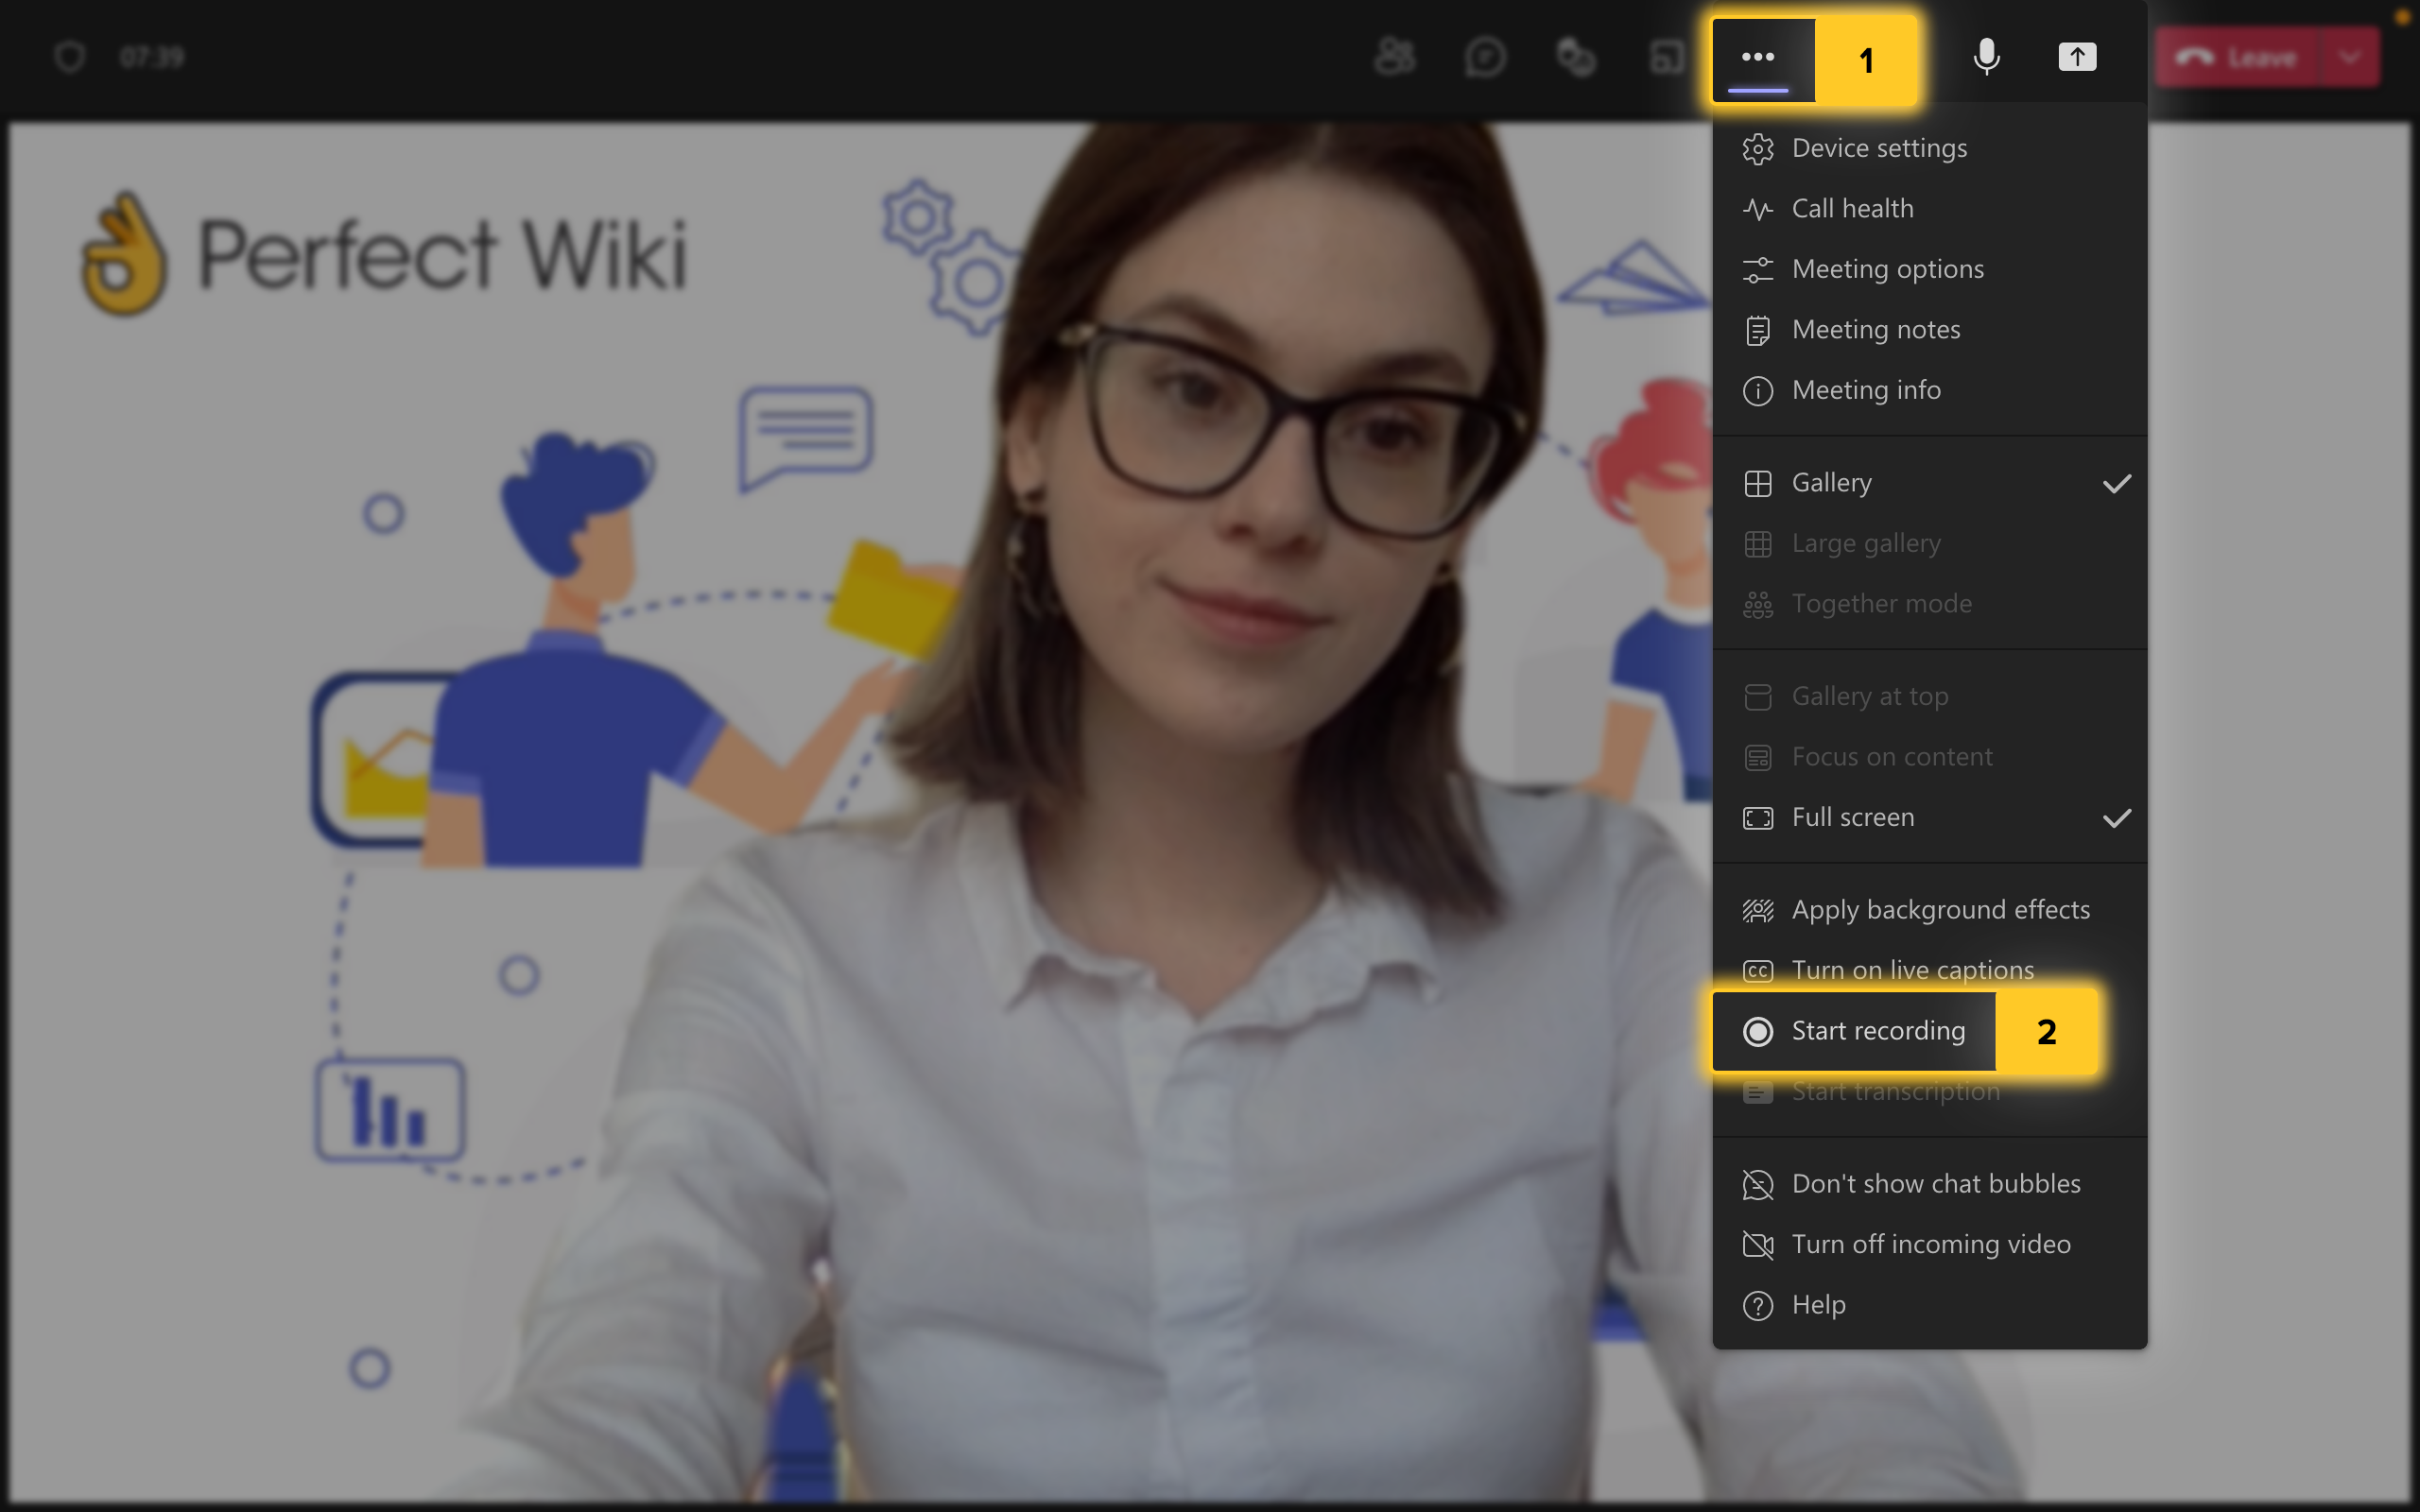
Be sure to send a message to your attendees in the meeting chat and let them know you are recording. Someone might need a second to fix their hair or remove their dog from the frame!
Note:
While only organizers and presenters can start recording a meeting, anyone in your organization (so anyone from your MS Teams workspace) can
stop
recording.
You can stop recording at any time. Or if you want the whole meeting, the recording will be automatically converted, saved, and stored to your Microsoft Teams OneDrive (if you had a meeting in a channel, the redorcing will save to that channel’s SharePoint folder) after the meeting ends.
And it’s important to note that attendees will have access to the recording after the meeting ends:
- If the meeting was in a channel, its members will have direct access—they can see the recording in the channel chat.
- If it was a meeting with select MS Teams or external users, they will have to be sent the recording by someone in Teams from the OneDrive folder.
How to Use the Chat Function in a Meeting
Let’s say you are doing a presentation for a large audience in a Microsoft Teams meeting. The last thing you want when you ask a question is for attendees to all start unmuting themselves and talking at once.
Thankfully, you can get everyone’s opinions and avoid a cacophony of voices by using the meeting’s chat function. It’s perfect not just for getting written feedback from your attendees, but also:
- To communicate quickly with your team members
- To share files
- To create interactive task lists and agendas.
To open the Microsoft Teams meeting chat, hit “Show conversation” in the top toolbar of your meeting.
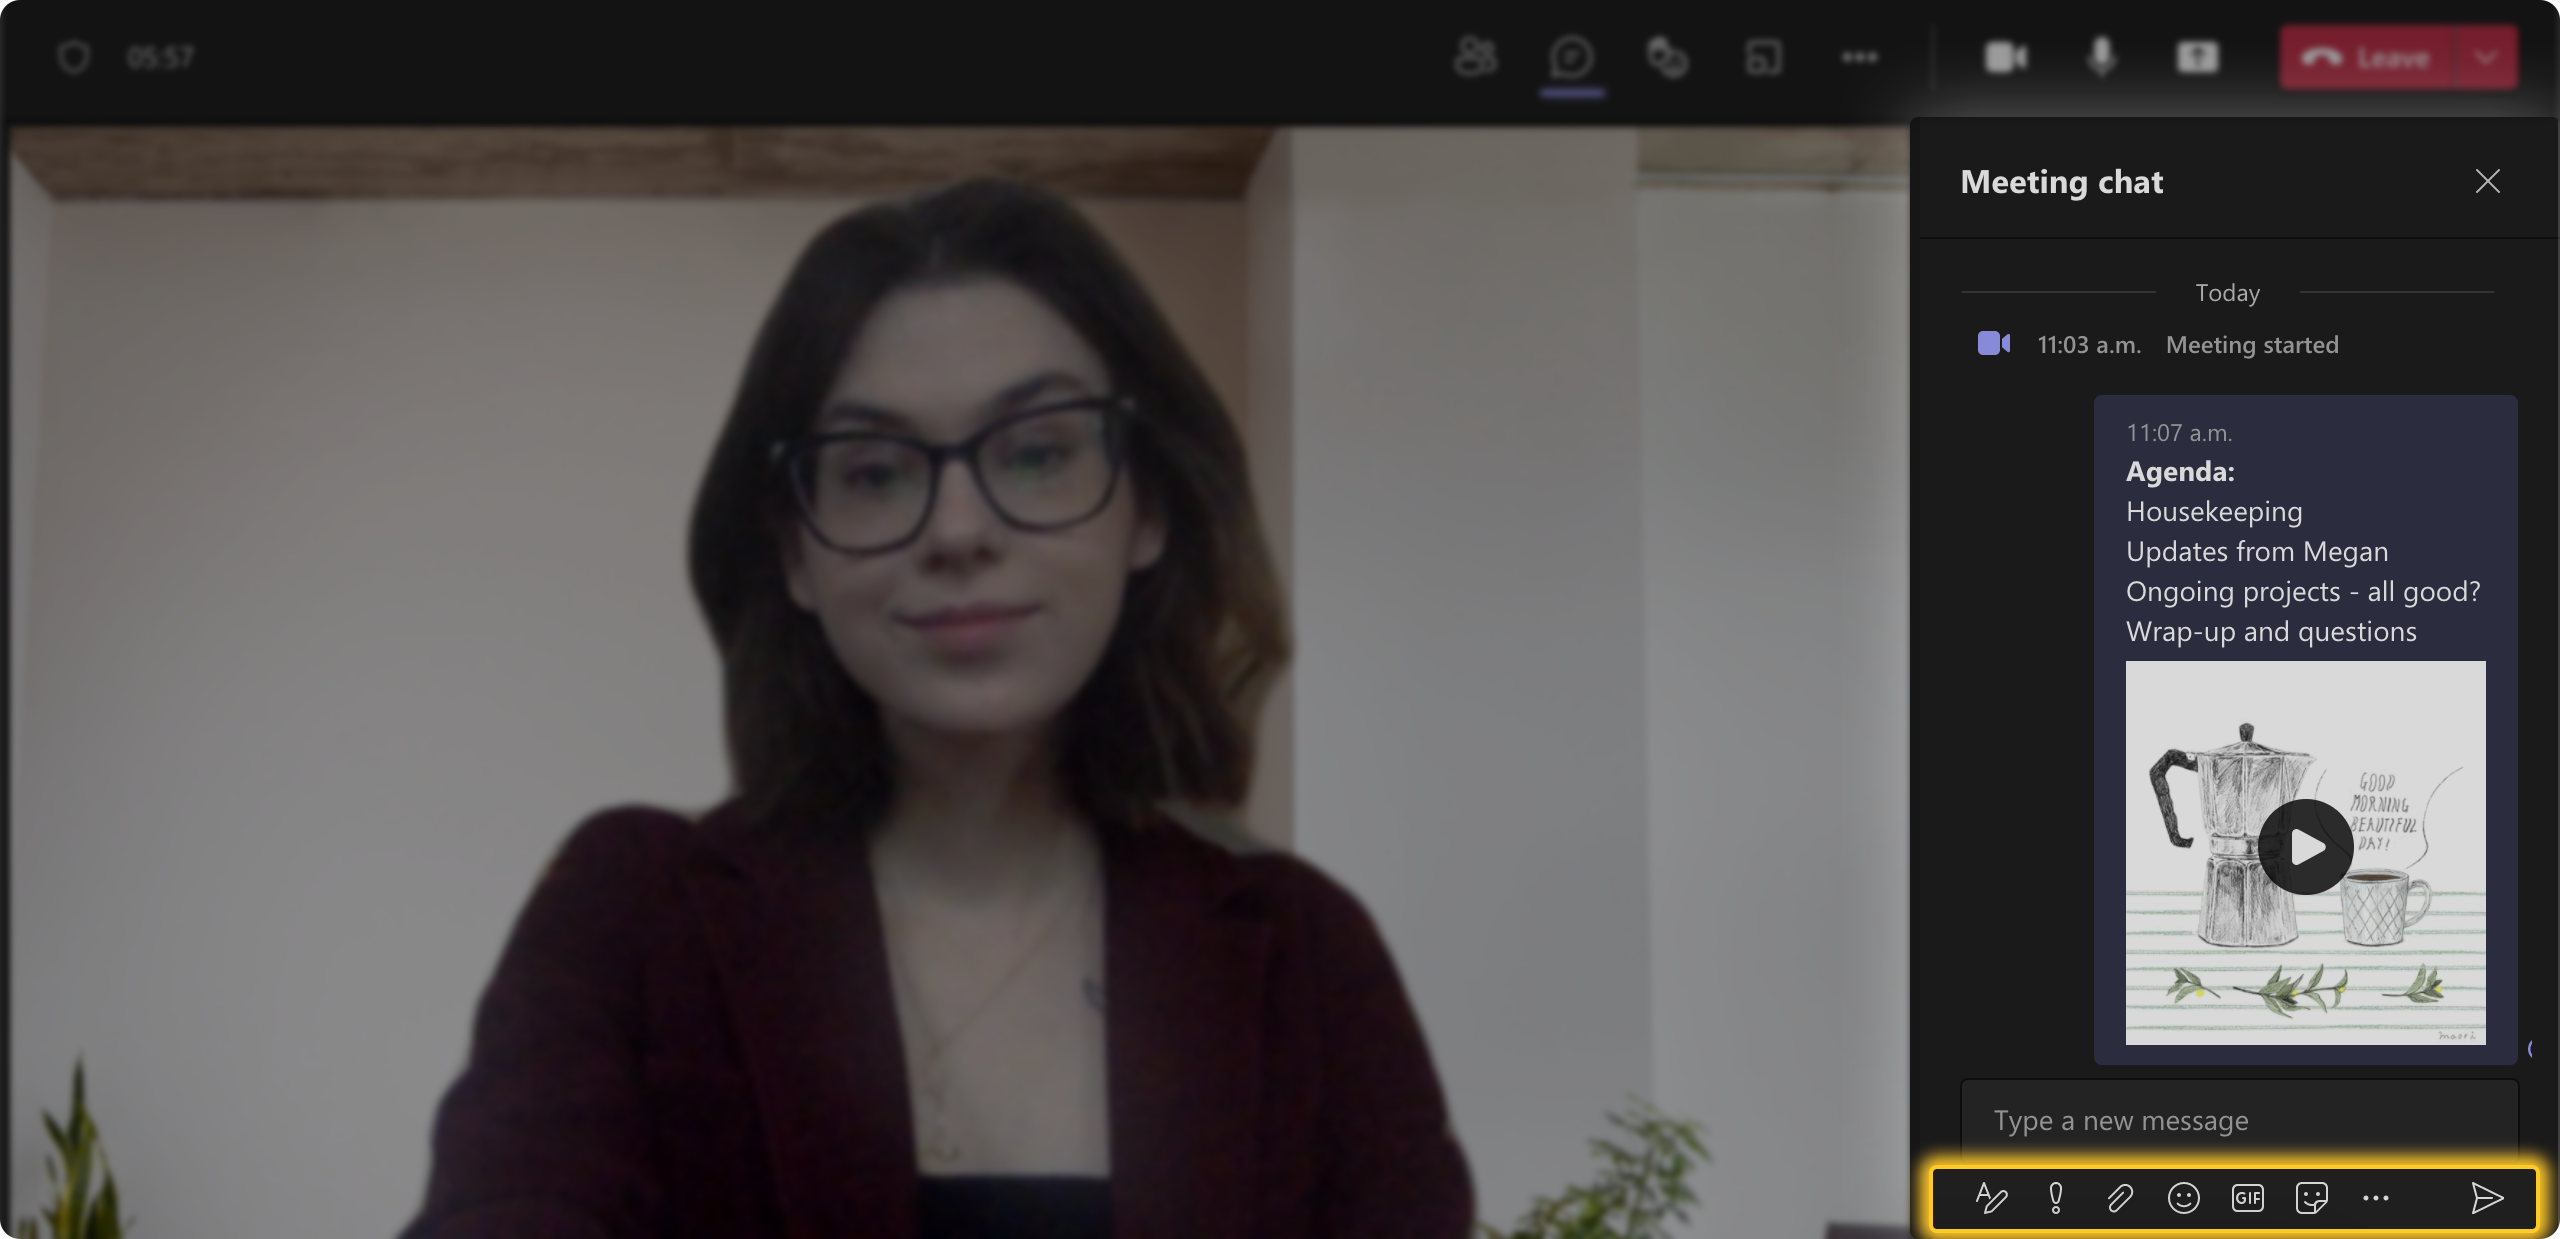
You can format your messages to make them stand out in the chat—change fonts, add GIFs and video links, or mark your message as “Important” so all attendees notice it among the potential message spam. You can get all these features in the bottom toolbar of the chat window.
Note:
If your meeting is in a channel, the meeting chat IS your channel’s chat, and the meeting conversation as well as attached files will be saved to that channel’s “Posts” tab.
Two important chat features we want to highlight are file attachments and live components.
To send a file to a Microsoft Teams chat, go to “Show conversation” > “Attach files” in the formatting toolbar at the bottom. You can upload a file from OneDrive or from your device.
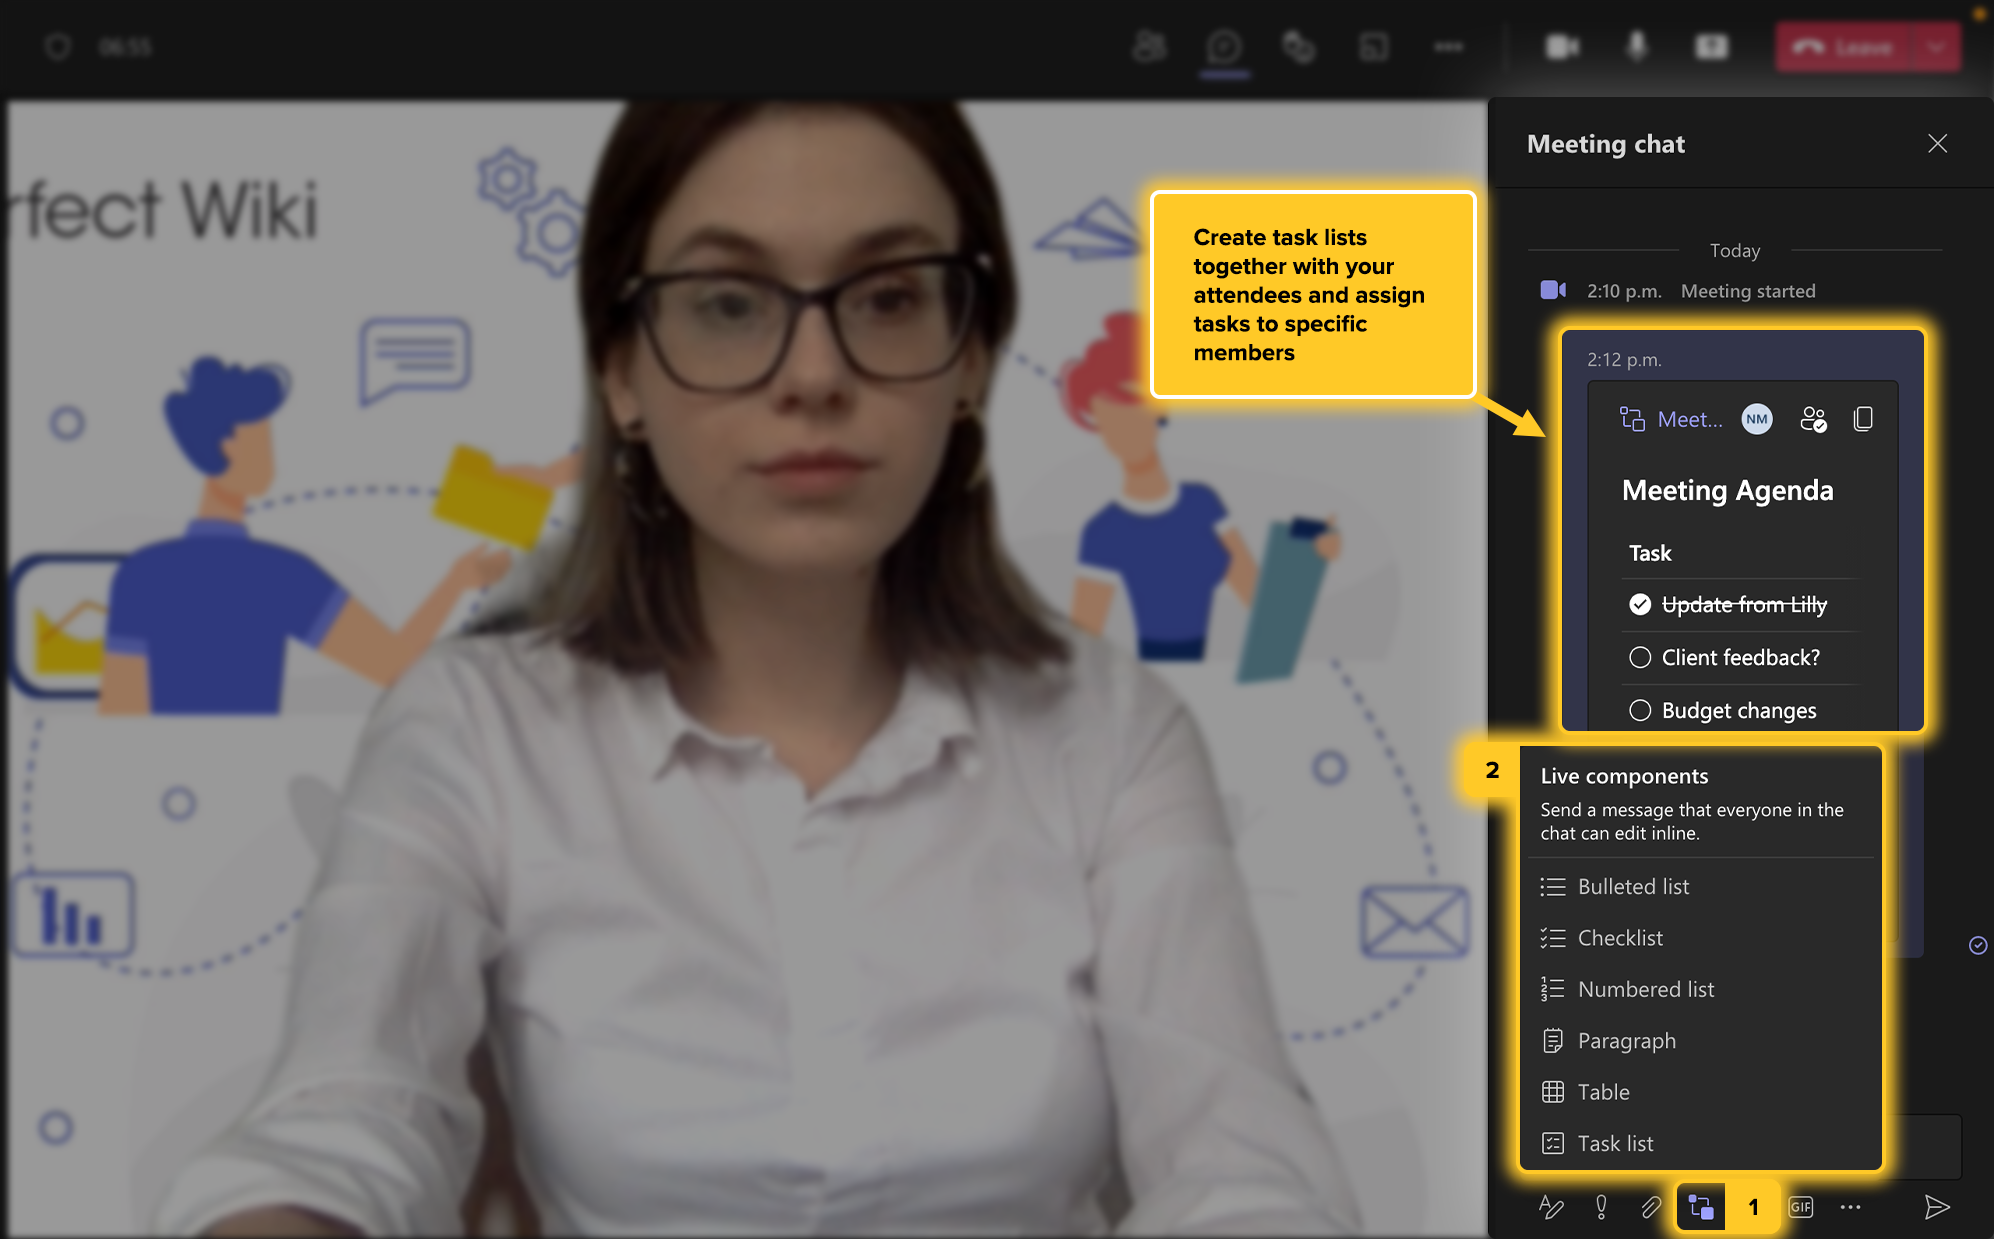
To send a live component—a task list or an agenda that you and your attendees can interact with together—go to “Insert live component” in that same formatting toolbar and choose from different checklist types, paragraphs, or even tables! Live components are a great way to set the plan for your meeting with your team and check topics as you go.
Disorganized meetings that “could have been an email” are a thing of the past!
How to Change Your Virtual Background
It’s possible we’ve all gotten a little too comfortable with working from home—think about all the times you had to frantically clean whichever part of your room was in view of the camera before your virtual meetings.
Microsoft Teams has plenty of virtual backgrounds that do the cleaning for you, and add a bit of pizazz and personality to your daily calls.
Unlike some virtual meeting apps, the MS Teams backgrounds work quite well without a green screen or monochrome background.
All you have to do to add a virtual background to your meeting is:
- Hit “Background filters” in the meeting lobby (a.k.a. The pre-meeting touch-up window)
- Choose from the Microsoft Teams selection of background or click “Add new” to upload one from your device (any image in PNG or JPEG format).
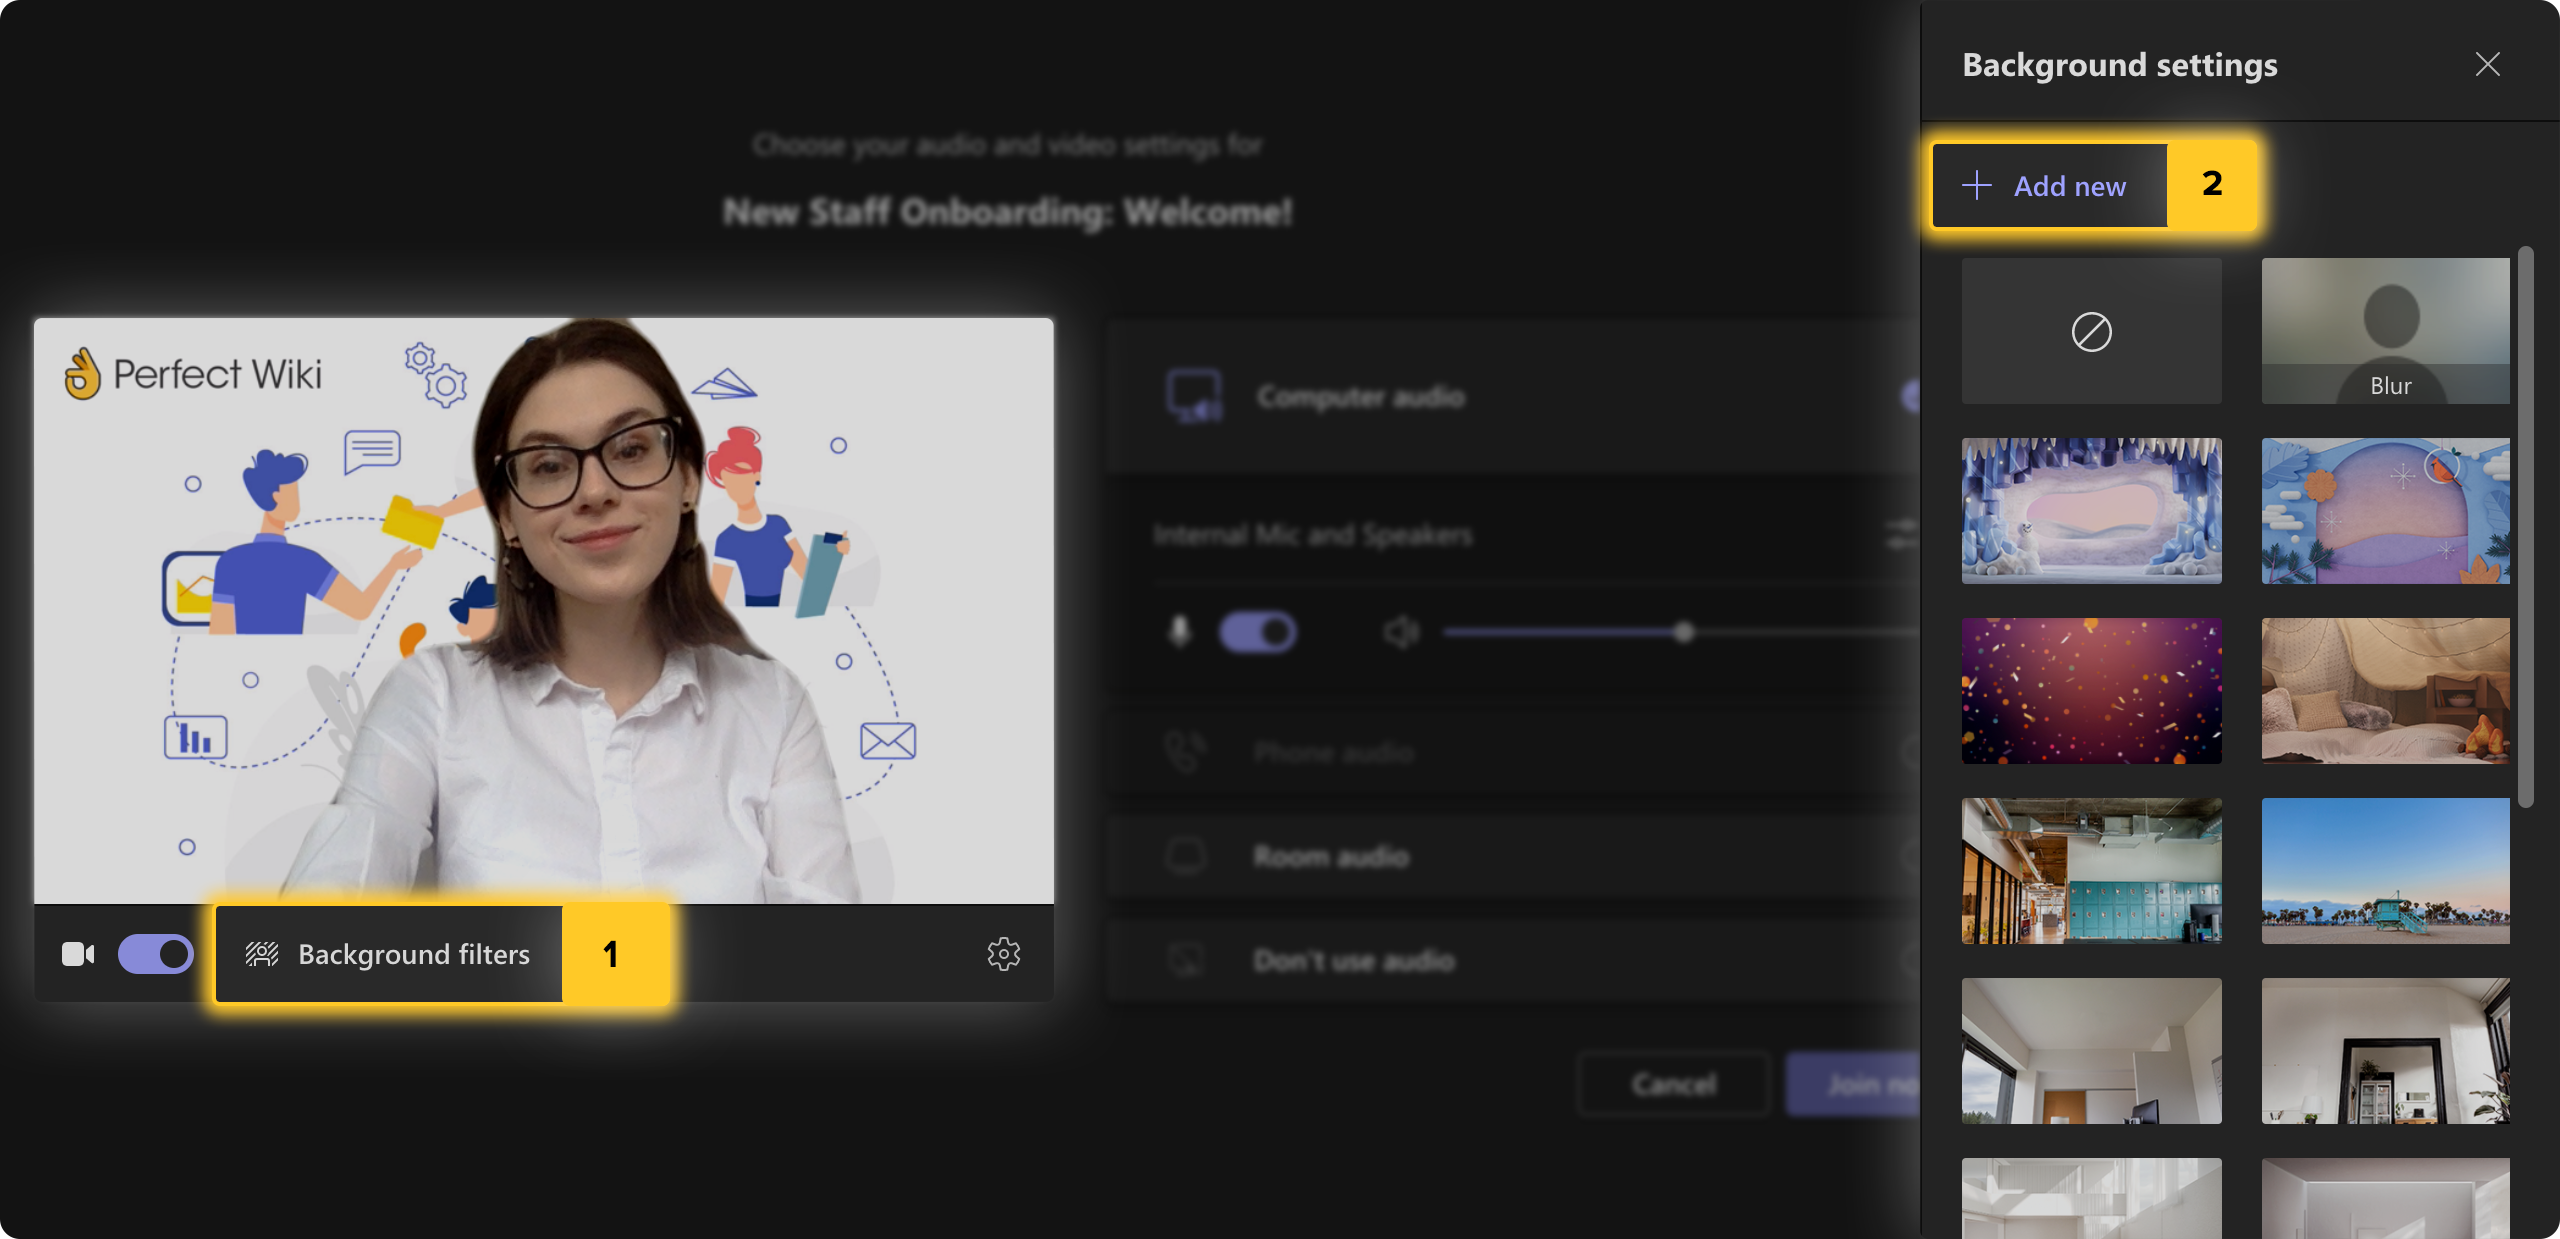
Custom backgrounds are a great idea for companies that value brand unity—in our experience, they help make calls with customers and external vendors much more professional!
Our 5 Top Microsoft Teams Meeting Tips
As a cherry on top of all you’ve discovered so far, we gathered a few tips and tricks that will help you tweak your Microsoft Teams meetings to the very last detail and really make this virtual meeting space work for you.
Use Noise Suppression to Block Out Your Surroundings
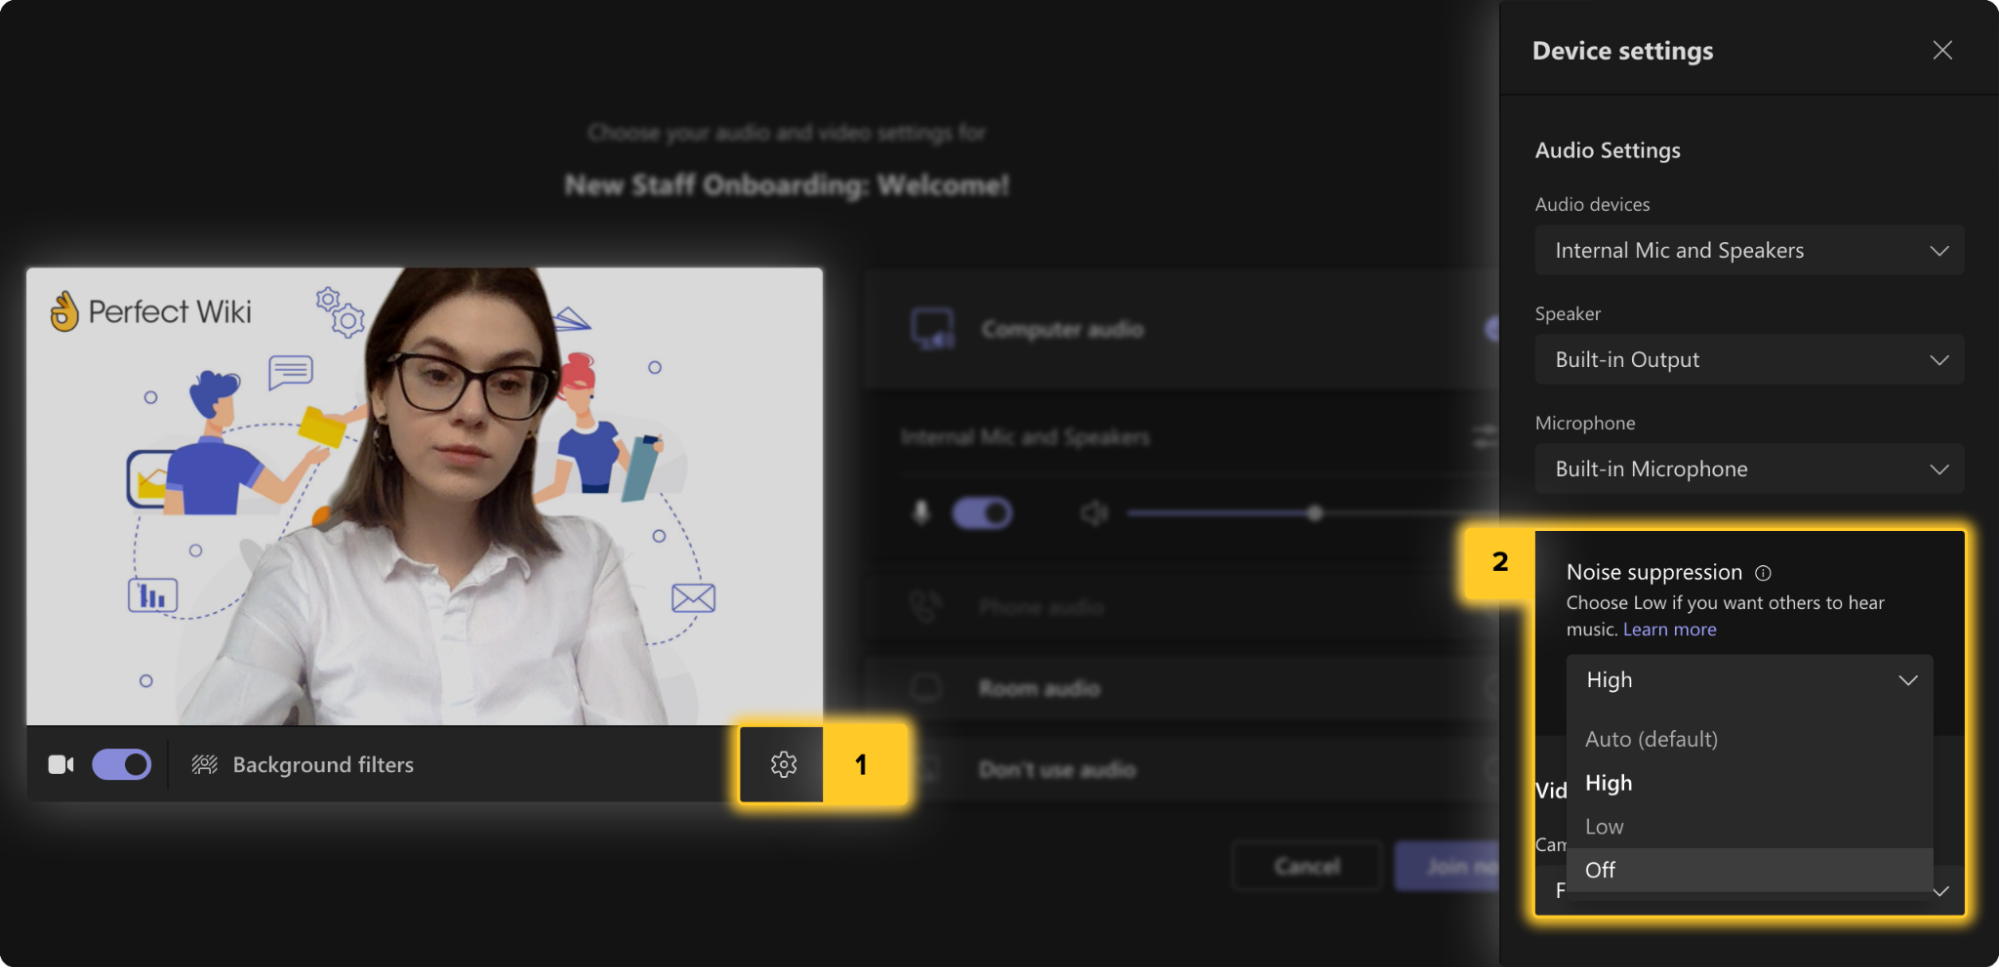
Attending the meeting from your home and don’t have a quiet room to yourself? Microsoft Teams Meetings has a feature for that. Use noise suppression to block out external sounds.
You can enable noise suppression right from the meeting:
- Go to the “More Actions” > “Device Settings” at the top
- In “Noise suppression”, choose “High”.
If you want your meeting attendees to hear your background sounds (e.g. you want their opinion on your amazing “Working from home” playlist), choose “Low”.
Get Meeting Attendance
Recording your meeting attendance is not just important for company accountability, it also helps you keep track of who was present for important decisions and customer calls.
You can keep a record of a Microsoft Teams meeting’s attendance a few different ways:
- From inside the meeting by hitting “Show participants” > “More actions” > “Download attendance list”
- After the meeting by clicking “Attendance report” in the meeting notification in your channel’s Posts tab (the notification pops up right after a meeting ends).
- If the meeting was scheduled in the Calendar app, you can get your list by clicking the meeting reminder in the schedule and going to “Attendance” in the top toolbar.
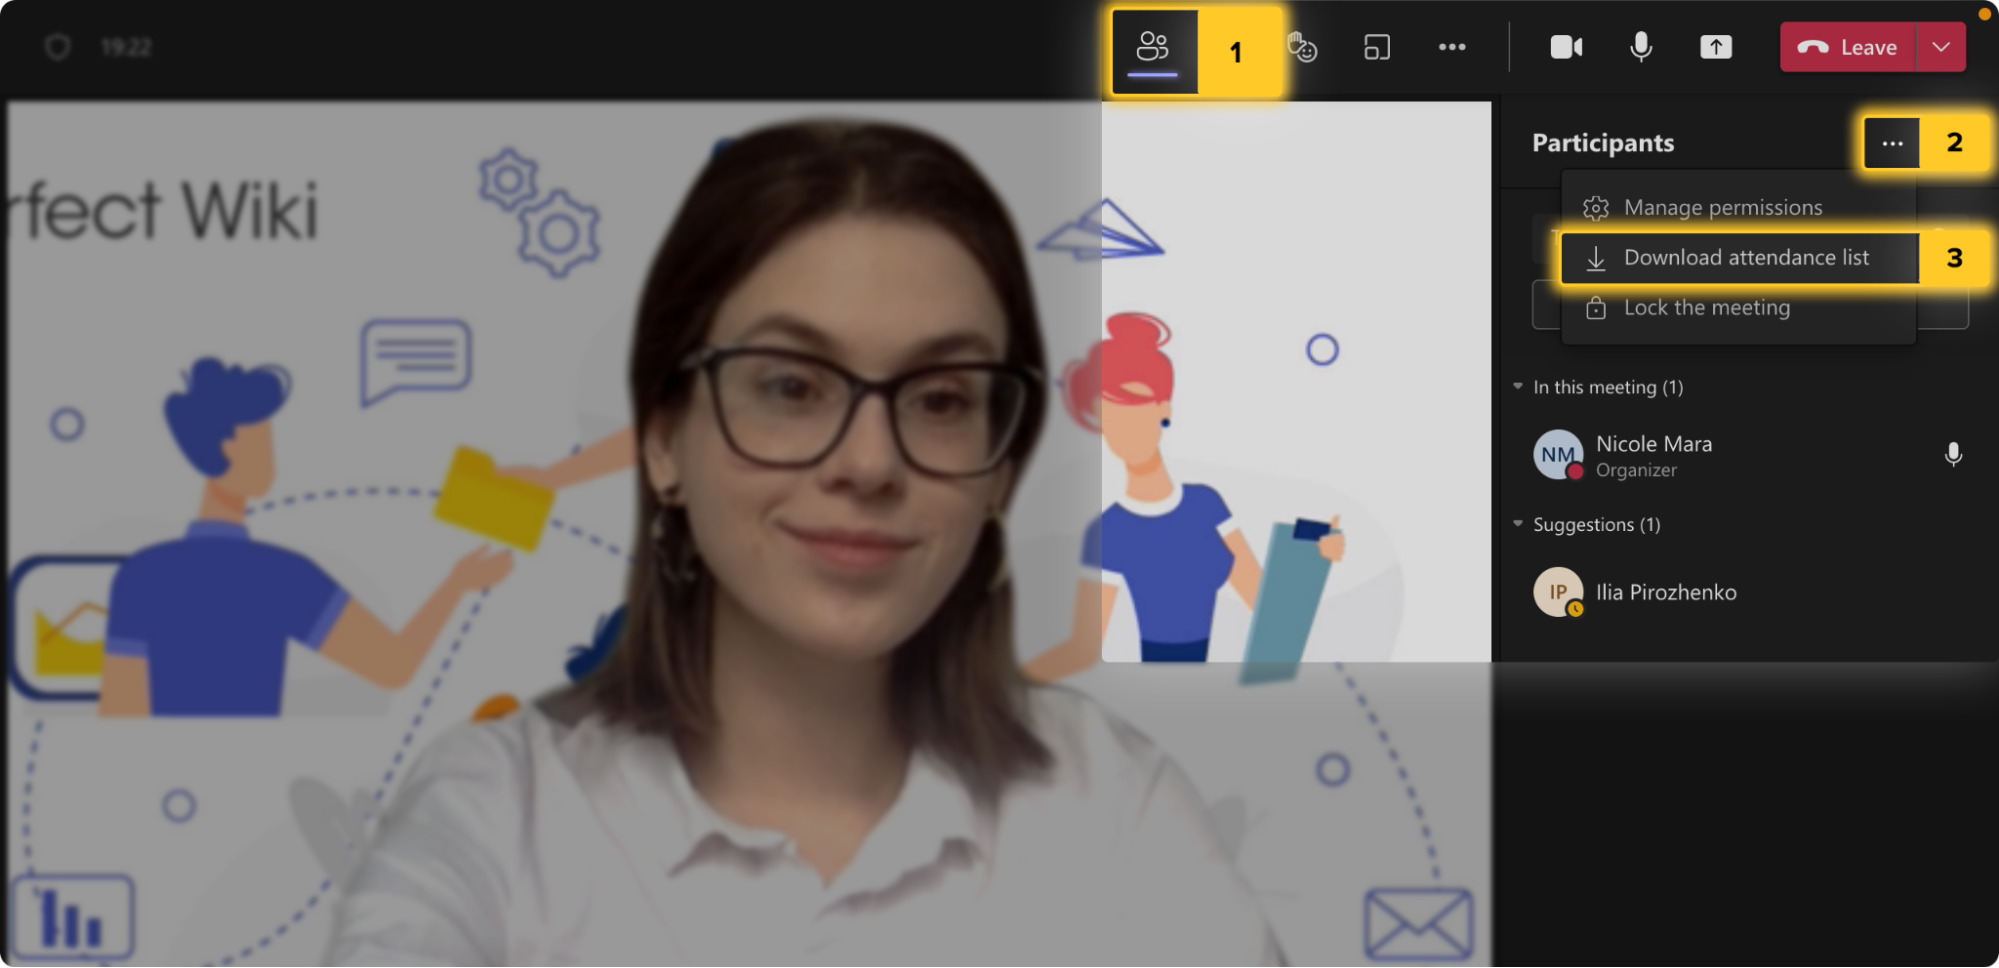
If you value punctuality and want to prevent people from entering a Microsoft Teams meeting after it has started, you can lock the meeting:
- Go to “Participants” in the top toolbar of the meeting
- Hit “More actions” > “Lock the meeting”
You can always unlock the meeting, but if it’s in “Locked” mode, no one from will be able to join it from MS Teams or from externally shared links.
Transfer Meetings from One Device to Another
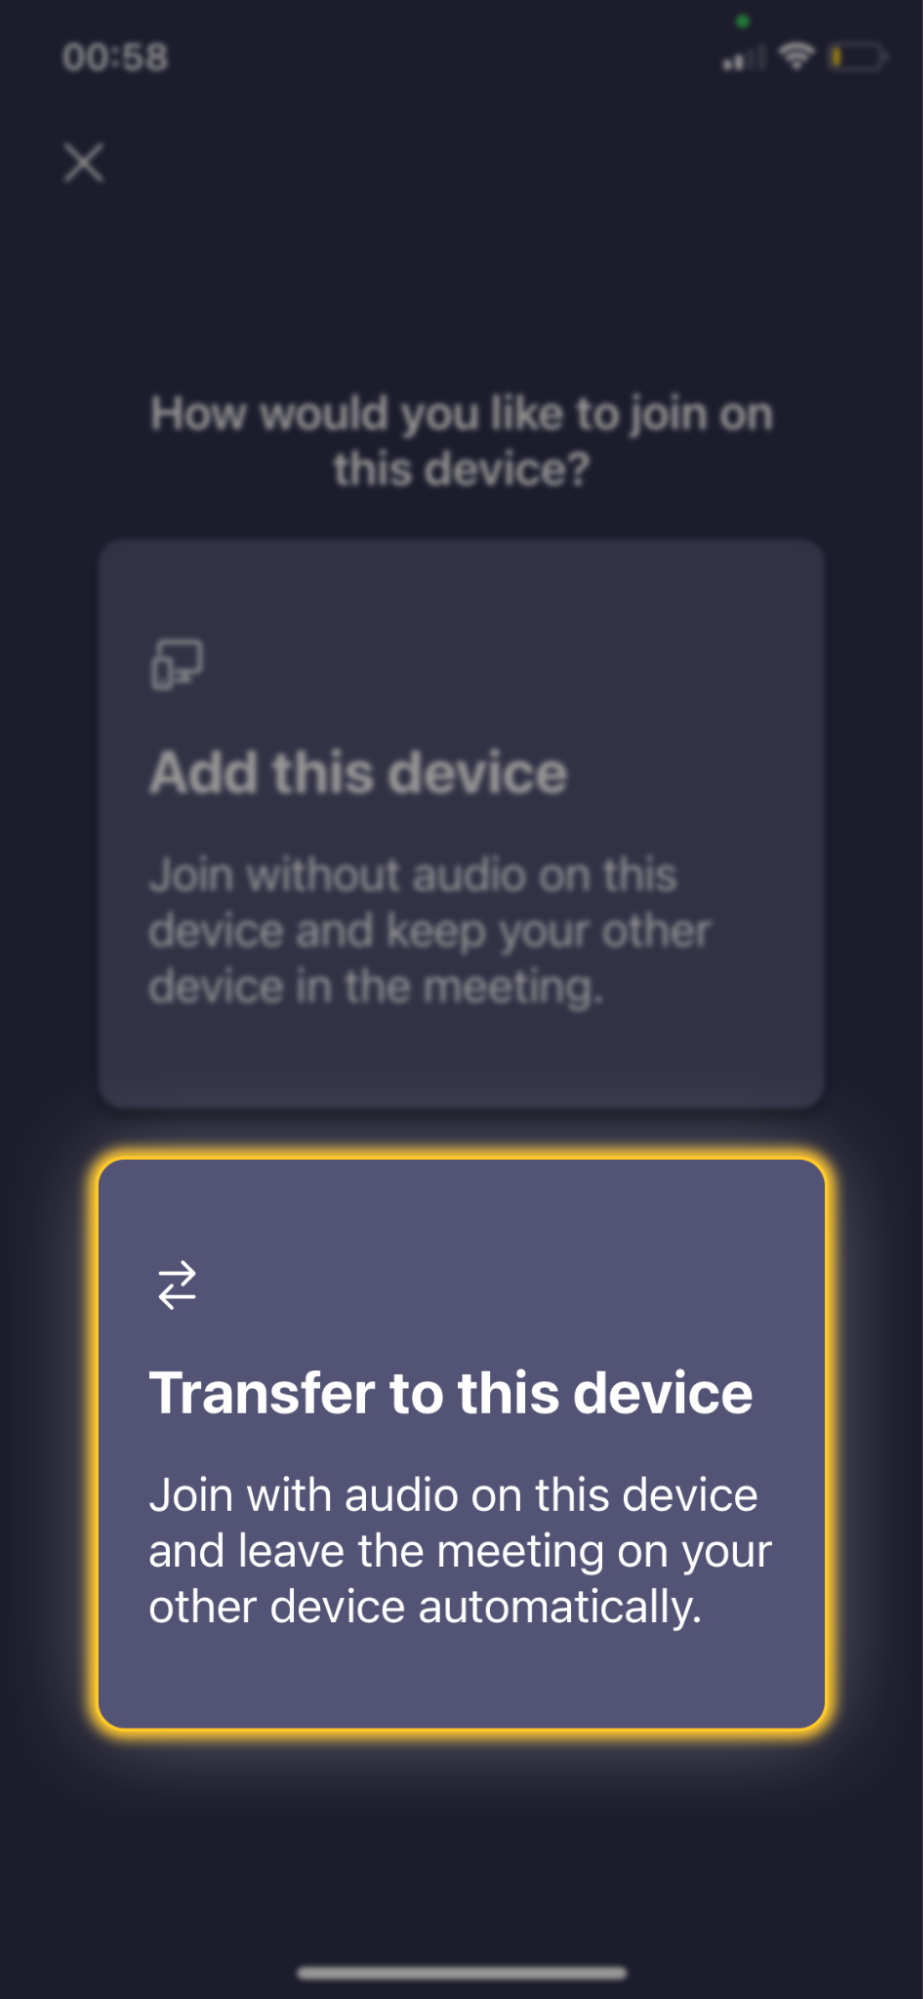
Are you in a team meeting from your laptop, but you need to run an urgent errand while staying connected? No problem, Microsoft Teams lets you transfer the meeting you’re in straight to your phone (or vice versa).
To transfer your meeting presence from one device to another:
- Go to the team where the meeting is happening and hit “Join” (as you would if you were just joining a meeting as usual)
- In the window that pops up, choose “Transfer to this device”.
Note:
Microsoft Teams will let you mute yourself and turn off your camera before you join the meeting from your second device.
Work in Small Groups with Breakout Rooms
Team building is more important now than ever—with so many companies working remotely, it’s easy to feel disconnected from your team members.
With Microsoft Teams’ breakout rooms, you can do small group and one-on-one discussions in your meetings, and help your users get to know each other better! Breaking up your large meeting into smaller groups is also a great way to do focus group brainstorming.
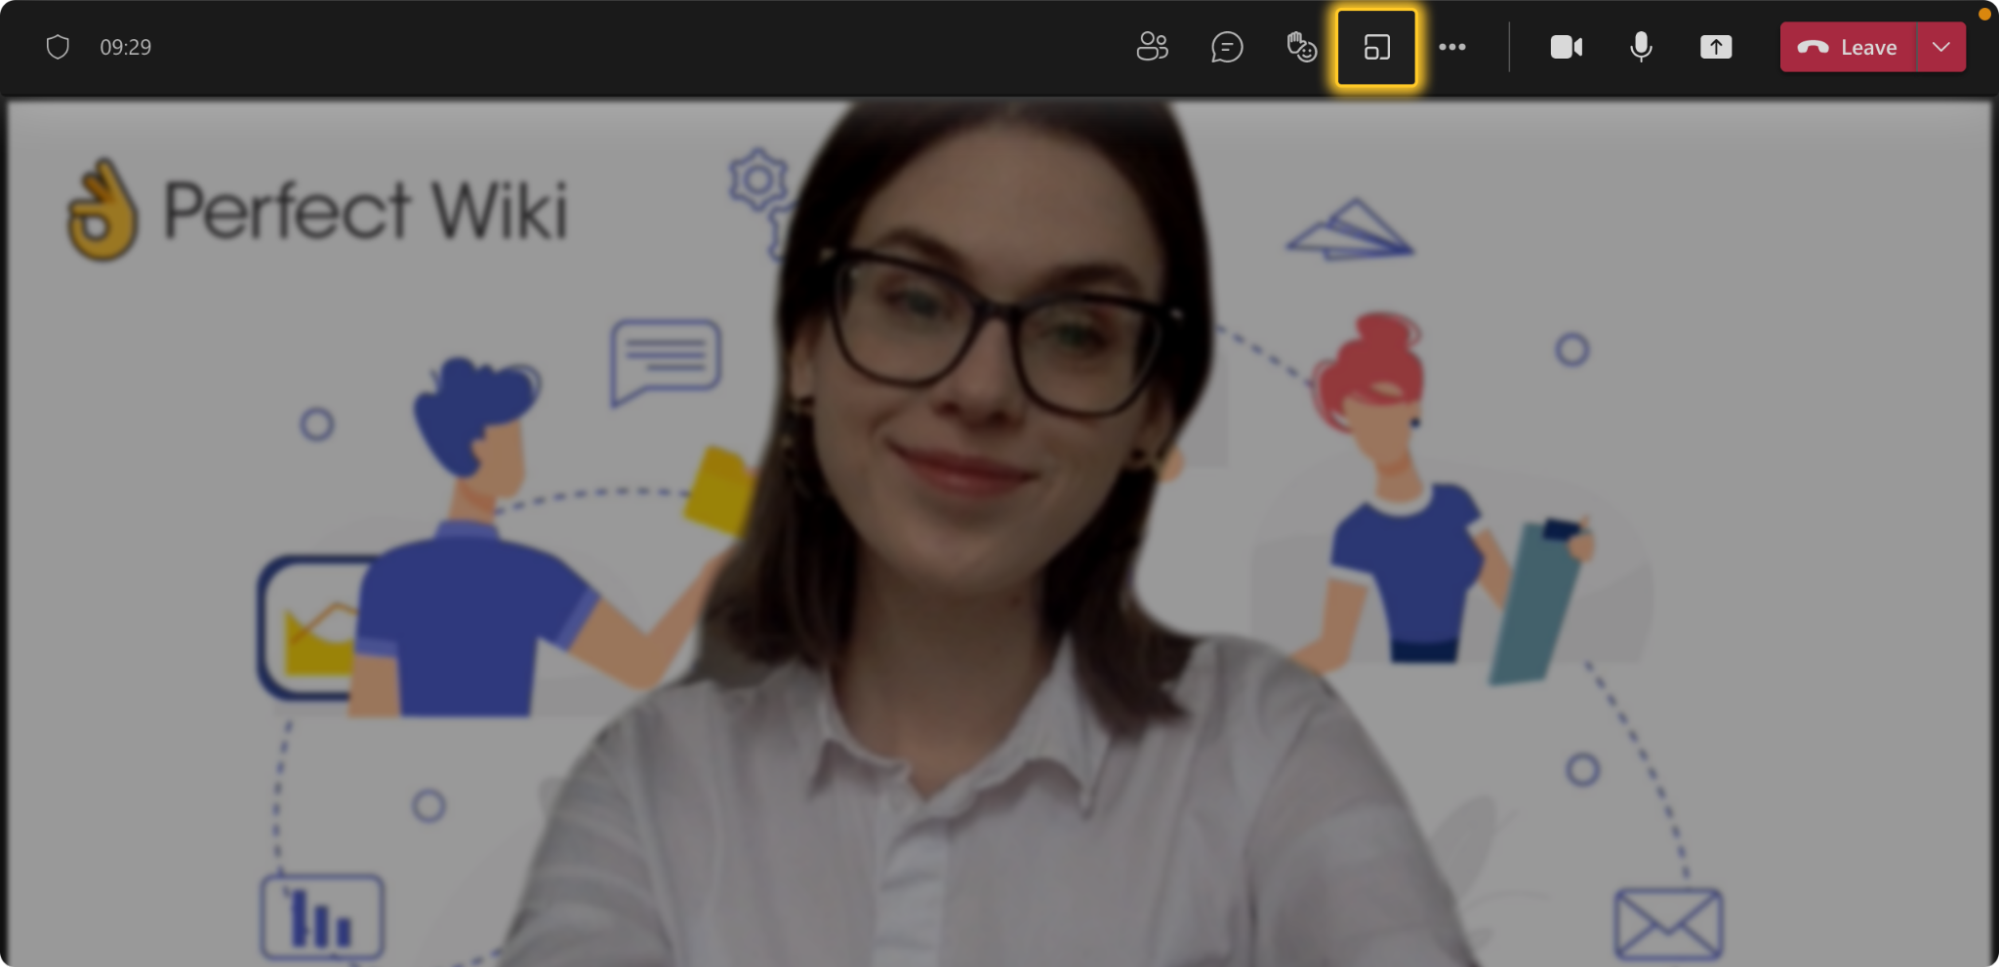
You can split your meeting attendees into small groups any time during the meeting, here’s how:
- Go to “Breakout rooms” in the top toolbar of your meeting
- In the pop-up window, choose between randomly assigning attendees to rooms or selecting the groups yourself
- Choose the number of rooms (groups) you want.
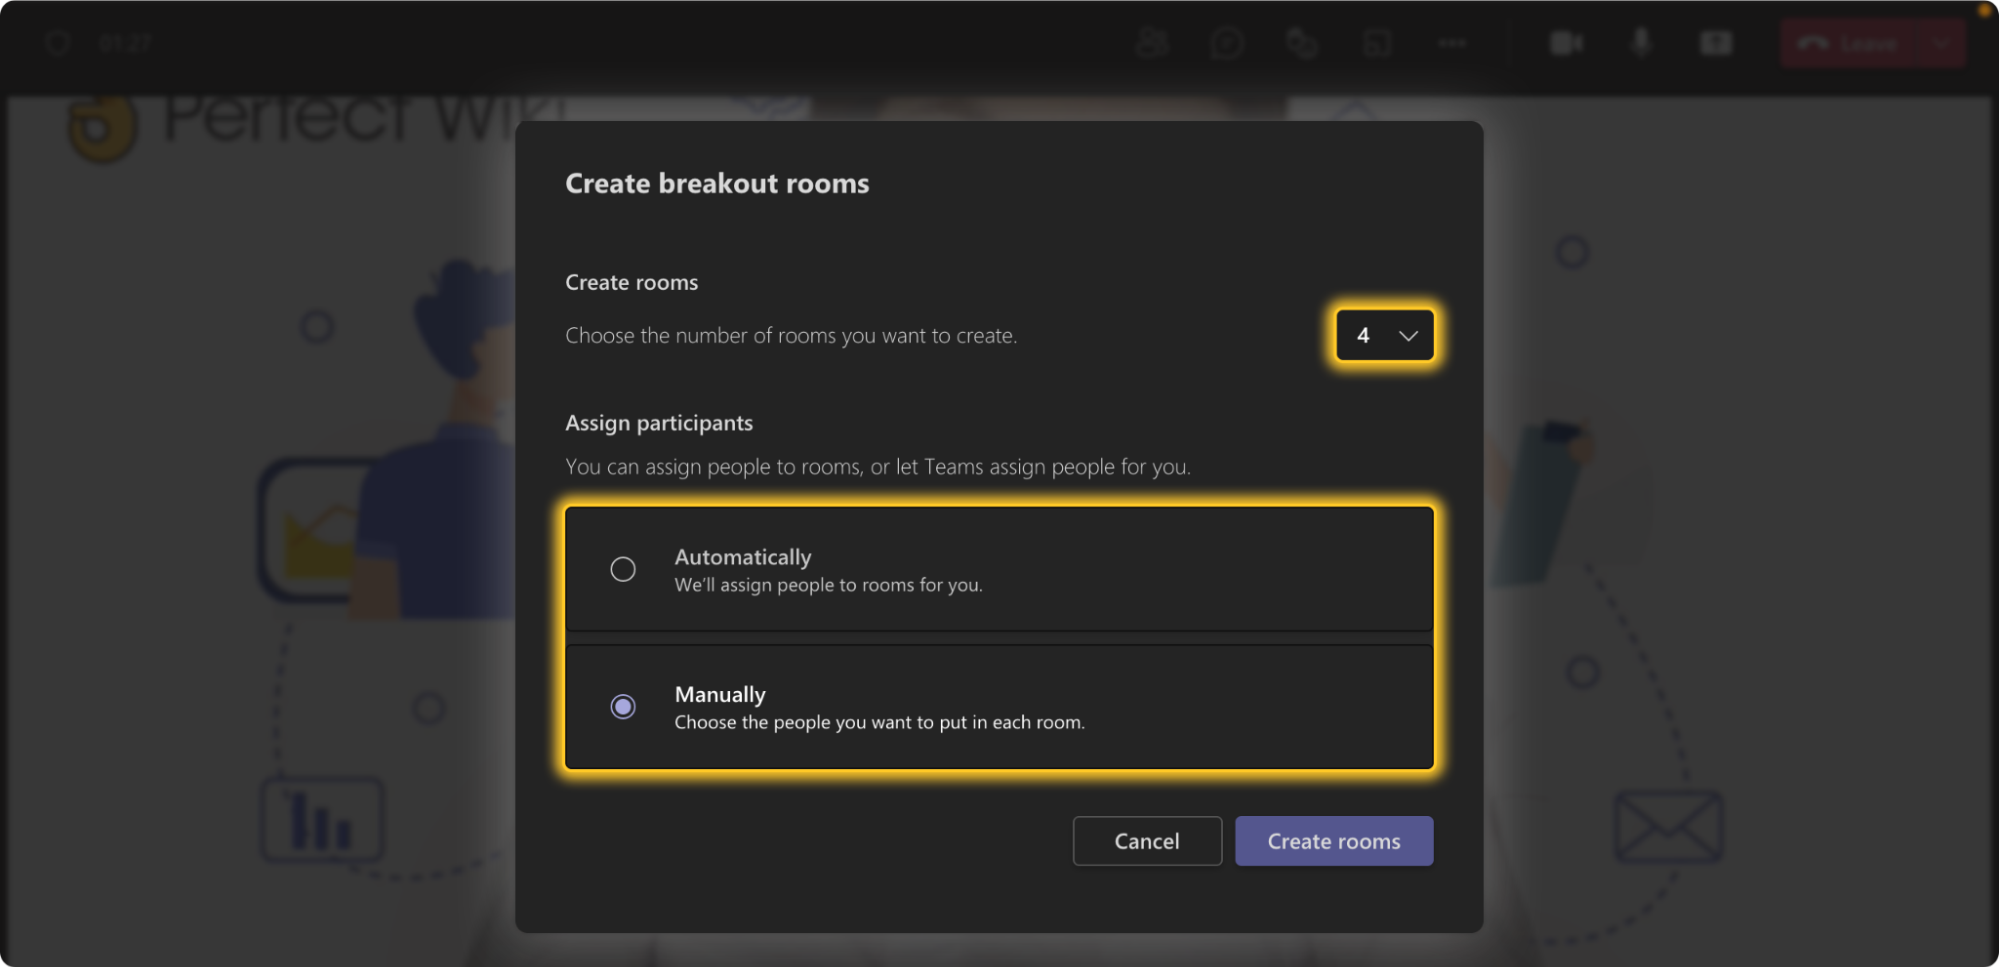
If you choose to manually assign users to breakout rooms, you will be redirected to do so after hitting “Create rooms”.
Note:
Only the meeting organizer can create and manage breakout rooms.
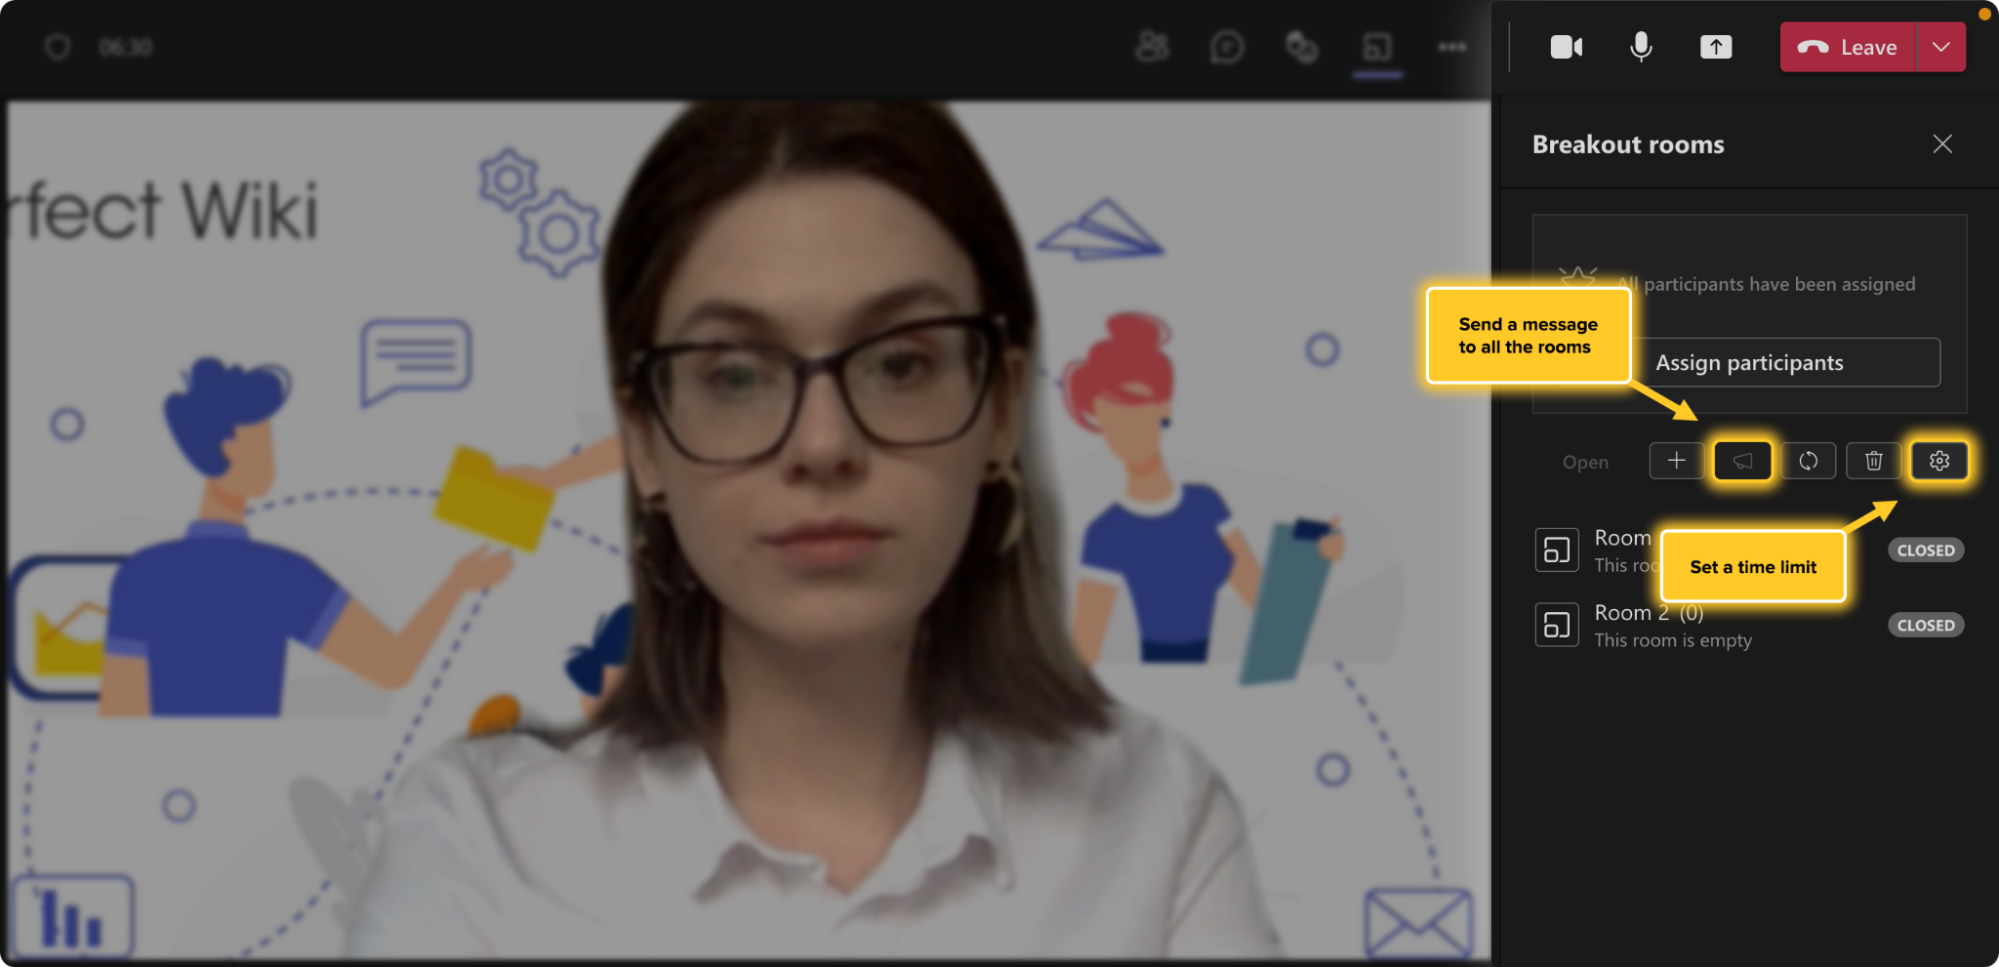
Once your breakout rooms are up and running, you can customize the time limit for small group work in the “Settings” menu, and you can send an announcement to all the groups while they’re still in breakout rooms (e.g. “Time to wrap it up, guys!”). Once your set time limit runs out, the breakout rooms will close and everyone will automatically return to the general meeting room.
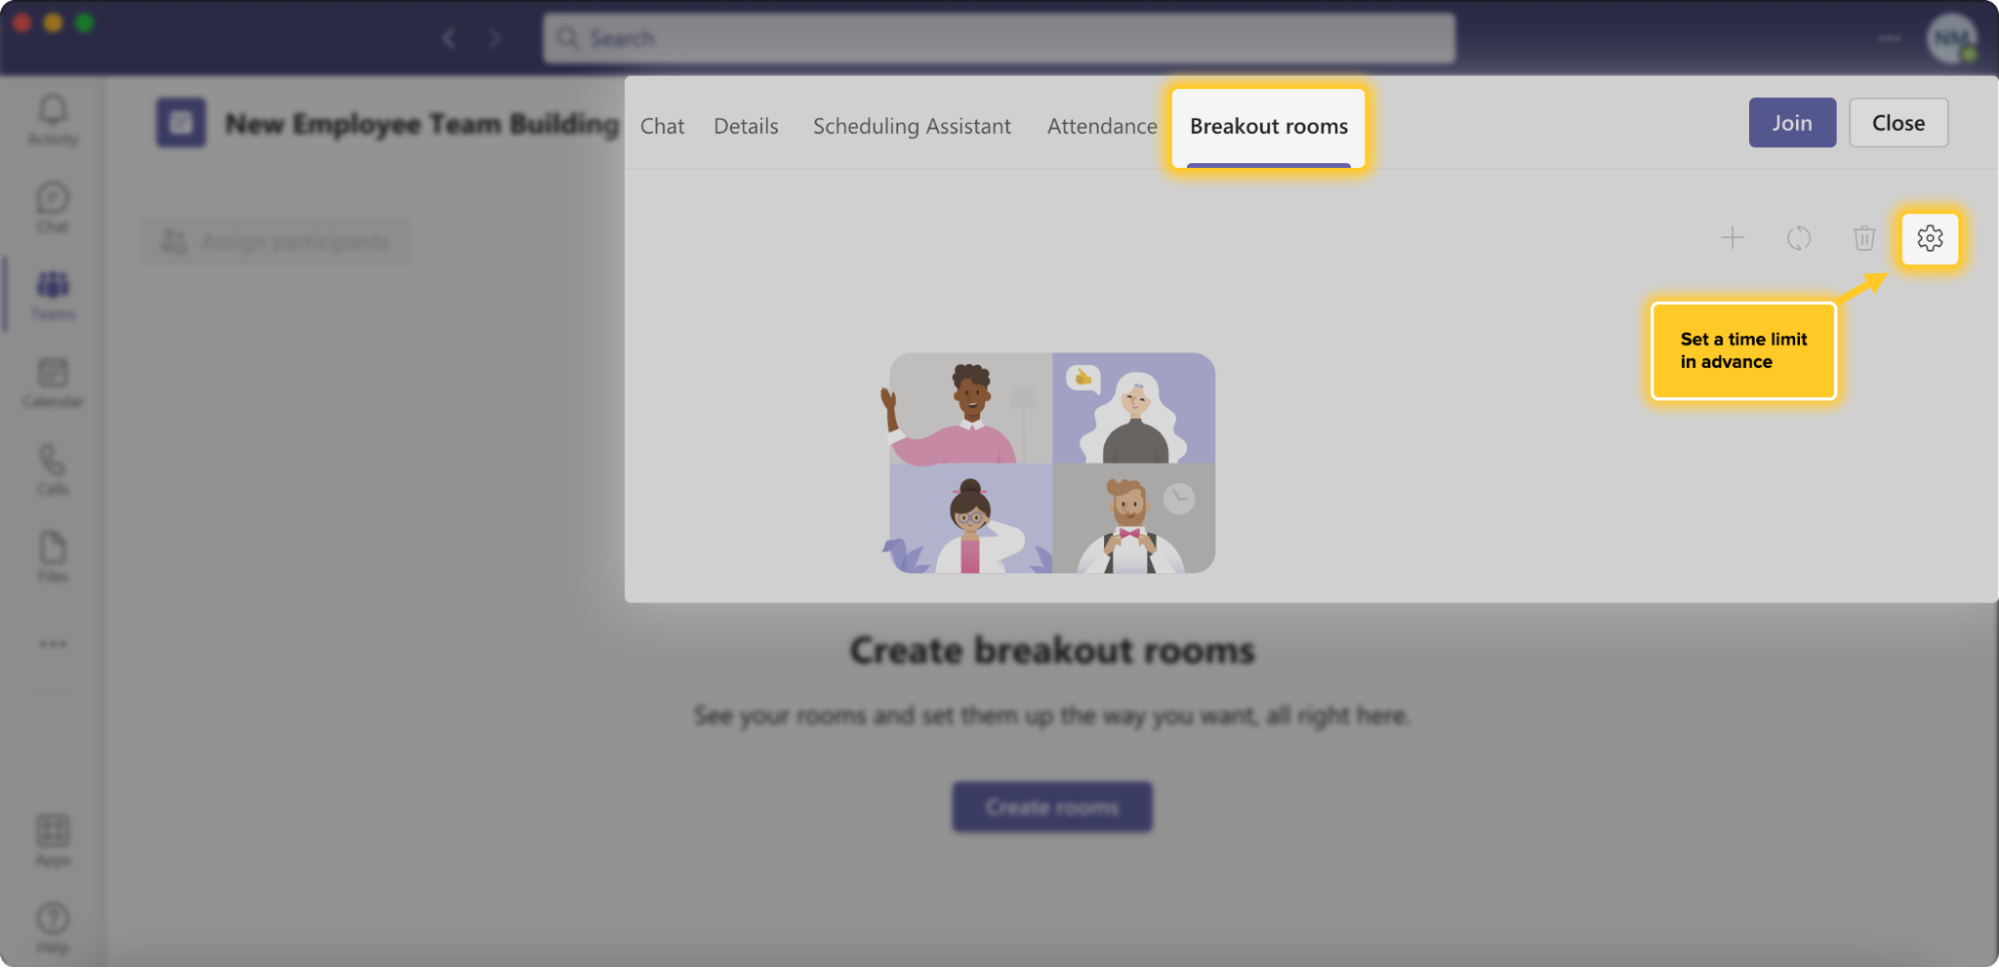
To set up breakout rooms for a meeting in advance, schedule a meeting the way you normally would in a channel (learn how to schedule meetings here), and after scheduling follow these steps:
- Hit on the Calendar reminder for the upcoming meeting in your channel’s chat (or find the meeting directly in your Calendar)
- Go to the “Breakout rooms” tab in the top toolbar
- Hit “Create rooms” to set the number of rooms you need, and “Rooms settings” in the top right to customize the rooms (e.g. set a predetermined time limit).
Pro tip:
Breakout rooms can also be used when you need to have a quick one-on-one chat with someone in the meeting. Simply set the number of breakout rooms to “2,” and assign yourself and the other user to one of the rooms, while the rest of the team continues the general meeting.
Create a Visual Brainstorm with Microsoft Whiteboard
We covered screen sharing earlier in this post, but we saved the best part for last—the Microsoft Whiteboard. It’s an MS Teams app that is already installed in your workspace and can be used right away in any meeting.
With Whiteboard, you and your meeting attendees can brainstorm in one creative space together.
To do this, go to “Share content” > “Microsoft Whiteboard”.
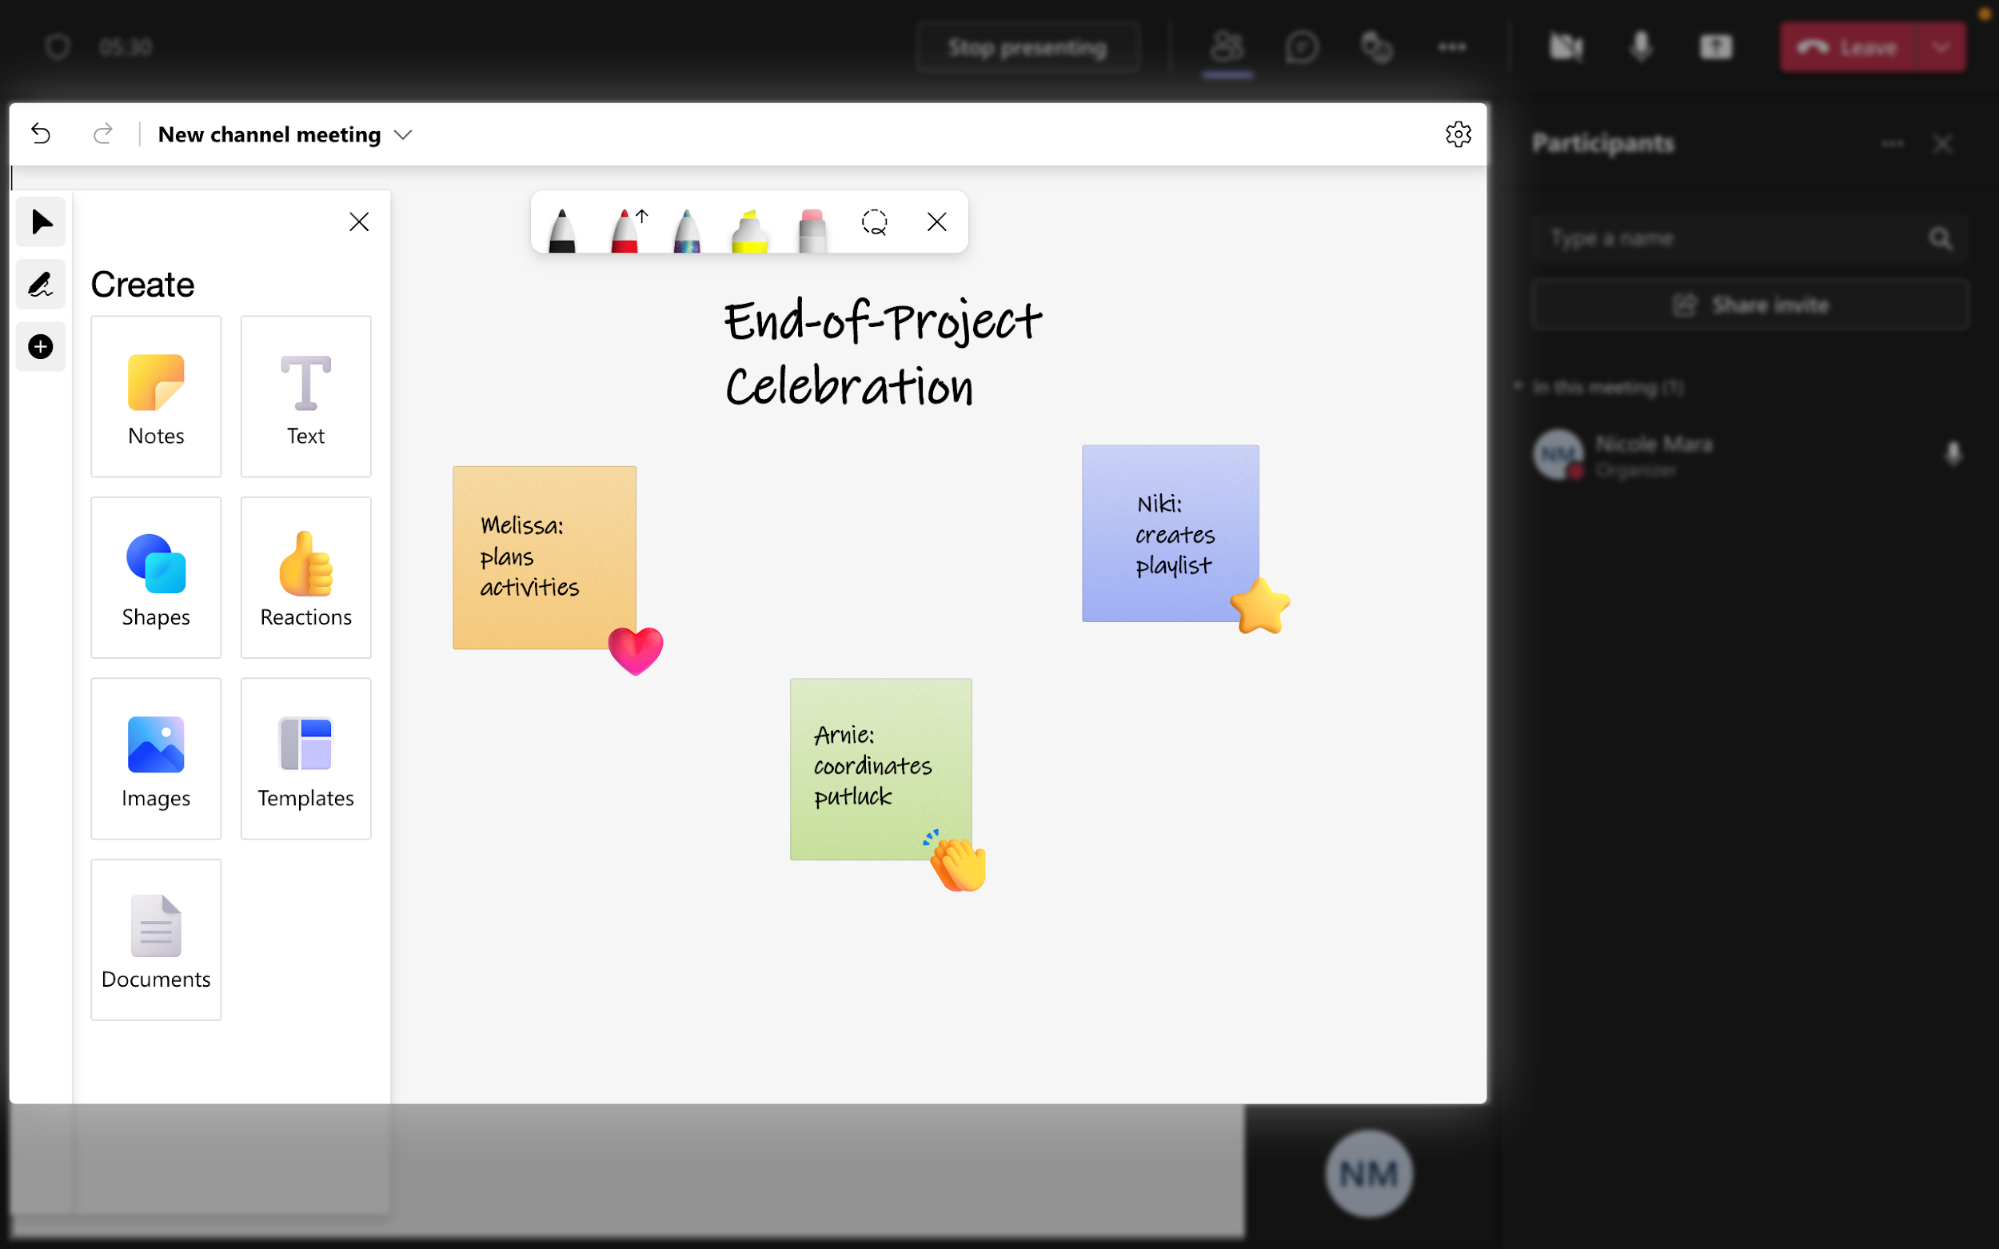
Anyone in the meeting can interact with the whiteboard with post-it notes, reactions, and sketch tools, and you can save your brainstorm masterpiece by hitting the “Settings” icon in the top right corner of the whiteboard and selecting “Export image”.
Final Thoughts
Congrats on completing our mini-course on Microsoft Teams Meetings! We at Perfect Wiki value remote collaboration that is as authentic and versatile as in-person collaboration, so we use MS Teams Meetings, and we hope you will feel more confident using them for your teamwork as well.
Of course, we’re biased when it comes to productive and hassle-free collaboration—that’s what our app was designed to do. Perfect Wiki is a company resource tool that provides pages for you to store and share your user guides, Standard Operating Procedures, marketing strategies, and more.
And we integrate seamlessly with your Microsoft Teams workspace, so you never have to think about switching between apps again.
Try Perfect Wiki for free for 14 days, no credit card required, and see just how easy it is to create a shared body of company knowledge, policies, and best practices right in your Microsoft Teams channels.
Like what you’ve read? Pass this post on to a fellow administrator or team manager—we’re positive they will learn something new about Microsoft Teams Meetings.


