


Microsoft Teams is an amazing place to bring your team together to work on everything from large-scale projects to one-on-one communication. We have been using Microsoft Teams from the very start, and we firmly believe it’s one of the best productivity workspaces out there.
With the impressive number of tools and apps that Microsoft Teams provide, it’s easy to get lost in the woods and miss out on many of its awesome functions. You and your team might not be making the most of one of MS Team’s best features yet — channels.
Note
: In this article we are assuming that you have an admin account in Microsoft Teams, not just a member or guest account.
So what are Microsoft Teams channels?
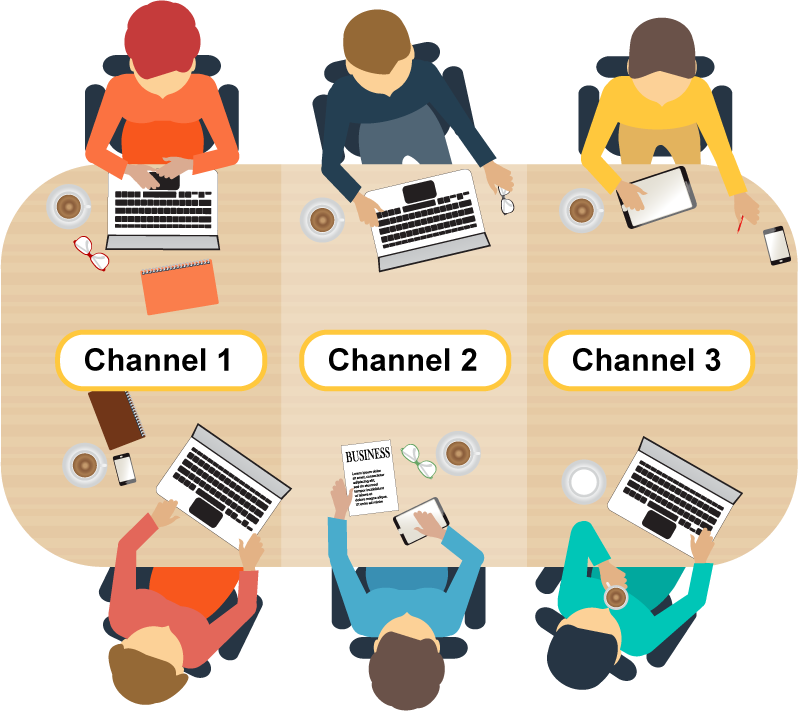
Channels are groups in a team that you can use to separate discussion and collaboration by topic, project, or department. They allow you or a team member to split your company teams the way you would in a physical office — group the people who work together the most into the same physical (in this case, digital) space.
By using channels, you organize each team into subgroups that have their own set of files, their own conversation hub, and their own tabs and apps that help them meet their goals.
What does this look like in Microsoft Teams?
Let’s say you are an executive at a large marketing firm, and you have your ongoing projects separated into teams. You realize that a lot of information gets lost in the teams’ “General” channel, because that’s the only space the whole project team can communicate with each other.
So you give each project group on your teams their own channel: Design and Visuals, Client Support, Copywriting, and Marketing Plan.
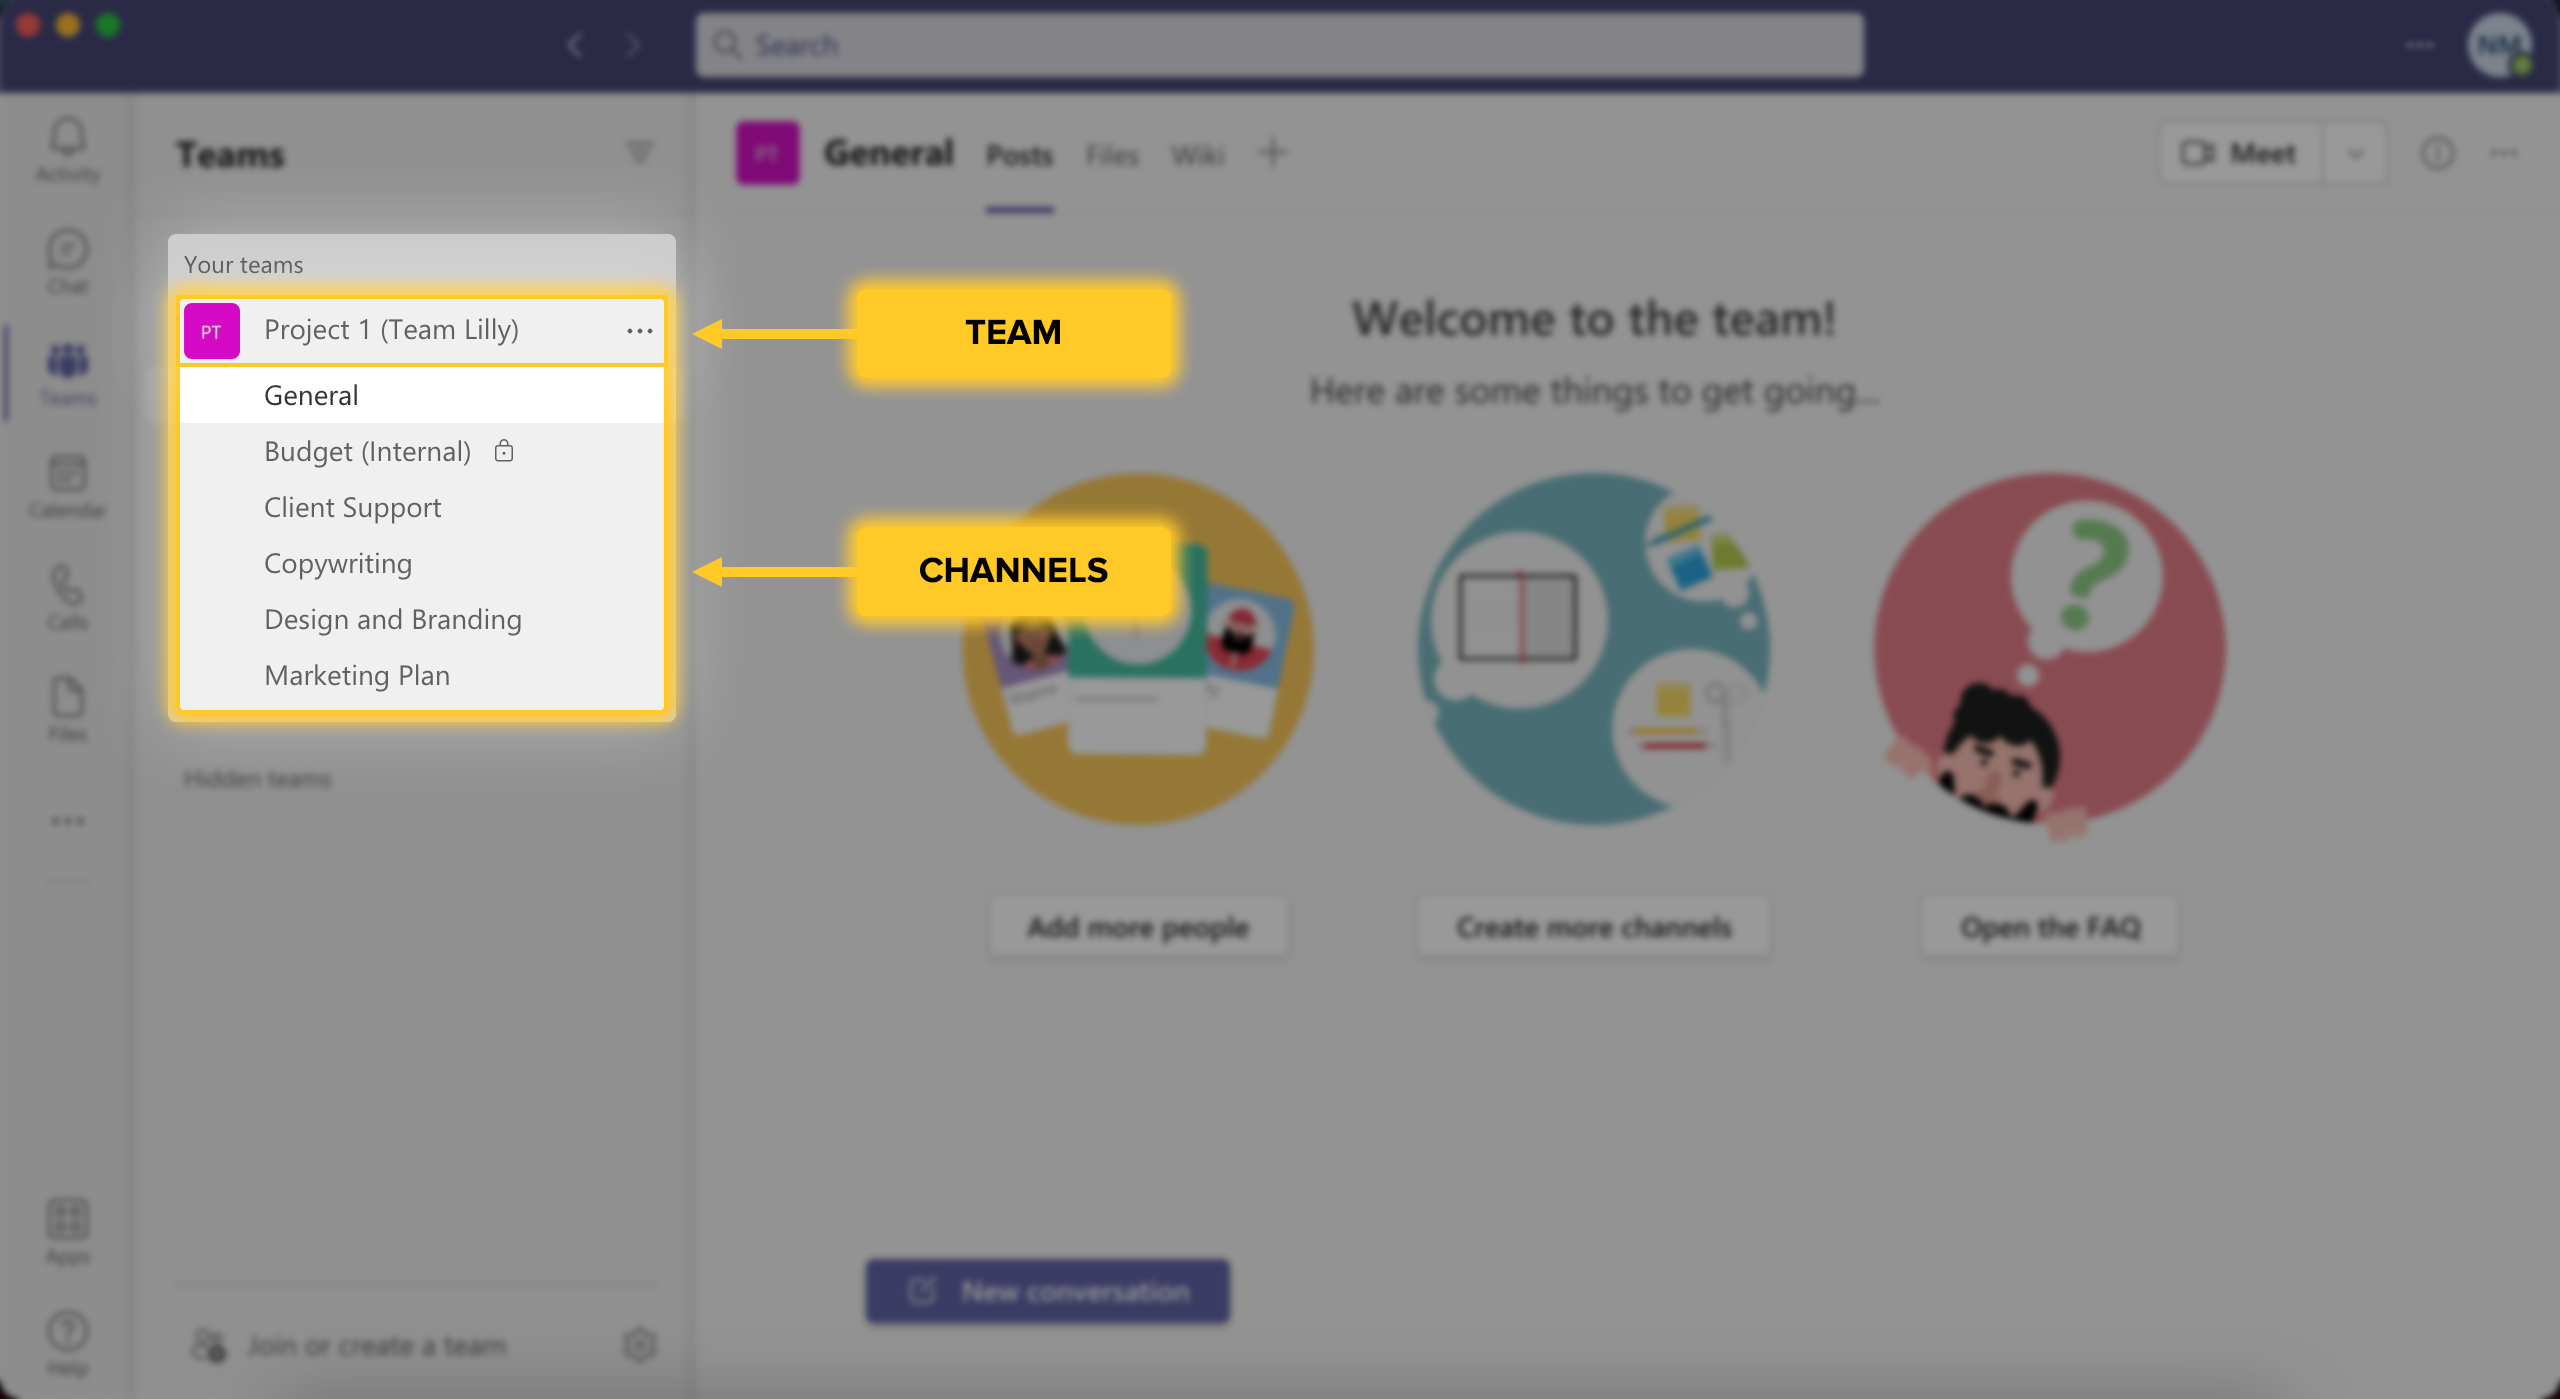
Now Project 1: Team Lilly can have focused conversations in separate subgroups, and keep visual mockups out of the General channel, where they might get lost among invoices and team meeting agendas.
Now we’ll walk you through the process of creating and managing your own set of channels, and hopefully answer any questions you have along the way.
1. The Basics: Create, Organize, and Work with Channels
Teams vs Channels
Channels are subgroups in a team. They are the smallest workspace unit in Microsoft Teams, aside from private chats. Channels always exist inside a team and always in the one where they were originally created, and you can have as many as 200 channels in one team (including the “General” channel and any channels you delete along the way).
Pro tip
: There are only 2 ways to separate Teams members into smaller sections: teams and channels. Subchannels are not a thing in Microsoft Teams (yet?).
All the members in a team are part of every standard channel. If you want to have a channel that only select members on a team have access to (for more confidential discussions), you will need to make a private channel.
You may have multiple teams in your workspace, or maybe your whole company is in one big team—that’s when you may find it useful to break up groups of people into channels to streamline work.
| Teams | Channels |
|---|---|
| Used for grouping by large departments | Used for focused work in smaller groups |
| Exist within your MS Teams workspace | Exist within a team |
| Communication through private chats | Communication through group messaging, virtual meetings and file sharing |
When to Create Channels
If you’re wondering whether you need to break up your teams into smaller groups, ask yourself these questions:
- Is the team’s General channel getting cluttered with too much information?
- Do my employees need separate spaces to share files and conversations directly related to their line of work?
- Will giving each focus group in my team their own set of apps, tabs, and a virtual meeting space increase their productivity?
If your answer to any of these questions was yes, then continue reading for a guide on how to get your channels up and running.
Pro tip
: Channels are great for short-term projects! You can delete them аfter the project is over and still keep the team running.
Create Channels
To create a new channel in an existing team, go to the dropdown “More options” menu next to the team name and click “Add channel”.
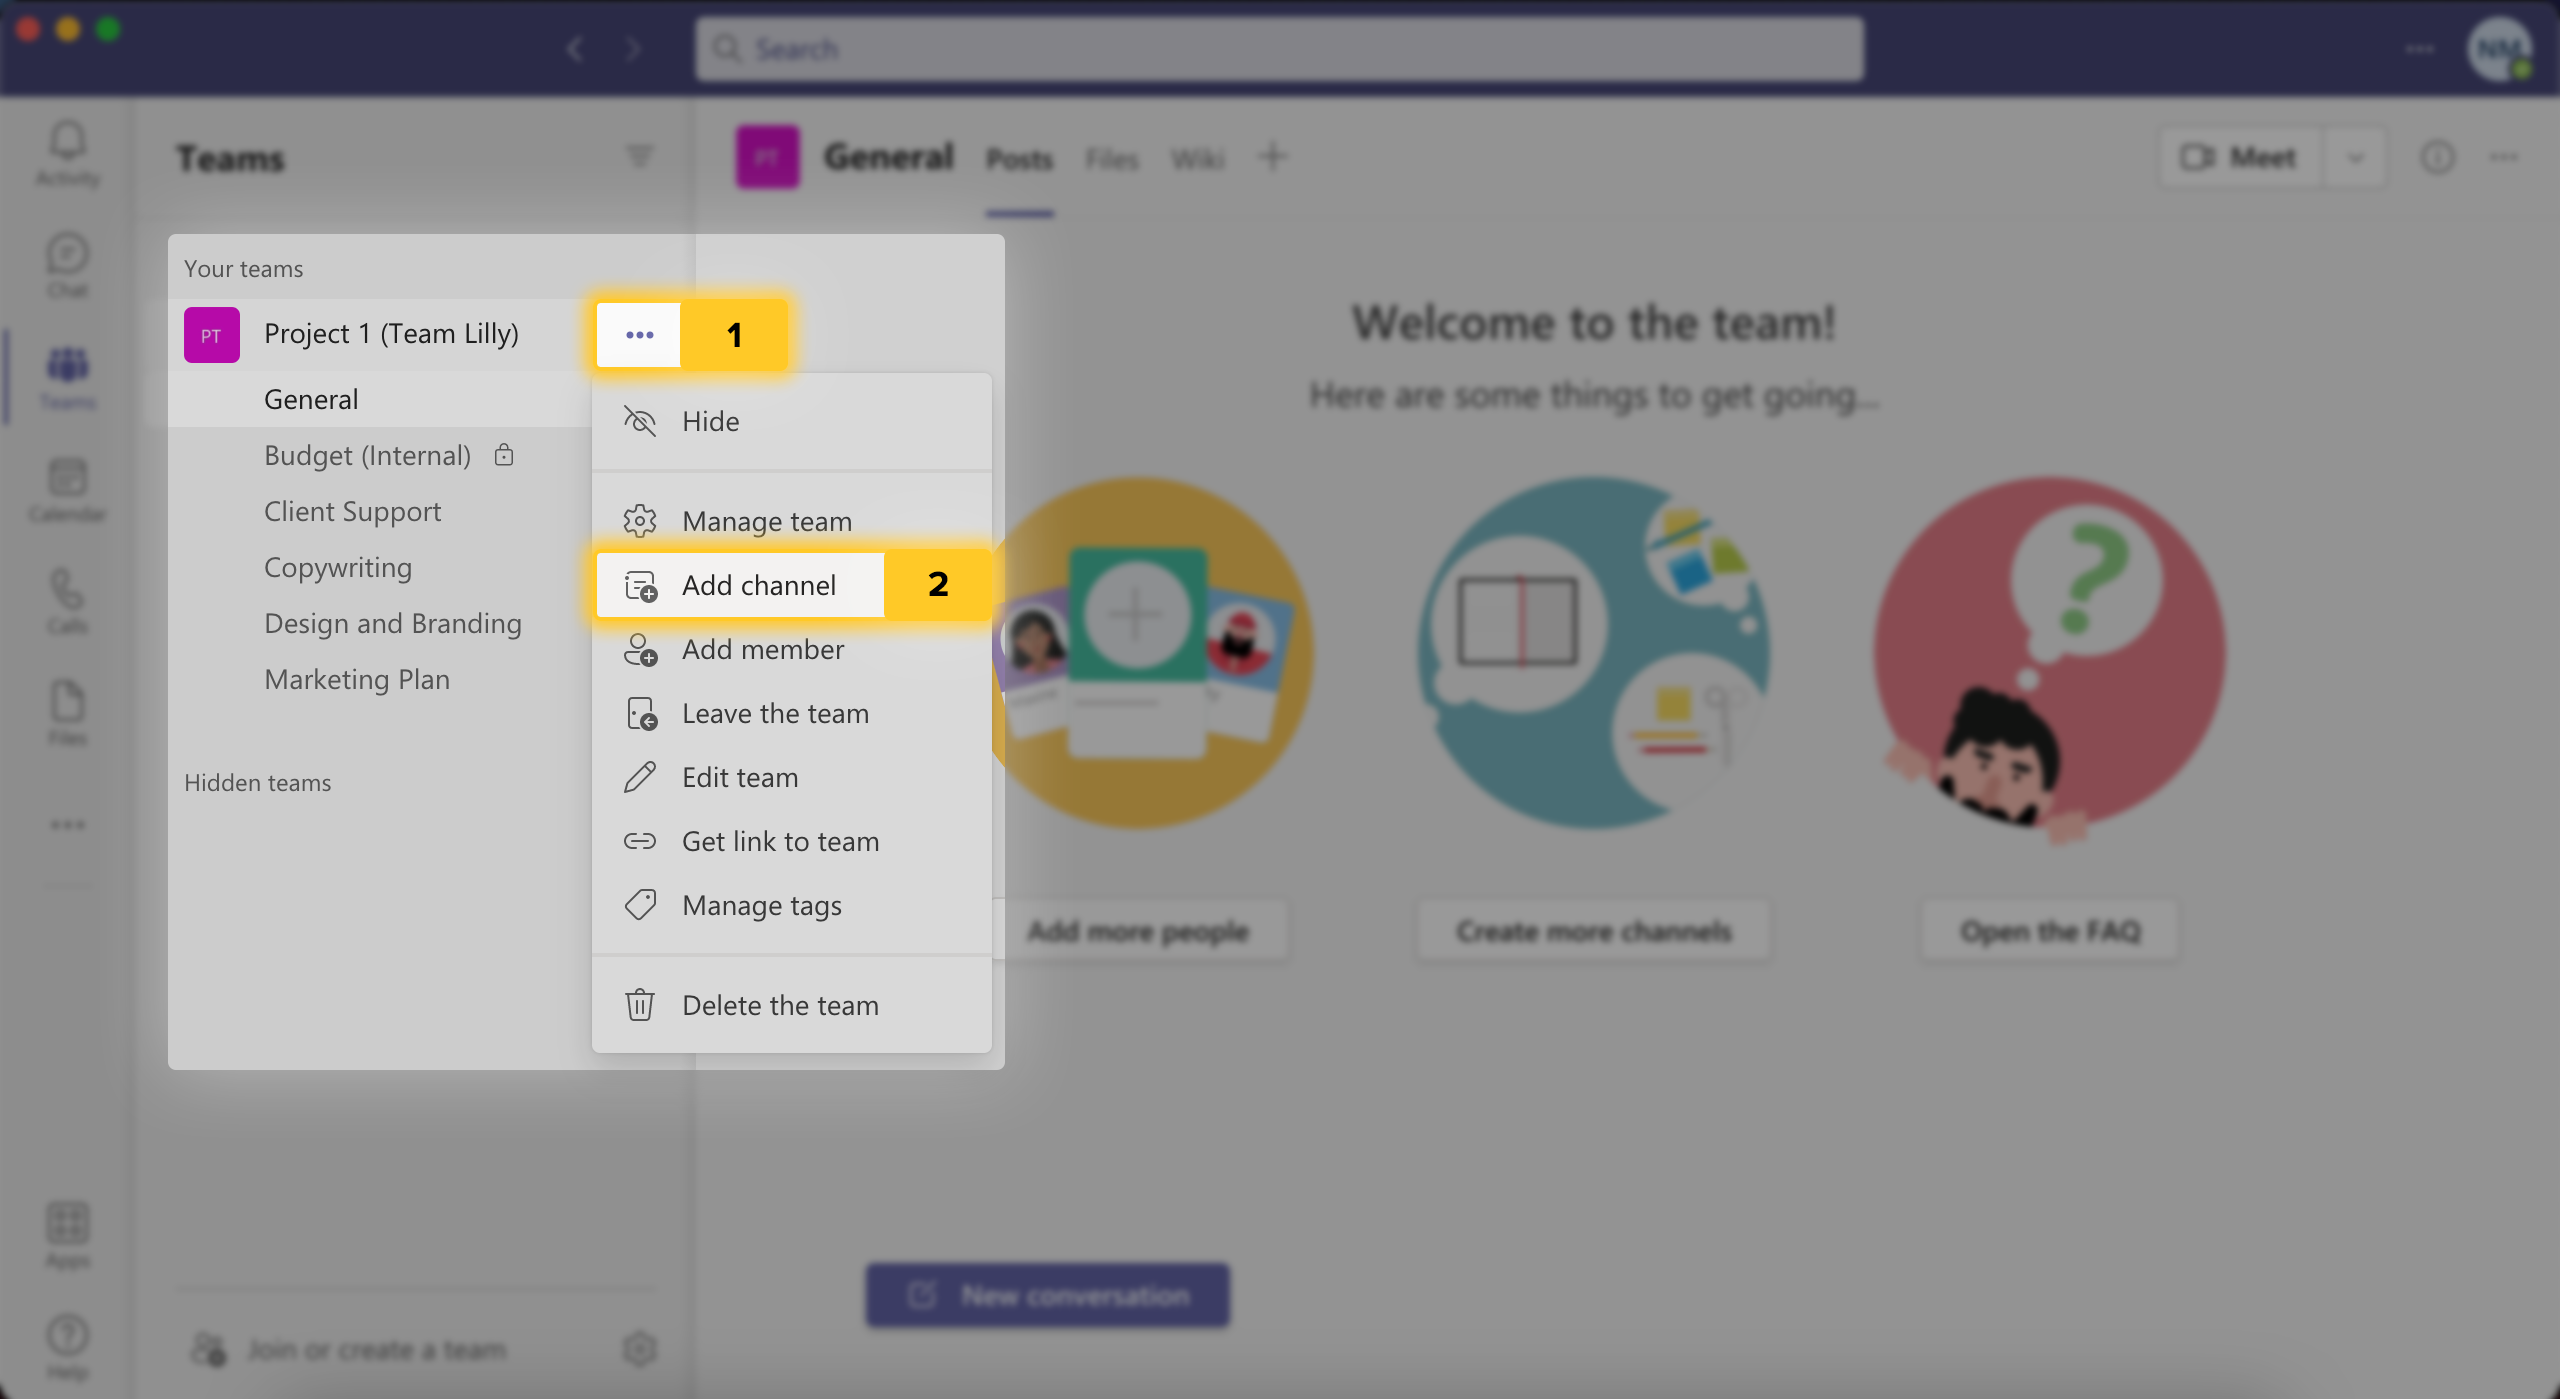
From there you are prompted to name the channel (you can always rename it by going to “Edit channel” in its dropdown menu), give it a brief description, and choose between a Standard or a Private channel (more on private channels here).
If you are starting a whole new team in your workspace and want to add channels from the get-go, Microsoft Teams will give you that option either by choosing one of their premade team templates or by clicking “Create more channels” on the General landing page.
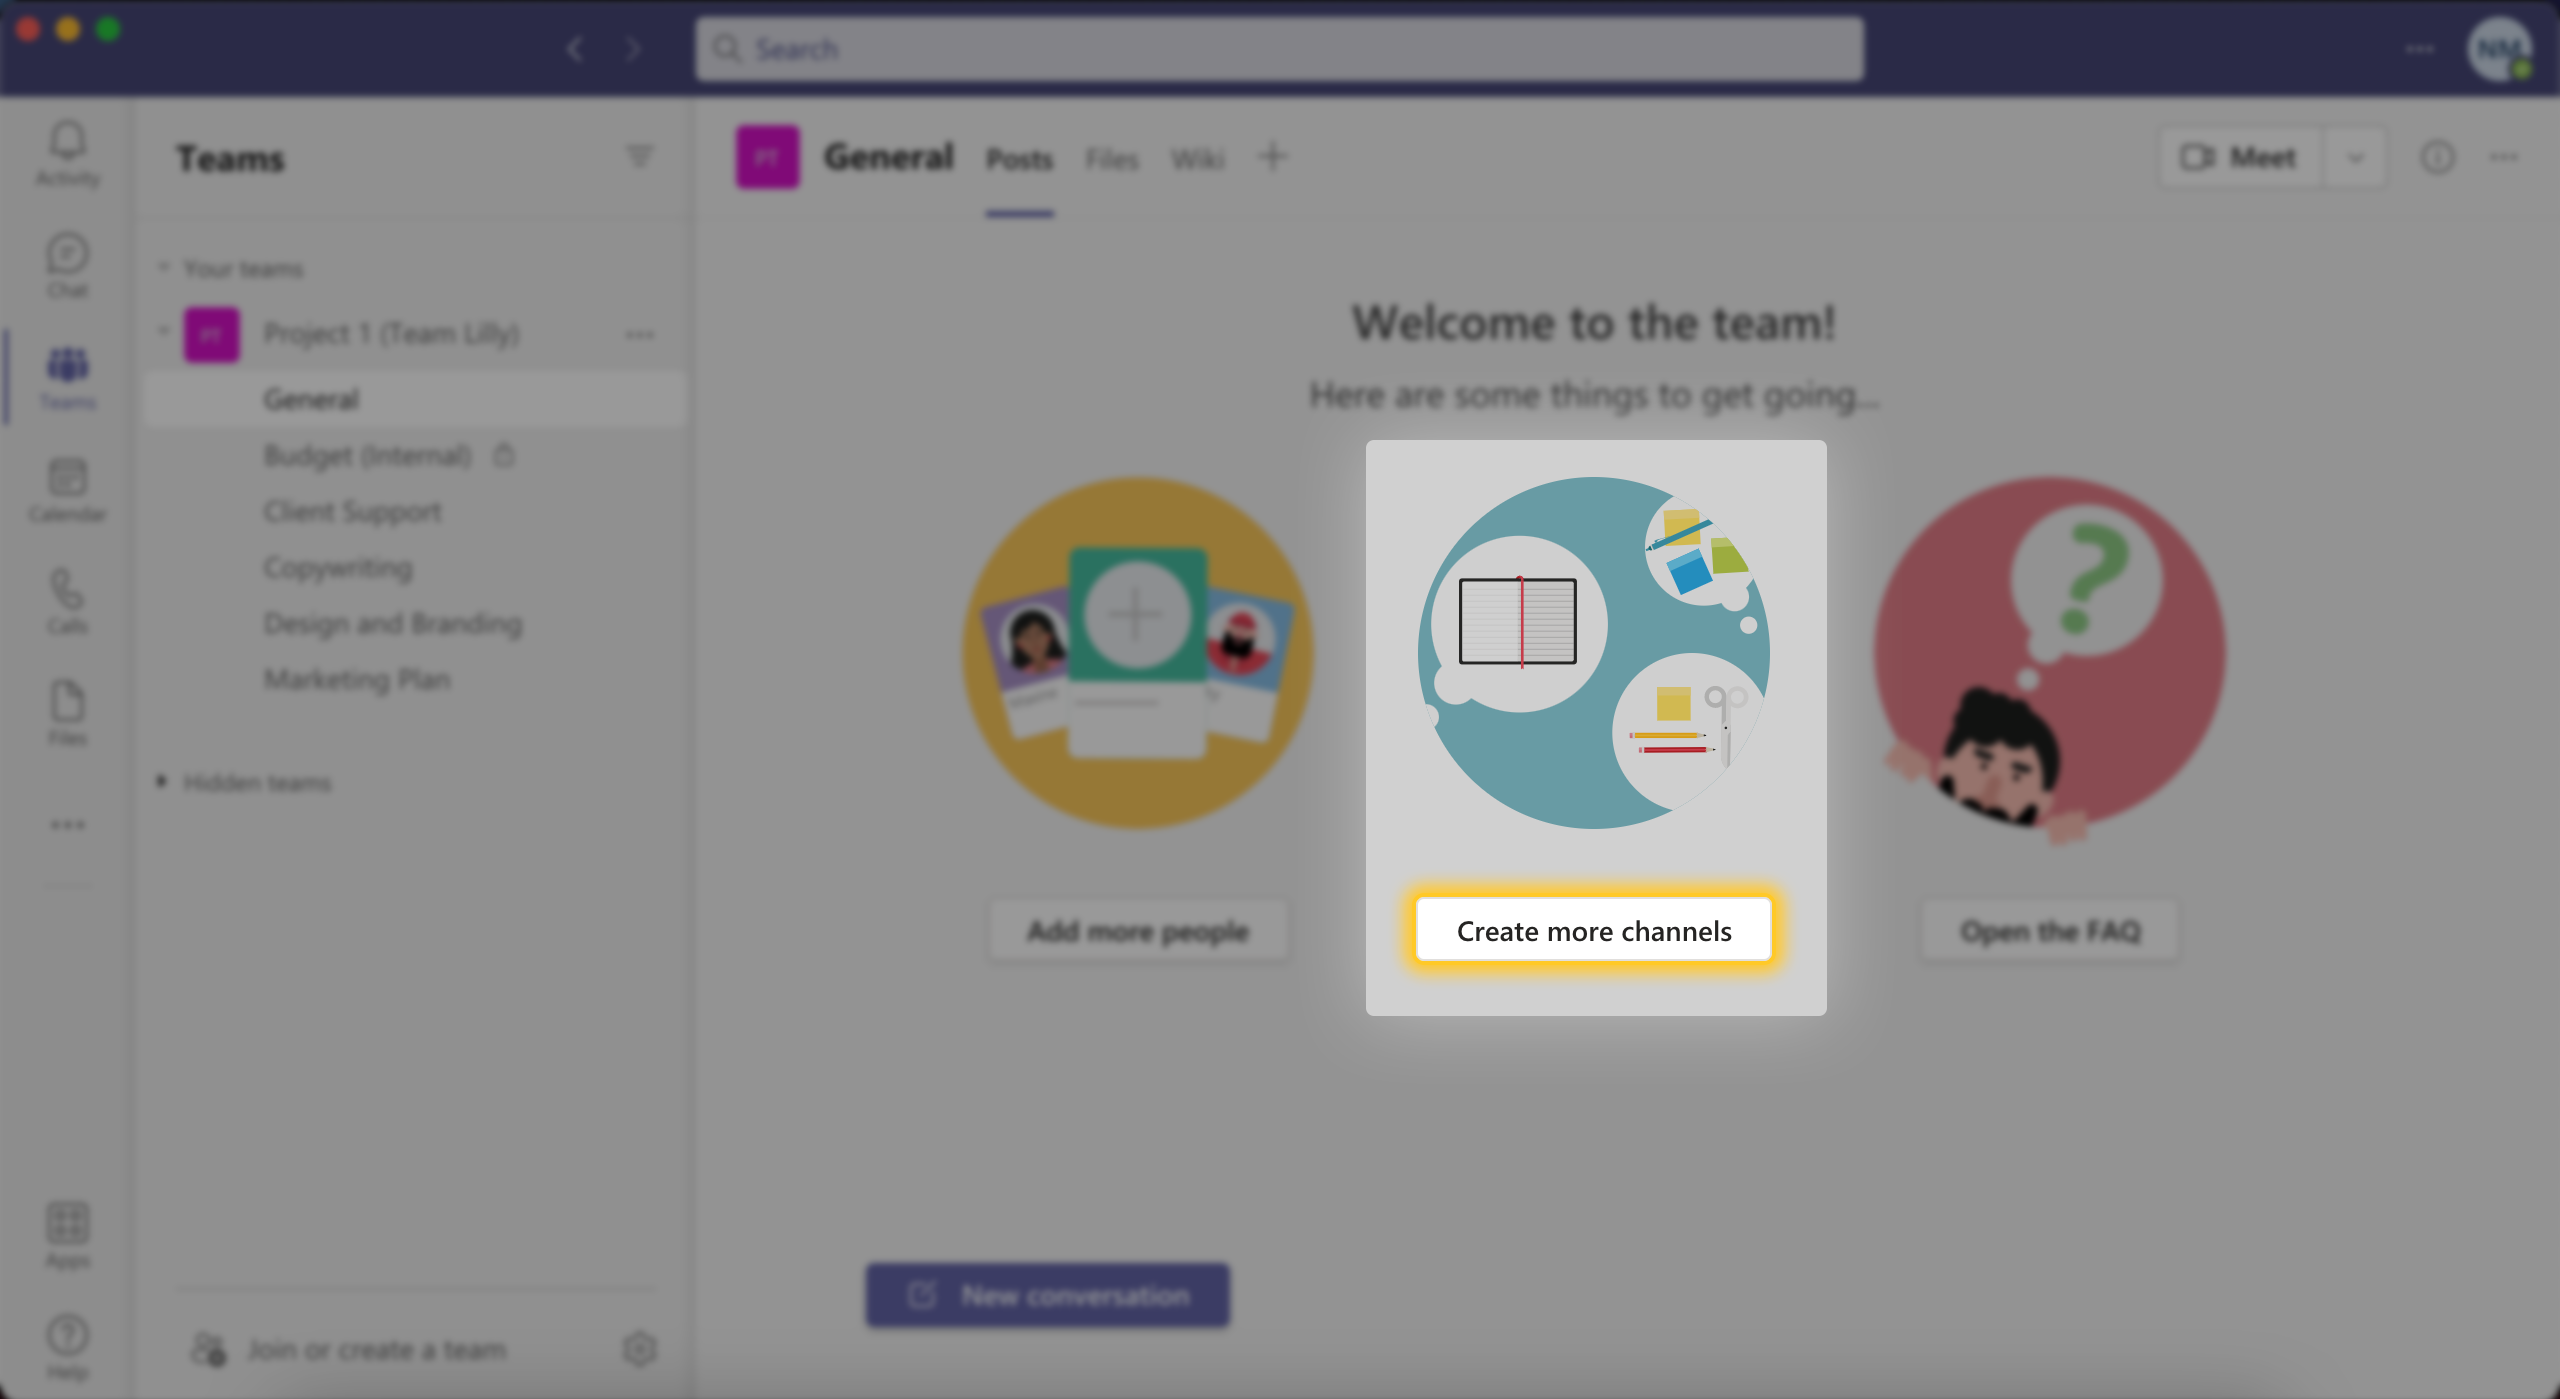
Either way, you will always have the option to add more channels to any team when you need them.
Organize Channels
Right now Microsoft Teams does not let you move channels around within a team or between teams. They appear (for you and your team members) in the order in which they were created.
If you want your channels to appear in a certain order, just be sure to plan that out ahead of time.
The “General” Channel
Every team in Microsoft Teams has a General channel. It is the default channel, and it can’t be deleted or hidden. So it’s up to you to use it in a way that fits your team’s needs!
For example, you can use the General channel to have discussions and meetings with the whole team, or to compile files that don’t really fit into any of your channel categories.
The general channel is your central team hub—all members of a team have access to it and this can’t be changed. You can, however, restrict who can post in the general channel: for example, give posting permissions to you and one other person and use the channel for top-down announcements.
Add New People to Channels
By default, all the members of a team will be added to all the channels (except for private ones). Unfortunately, you can’t add or remove users in select channels — you need to add or remove people from the whole team. That means if a user is no longer involved in a project in a certain channel and wants to leave (or you want to remove them), you will have to kick them out of the team altogether, or you will need to create a private channel in that team for all the users except them.
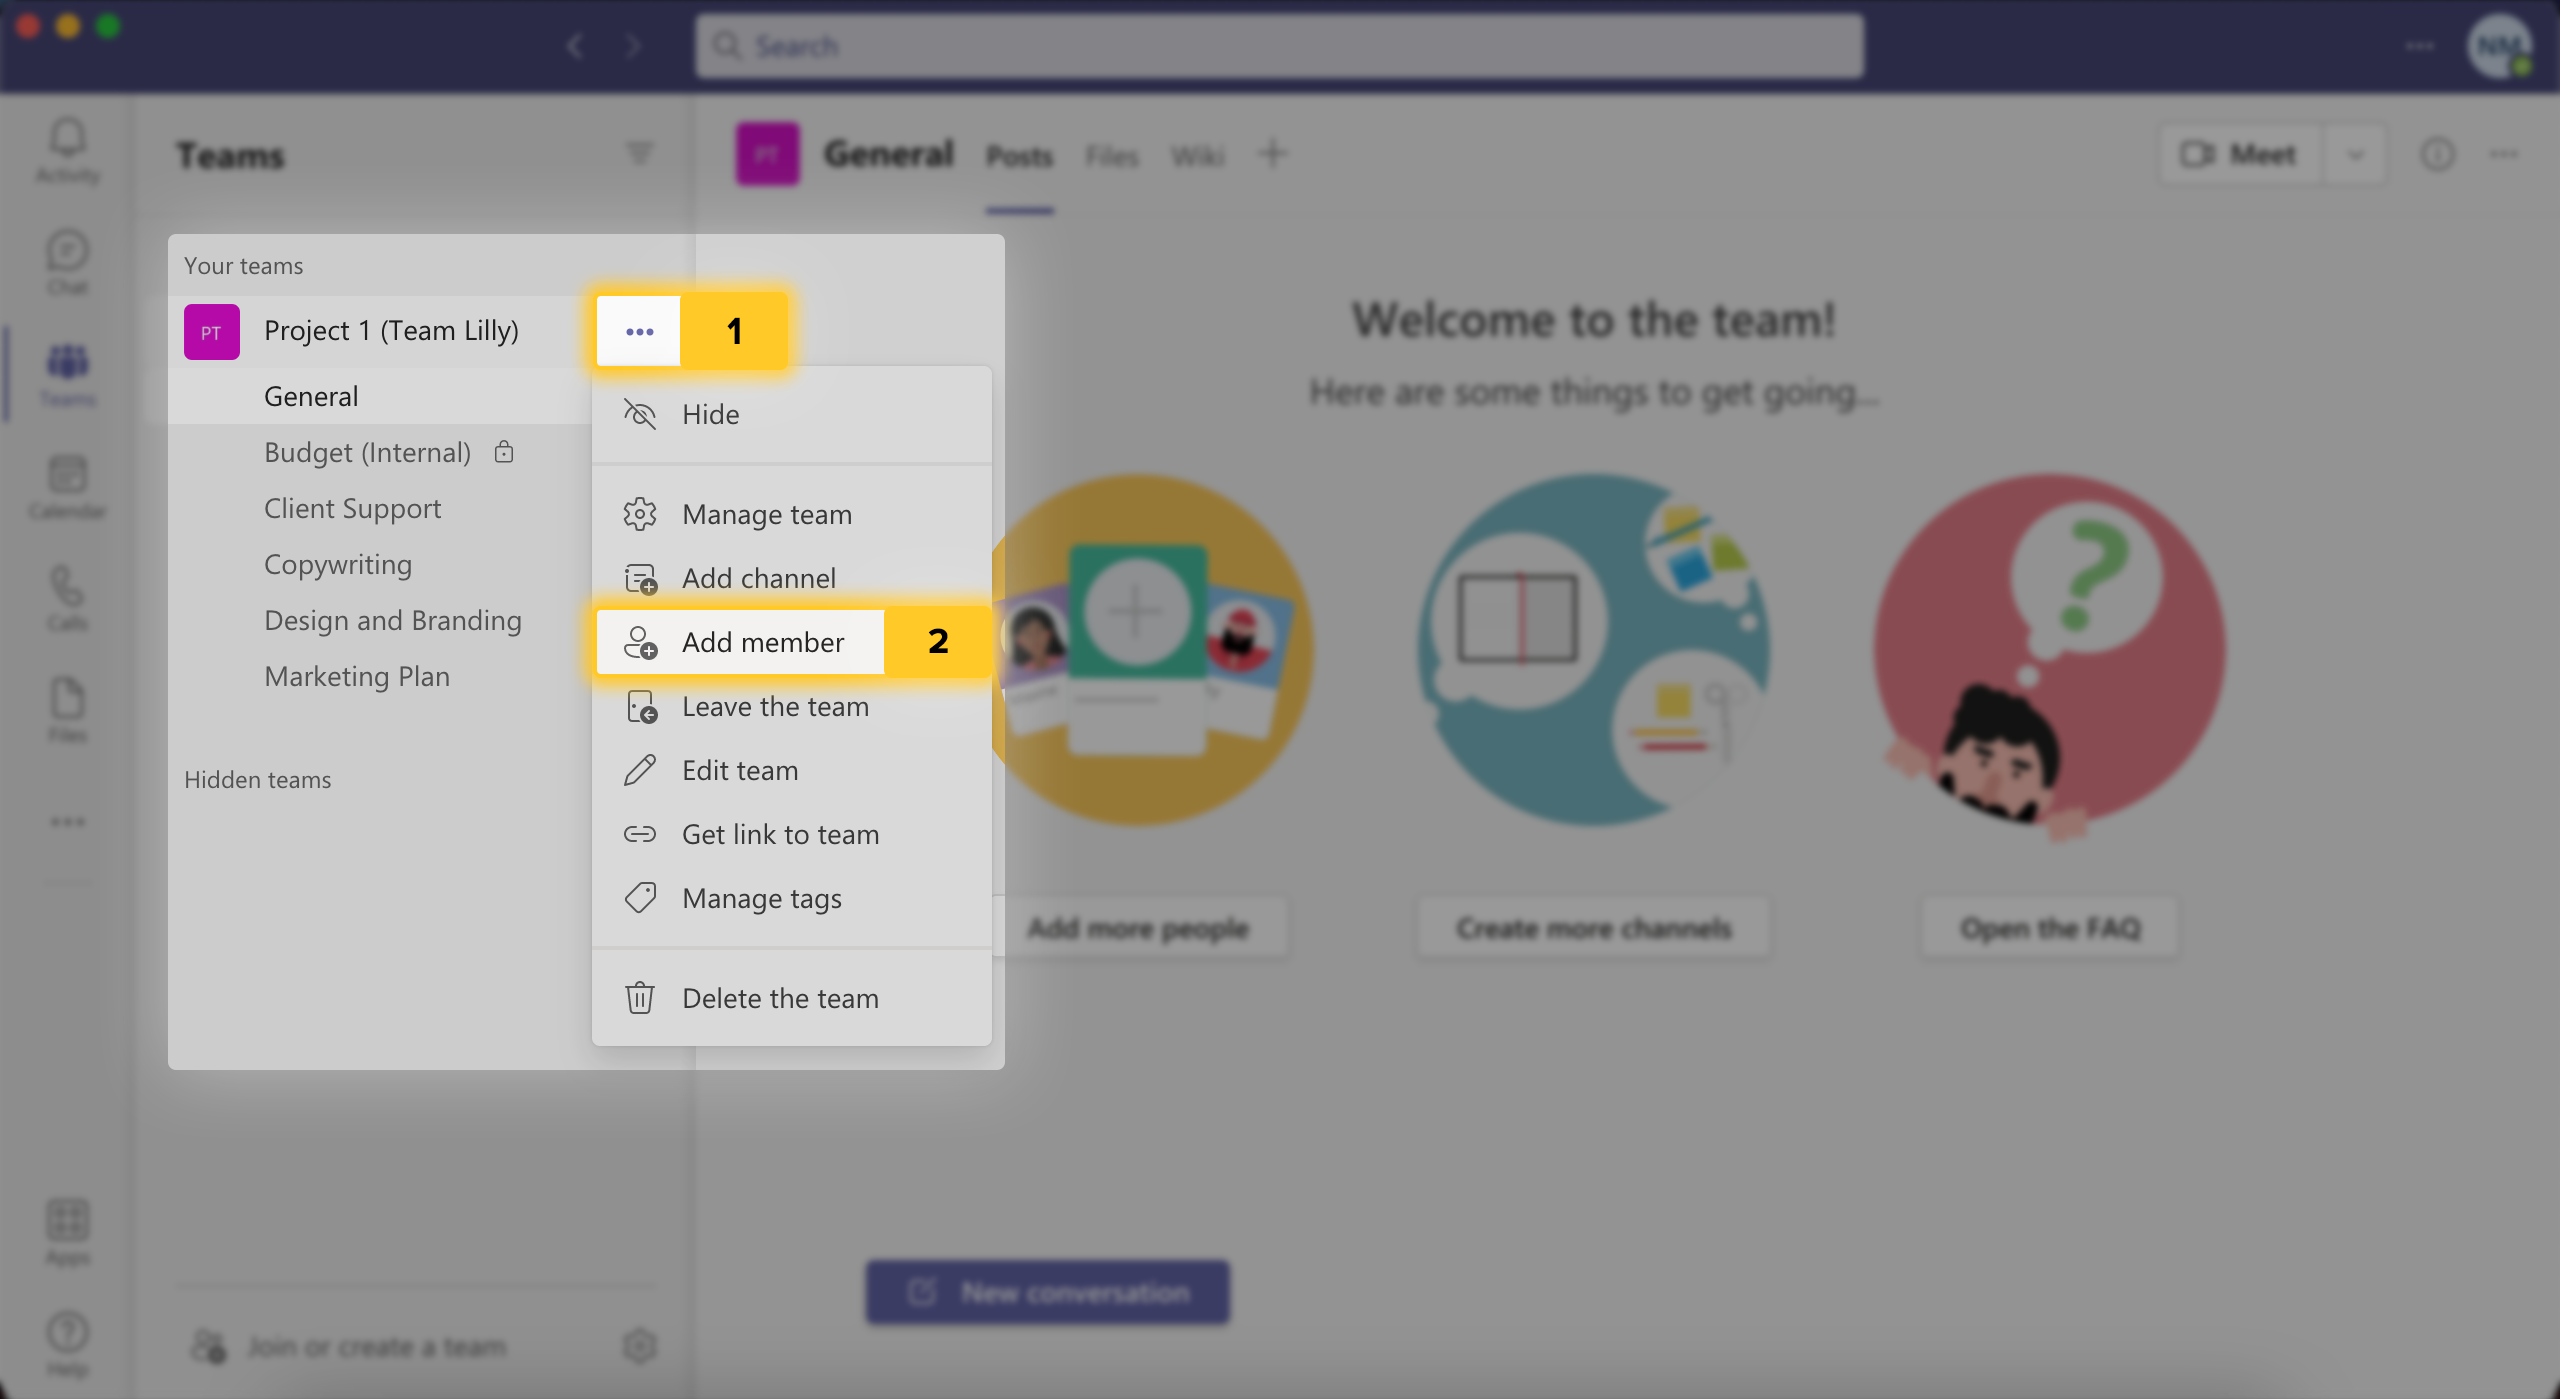
To add a user to a team, hit “More options” > “Add member” and type in their name as it’s shown in Microsoft Teams.
If your employees only want to receive notifications from the channel that’s most important for their work, they can hide or mute all other channels (see how to do that here).
Private Channels
When to make a private channel
Ever wish you had a group chat in Teams where you could discuss confidential or sensitive information with a small group of team members? Well, that’s what private channels are for.
A few more scenarios where you might need a private channel:
- You need to discuss a project budget with only the accountants on the team
- You want a space for internal team members to communicate without external guest users such as clients or contractors
- You want to keep confidential employee information (like pay grades or promotion tracks) accessible to a small number of people, and you want then to have a private space to discuss and meet virtually
The best part about private channels is that they allow you to have a focused group for secure conversations without needing to create a separate team.
How to create a private channel
You can create a private channel by going to the “More options” > “Add channel” next to your chosen team. In the privacy settings, choose “Private”.
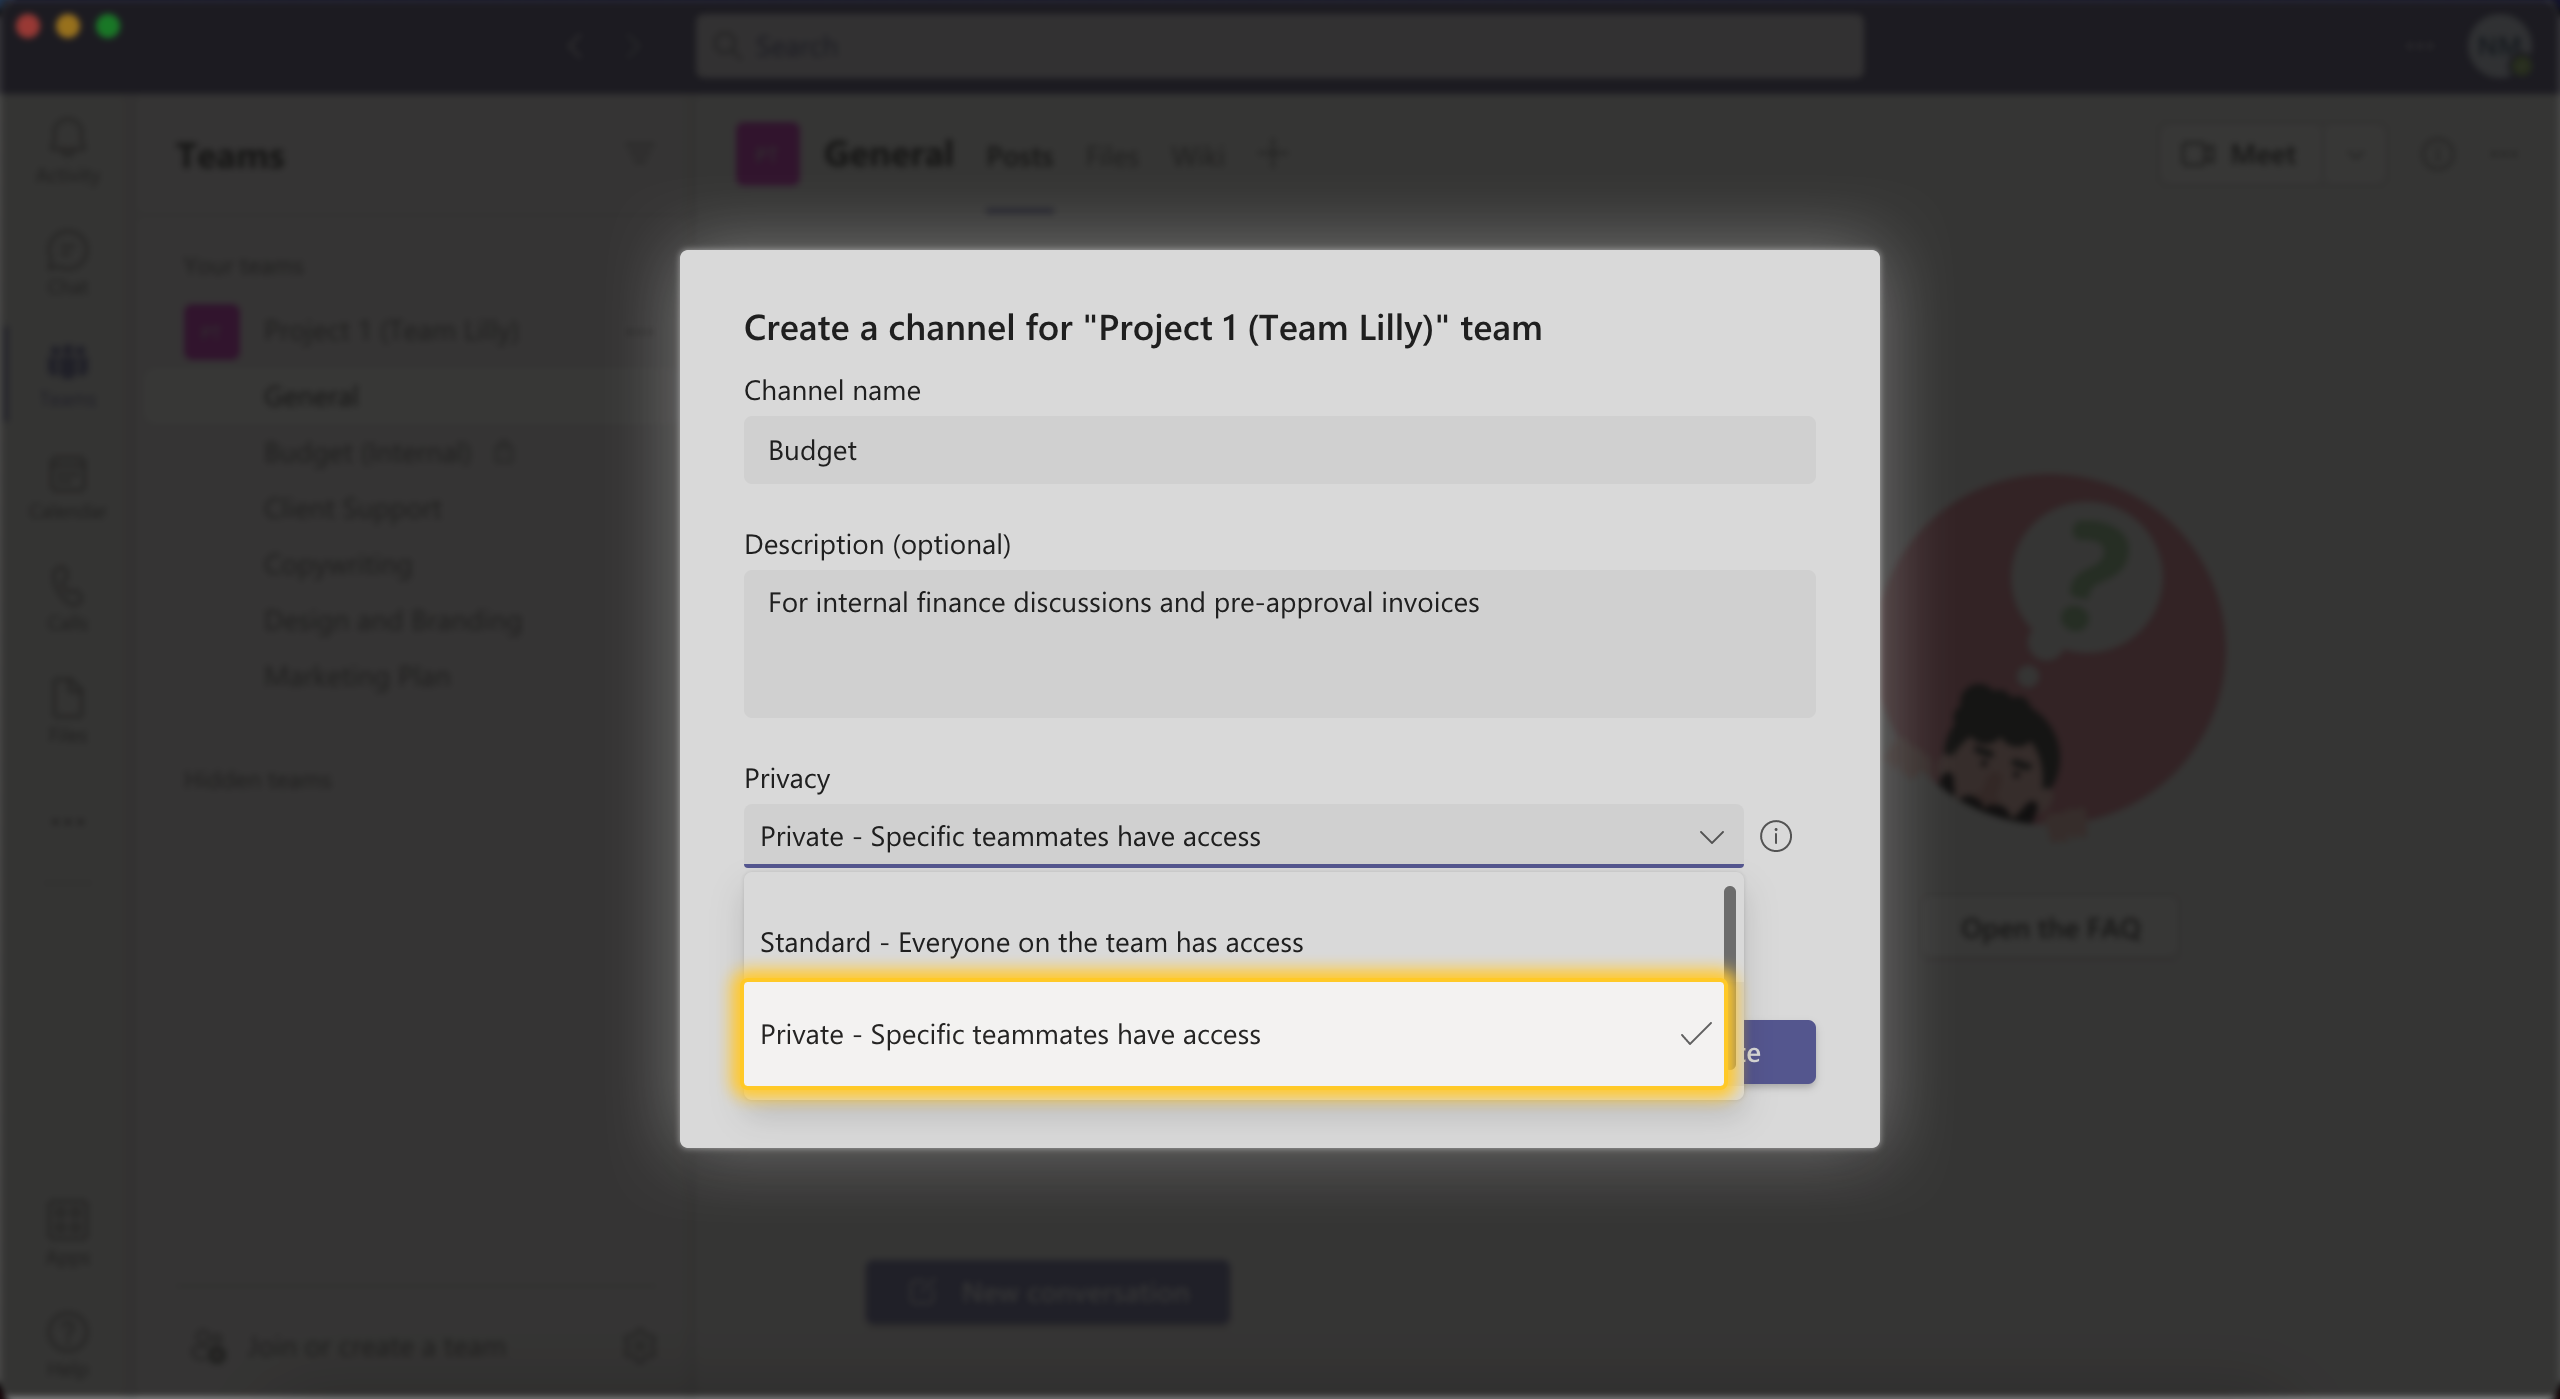
Once you make a private channel, it will always be private. Just like standard channels — you can’t make a standard channel private once it’s up and running.
And just a few technicalities — by default anyone in the team can create a private channel if they need one, and whoever creates the channel is automatically its owner and the only one who can add or remove users. That person can also assign moderators to the private channel.
Last but not least, private channels can not be seen by anyone who isn’t a member, even if they are part of that team. So rest assured, sensitive information in private channels really is tucked away from the public eye.
Note
: You can create up to
30
private channels in a team.
Channel Permissions: Owner vs Member Capabilities
Understanding channel restrictions and permissions
You as the owner of a team have full access to all administrative and moderating functions. Here we are assuming that you have an admin account in Microsoft Teams, not just a member or guest account.
| Default Settings | Owner/Admin | Member | Guest |
|---|---|---|---|
| Access to Admin Center | ✅ | ❌ | ❌ |
| Archive channels | ✅ | ❌ | ❌ |
| Create channels | ✅ | ✅ | ✅ |
| Delete channels | ✅ | ✅ | ✅ |
| Add users to channels | ✅ | ✅ | ❌ |
| Moderate channels | ✅ | ✅ | ❌ |
| Change member and guest user permissions | ✅ | ❌ | ❌ |
| Create private channels | ✅ | ✅ | ❌ |
| Participate in a private channel | ✅ | ✅ | ✅ |
| Create new posts | ✅ | ✅ | ✅ |
| Upload files to Sharepoint | ✅ | ✅ | ✅ |
| Add new tabs to channels | ✅ | ✅ | ❌ |
| Start and schedule meetings | ✅ | ✅ | ❌ |
As the admin, you obviously have the power to create new standard and private channels, delete them, and make posts in those channels—you have the full range of motion!
But so do your non-admin team members. By default, team users (except for guest users) have almost all the same permissions you do — they can post in any non-private channel and even create private channels without you. And that’s a potential recipe for chaos—you probably don’t want 20 people in a team creating and deleting channels at will.
How to change channel permissions
So, to avoid a free-for-all and keep your team structure the way YOU need it, put on your boss hat and go to your team’s “More options” menu. From there, go to “Manage team” > “Settings”, and you can restrict pretty much any member and guest user function, such as creating new channels and adding tabs and apps.
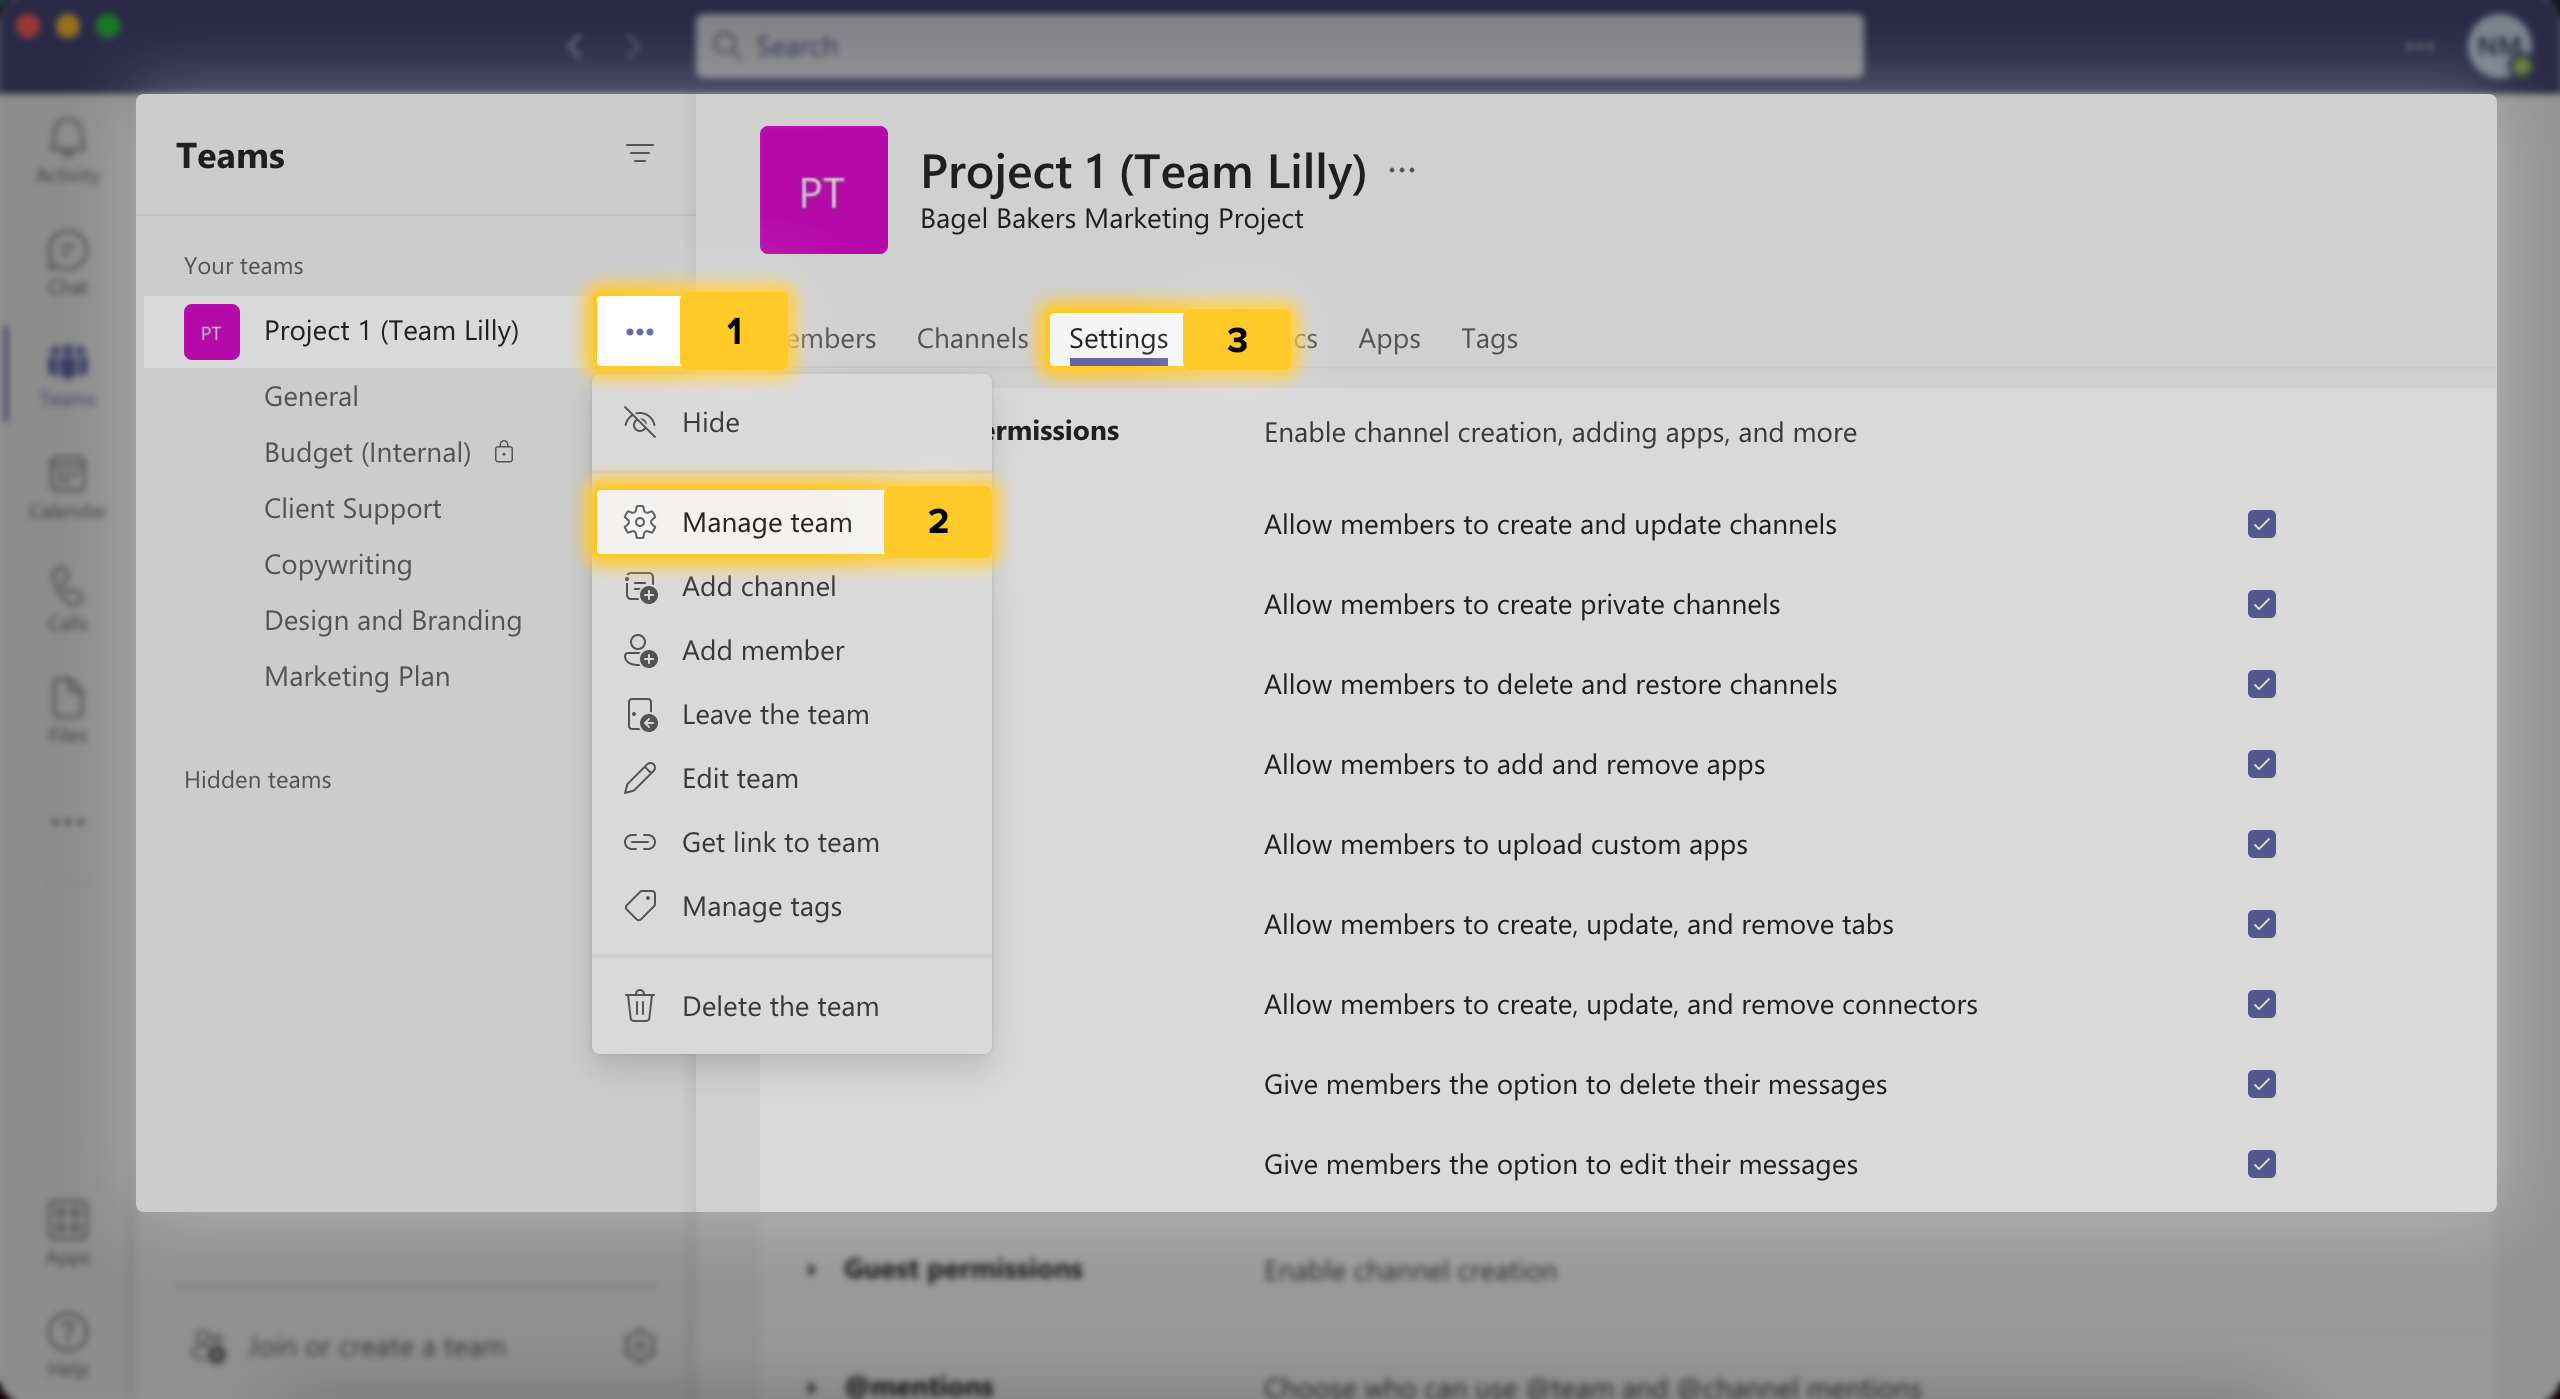
By the way, guest users have no permissions by default other than the ability to write and respond to posts in channels, so if you want your guest users to create their own channels, you can give them access in the same “Settings” menu.
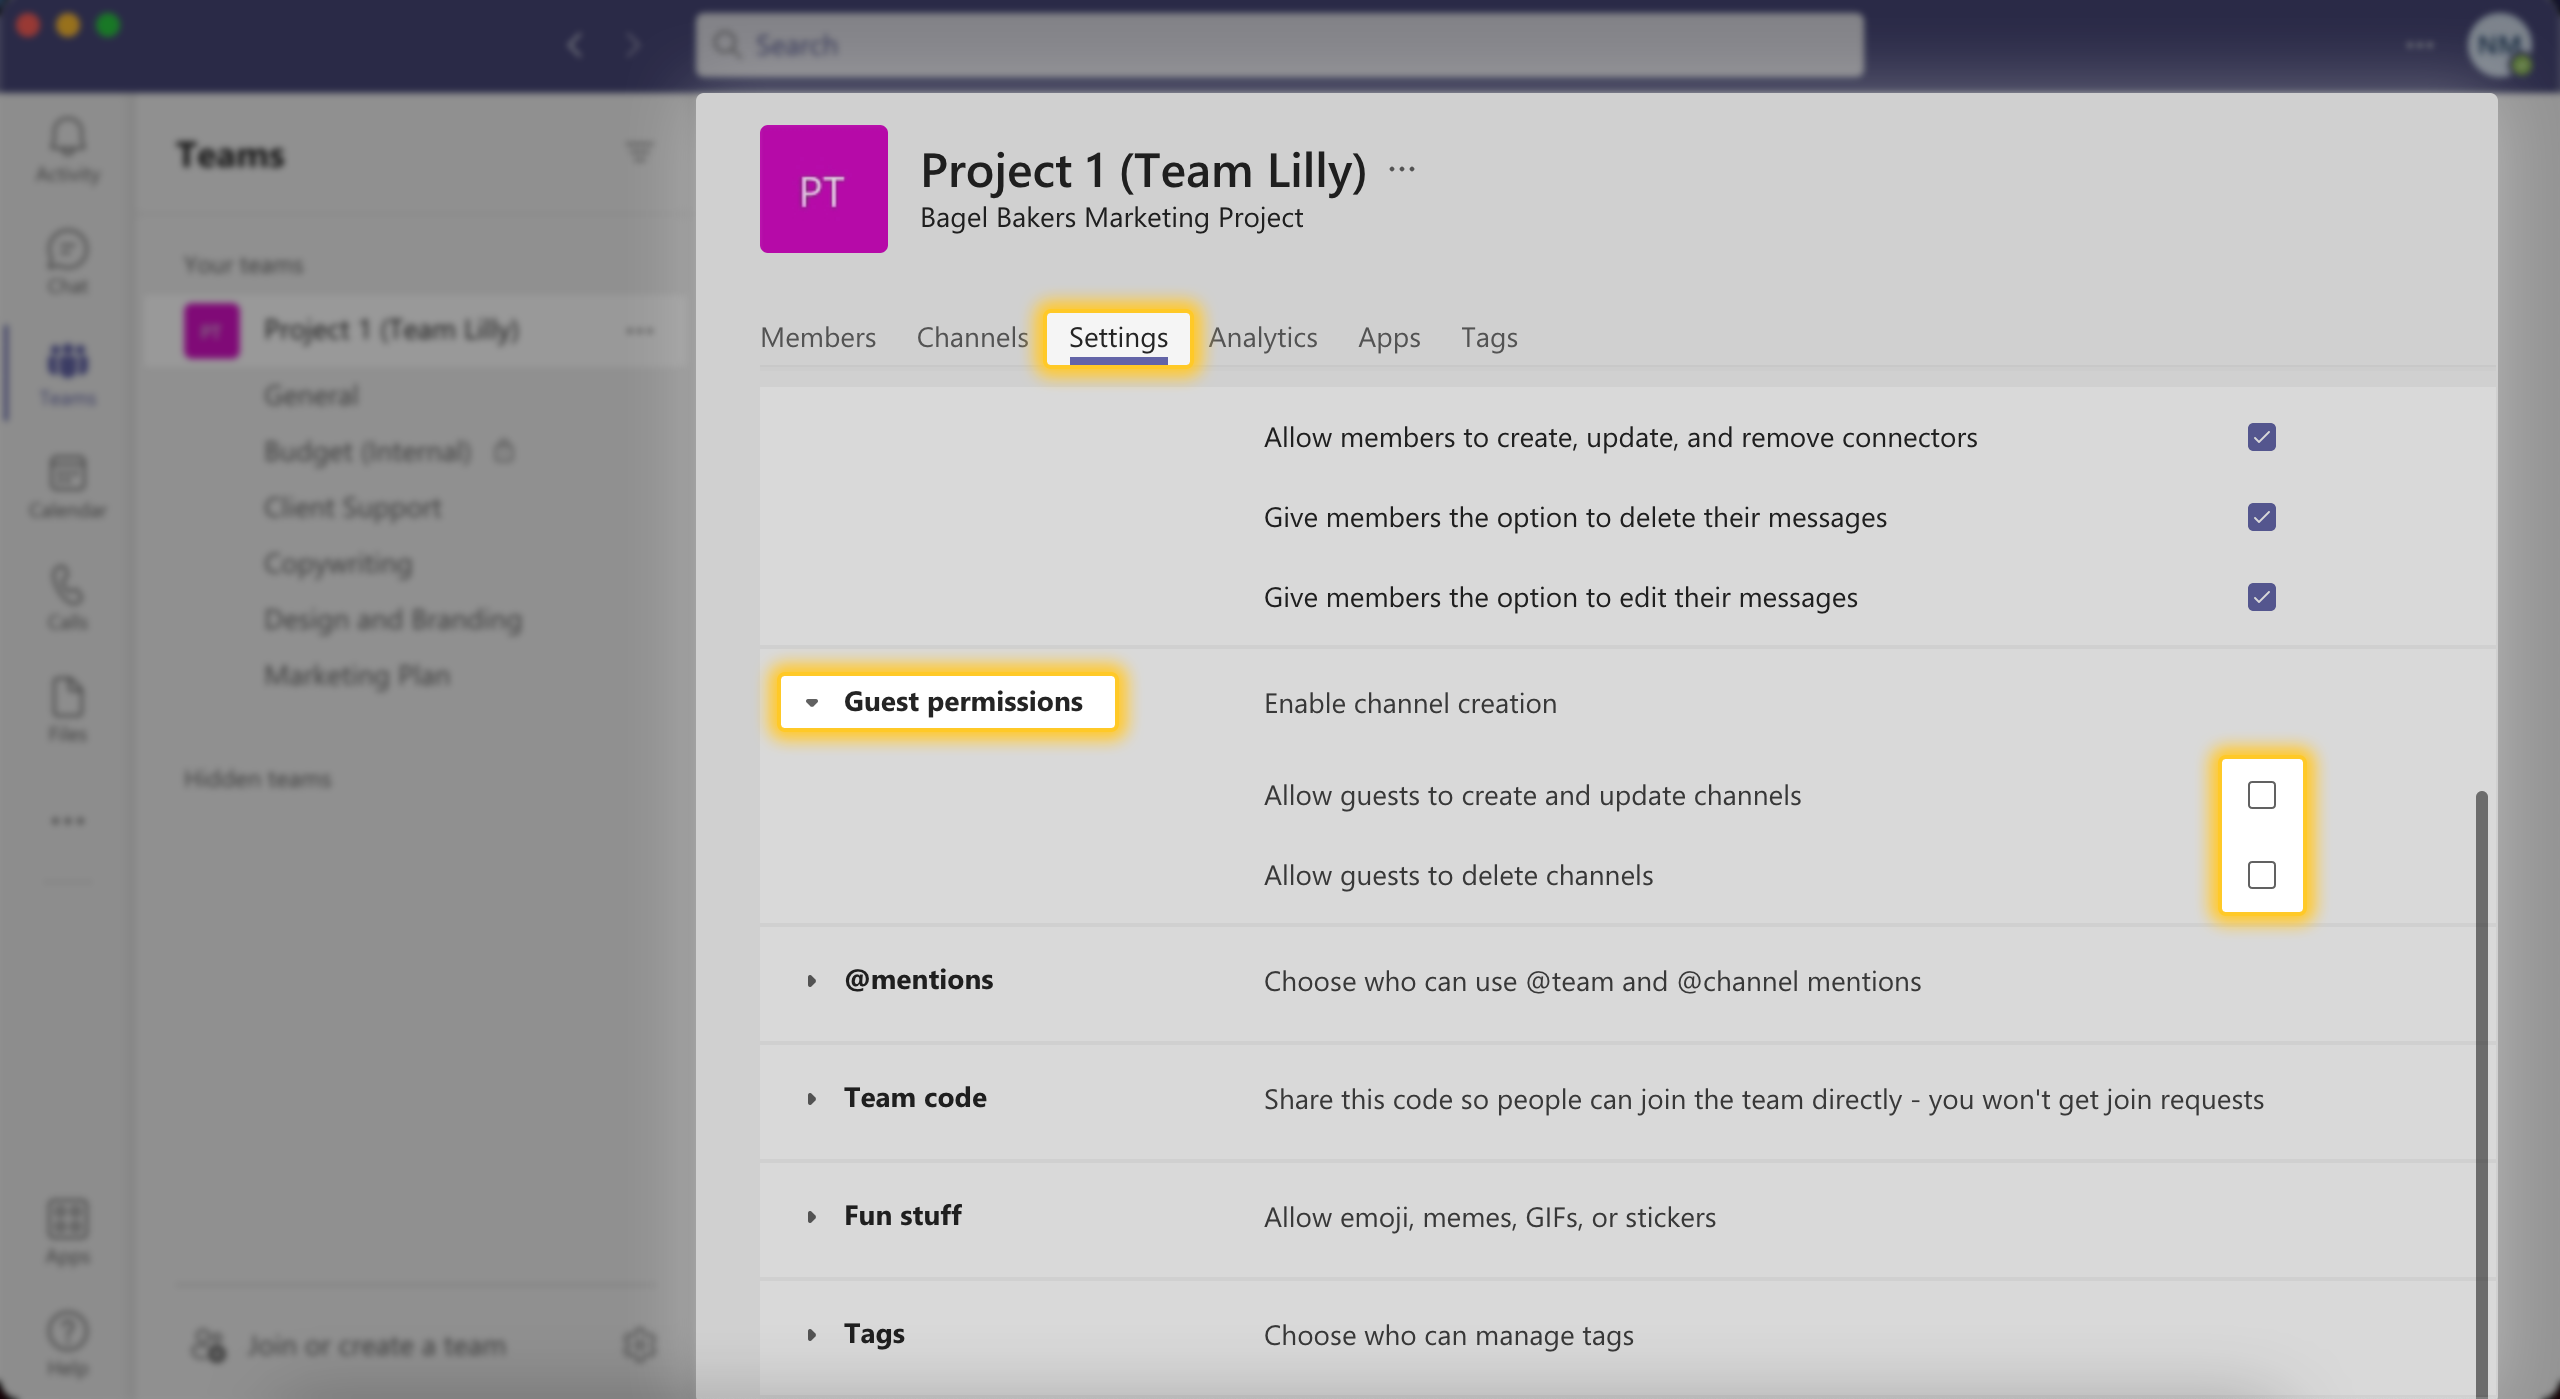
The changes you make from this menu will apply to ALL the channels in the team. If you want to tweak the permissions settings for just one channel, simply go to that channel’s “More options” menu > “Manage channel”.
From there, however, you’ll see that you can only change a few member capabilities, namely channel moderation.
Pro tip
: Another way to make these changes is to do it through the Microsoft 365 Admin Center
. This control center gives you a full bird’s eye view of your company’s teams, channels, and the permissions you can grant and change within them.
How to use and change channel moderation
Channel moderators are the ones who can create new posts, control who can respond to messages, and add new moderators.
If you just created a new channel, everyone in it will be able to create new posts, which could escalate to a spammed group chat in no time. So if you think there are really only 1-2 people in a channel that should have the right to post, add them as moderators (as long as they’re already in that team).
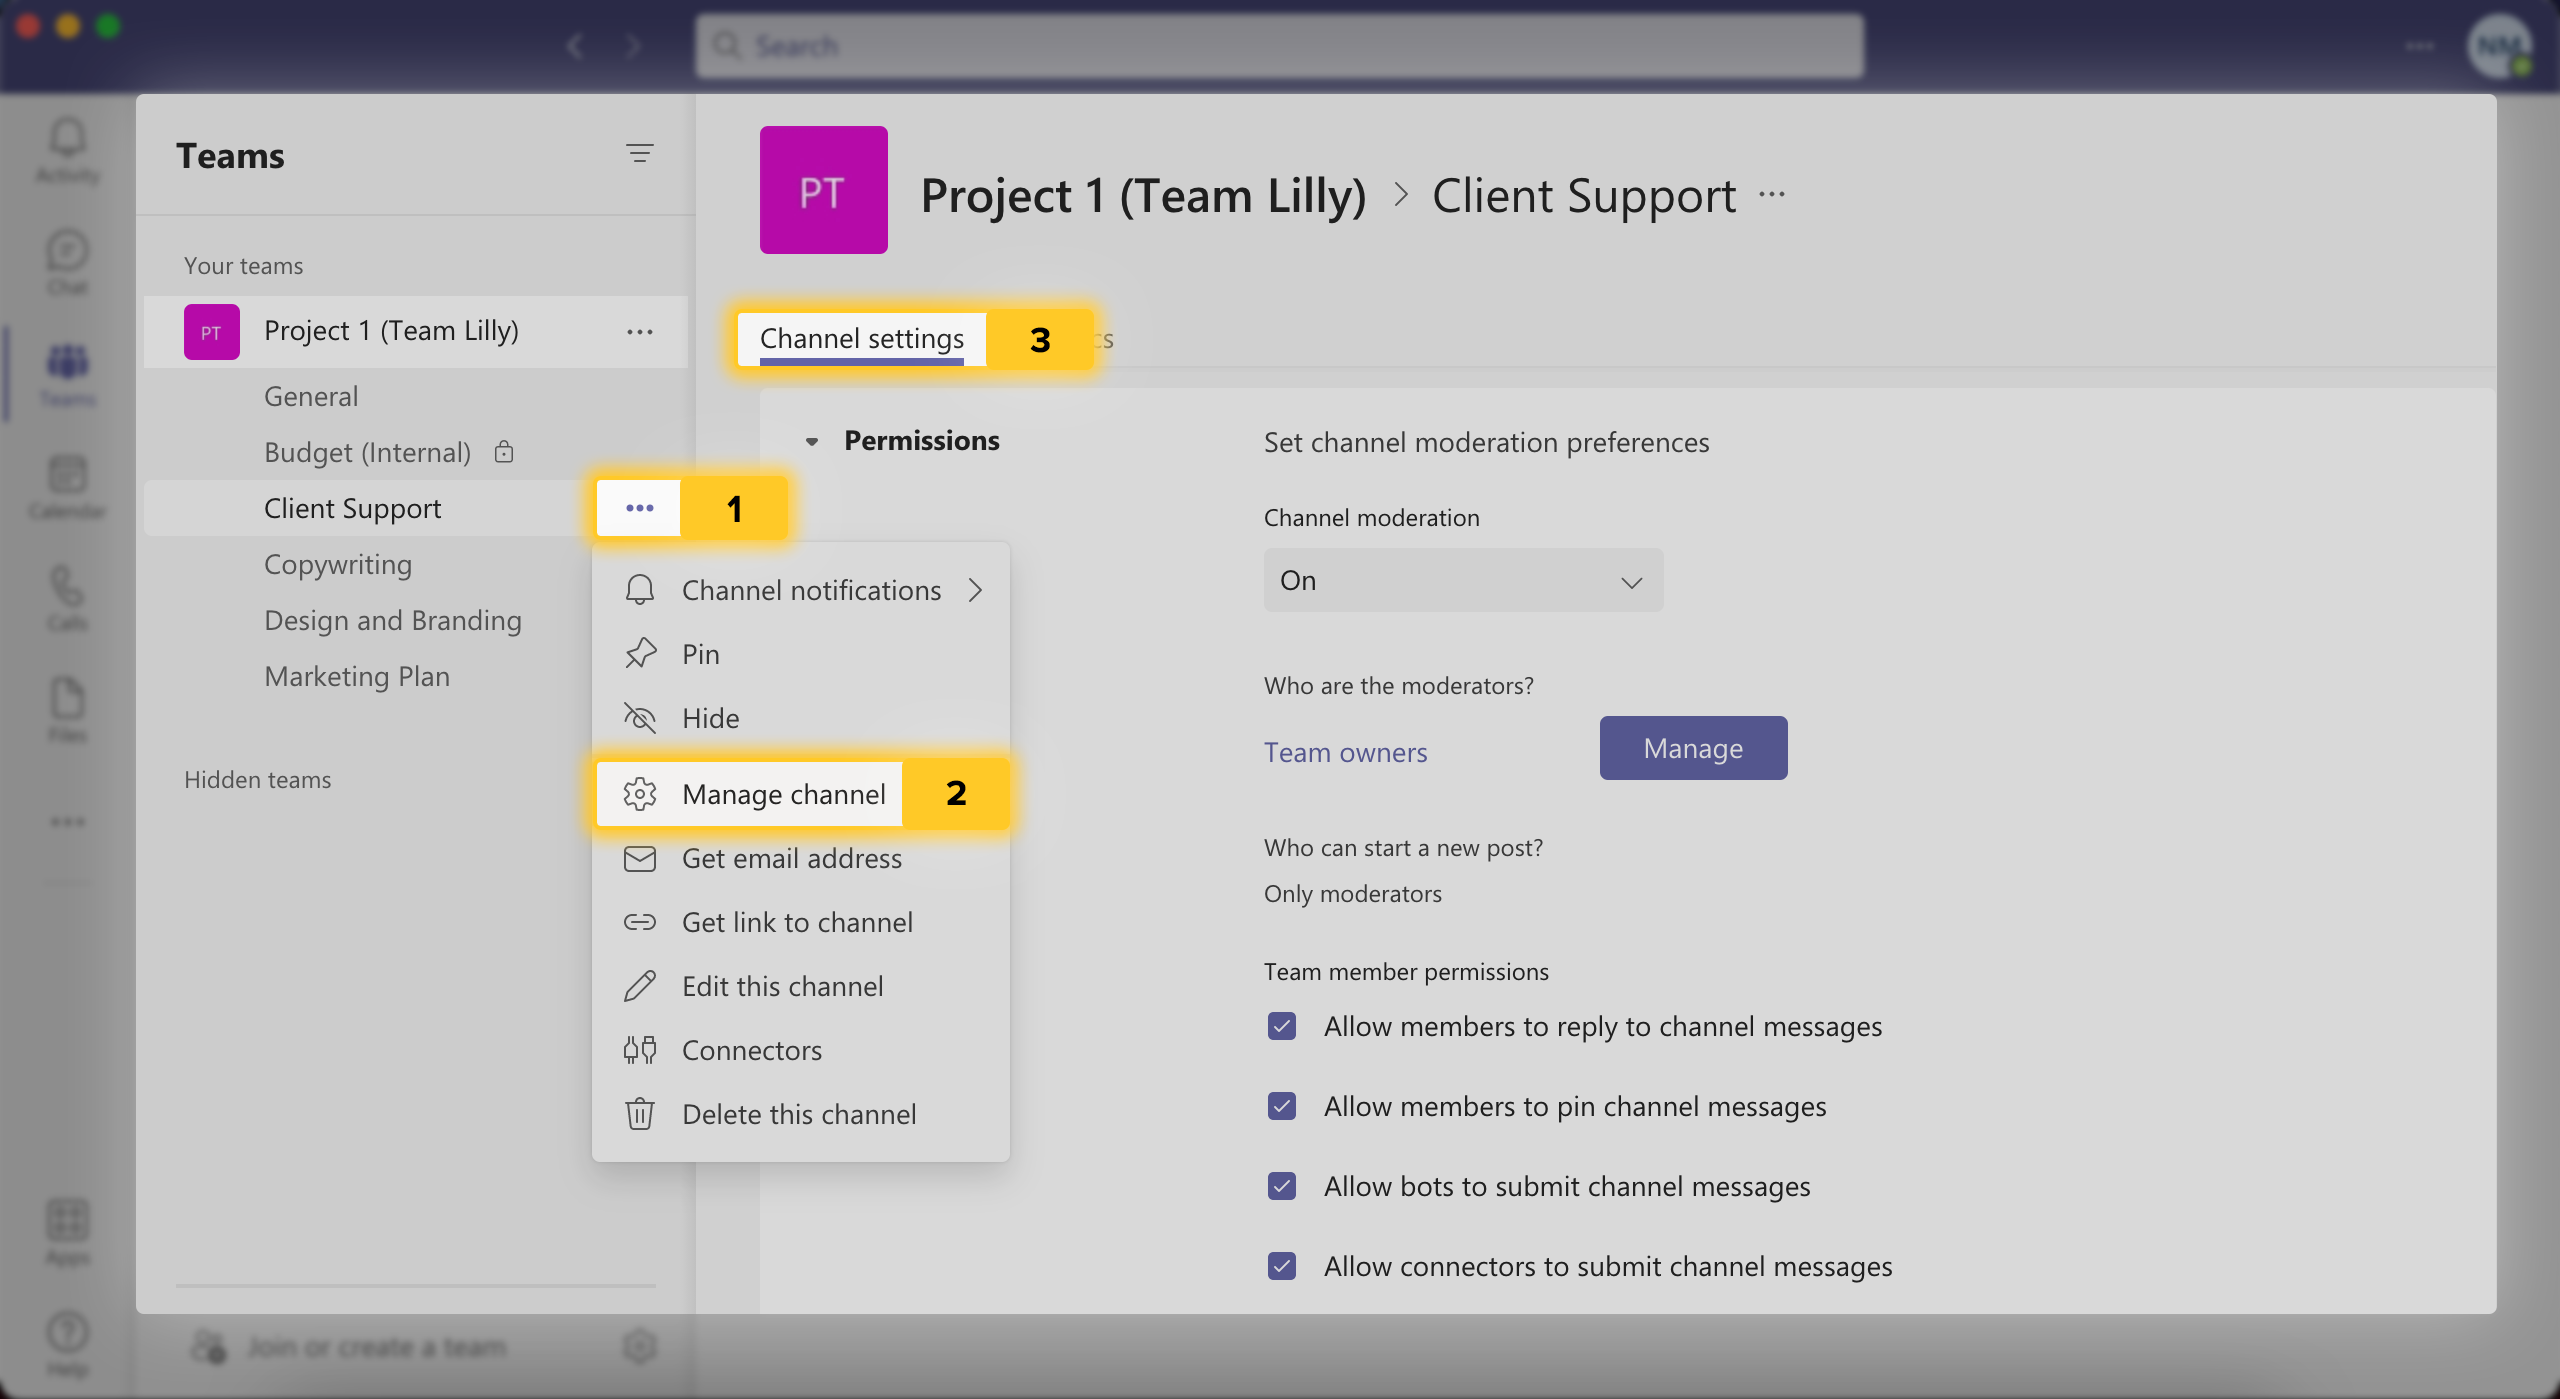
For example, let’s say you want to assign one of your team members to be a moderator for the “Copywriting” channel in your team, because they are the head copywriter in the company and are more qualified than you to make announcements and lead the conversation in the channel.
Other users will still be able to reply to messages you and the other moderator send (but you can change that too in the channel’s settings as shown above). The moderator can later let all users make posts in the channel if they want to have a whole-team discussion or brainstorm in the chat (although we strongly suggest using Meetings for that).
Built-in Channel Tabs and What They Do
You can do a lot more than just message users in a channel. In fact, channel tabs allow you to basically create a mini knowledge hub for very specific topics and goals. Here’s what each of the tabs are for and how you can make the most of them.
Every channel has 3 built-in tabs, or sections: Posts, Files, and Wiki. These tabs can’t be deleted or moved, so make the most of them!
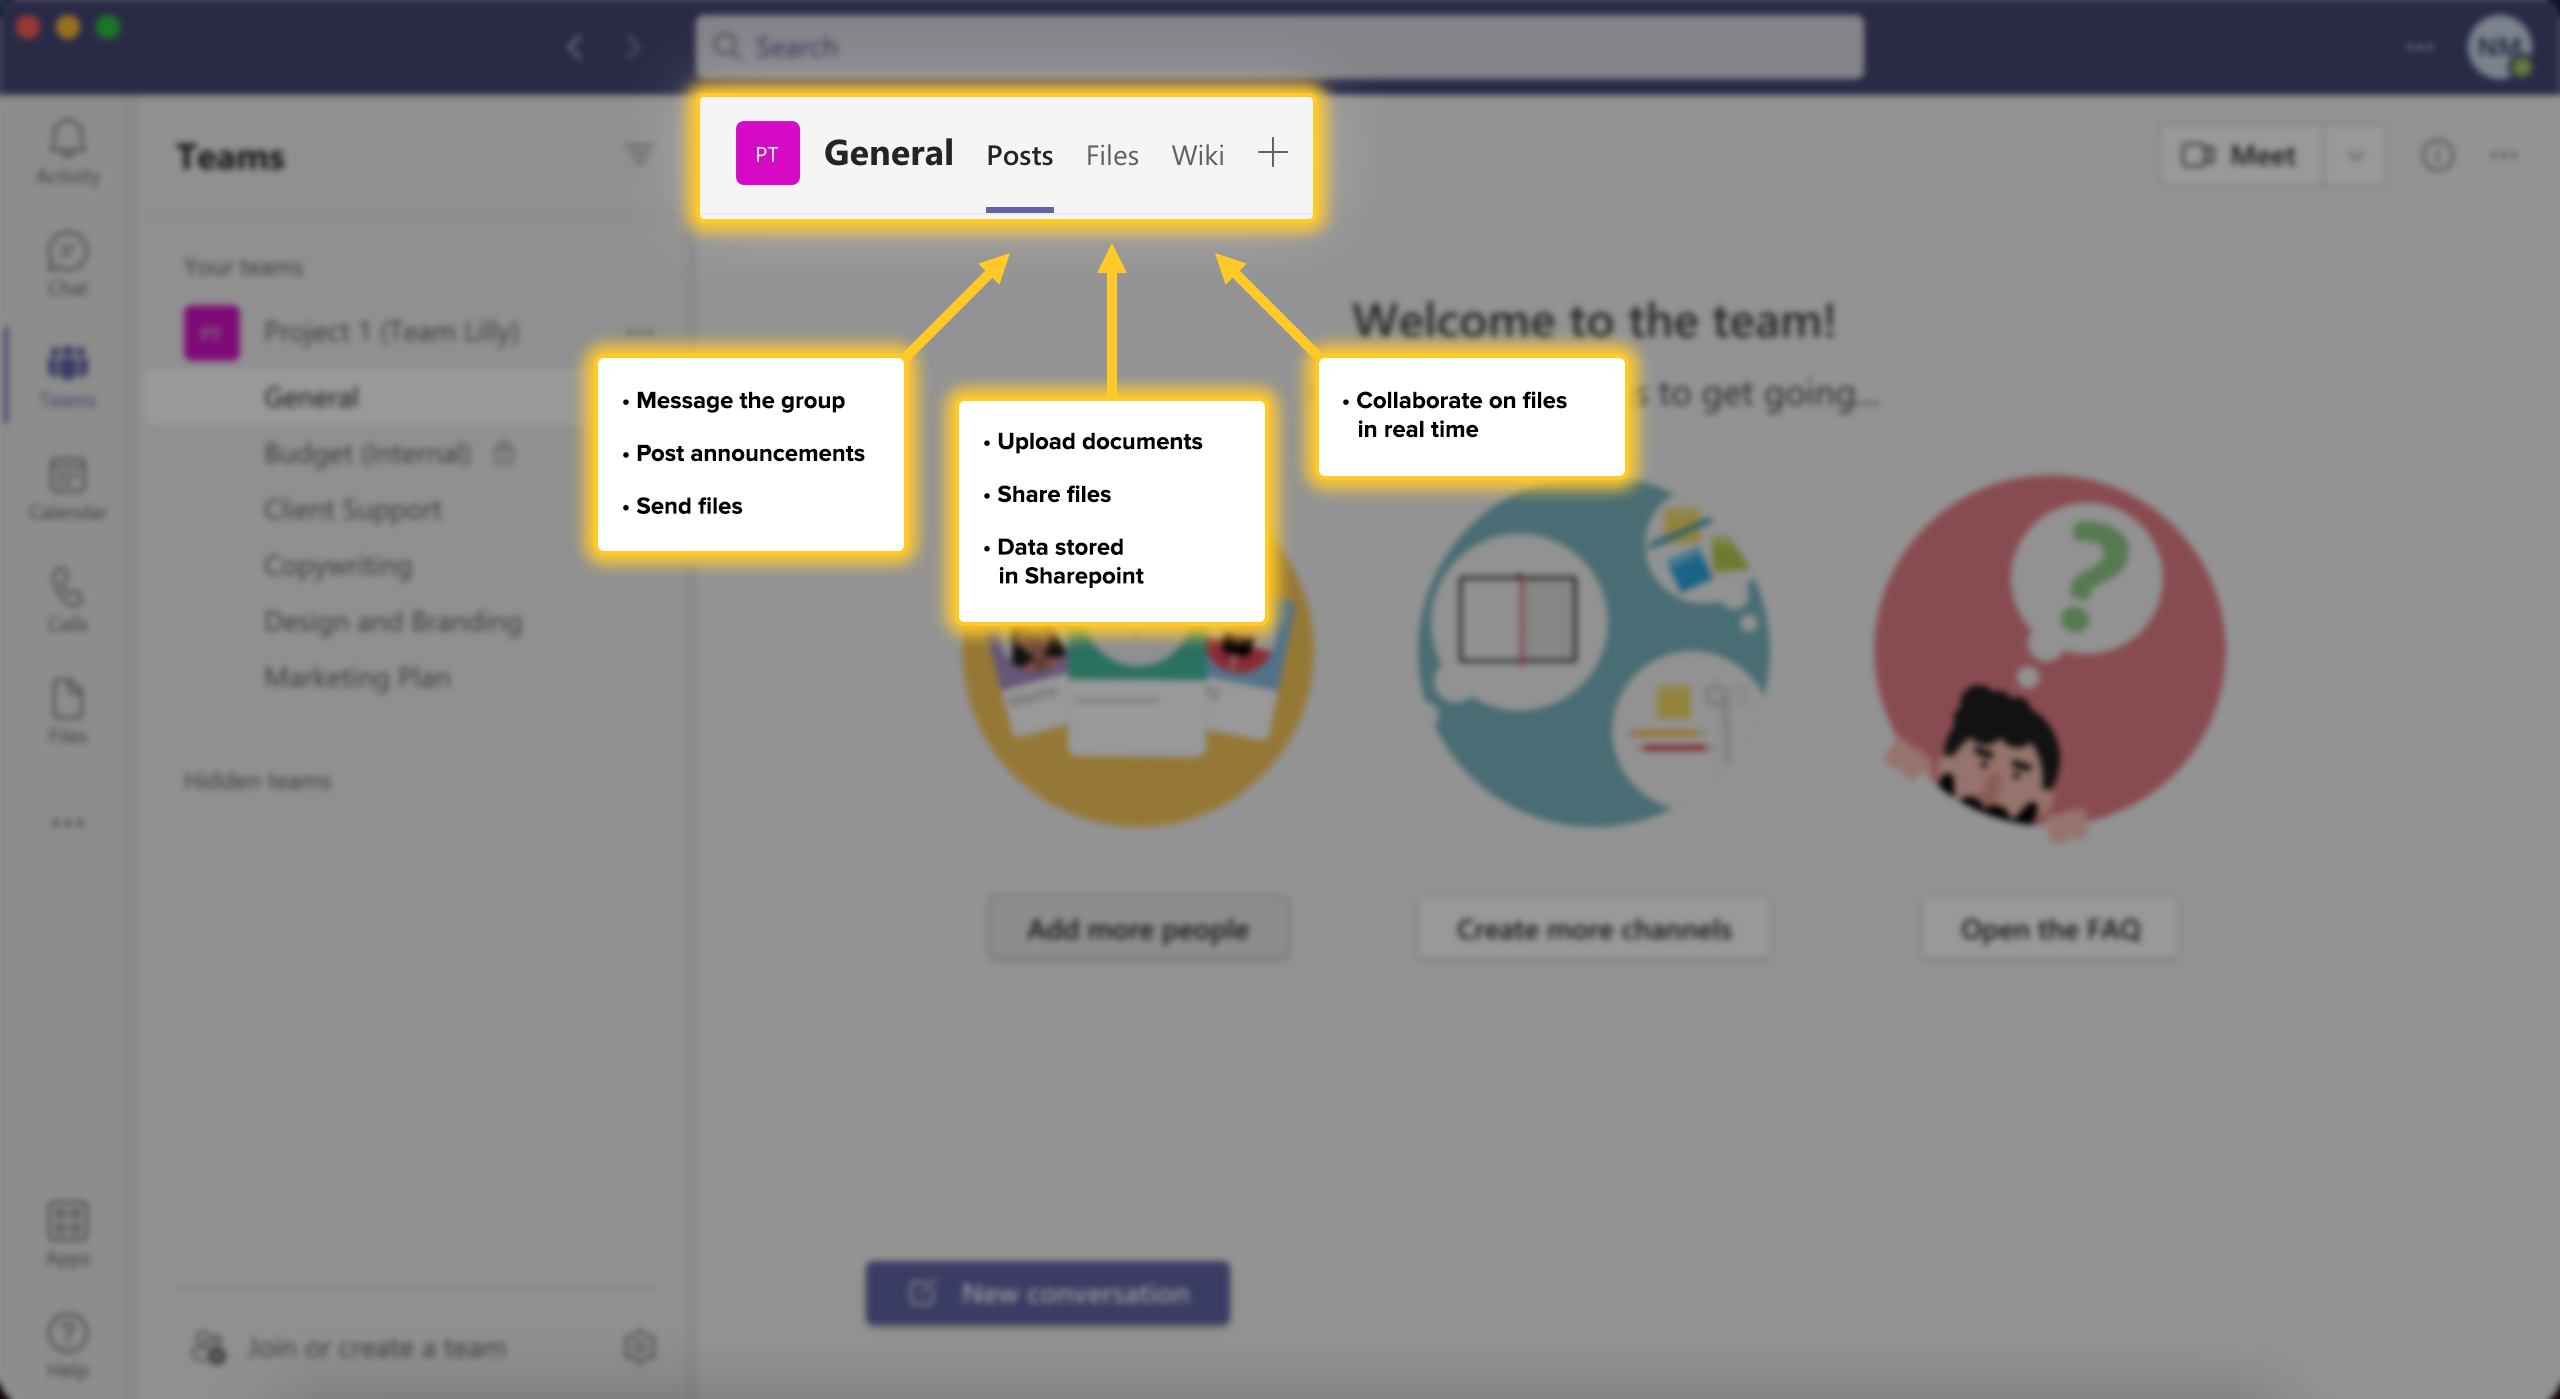
The Posts tab is where all your conversations happen in the channel. This is where your team can discuss their project or tasks in real time, share posts and announcements, and send files for the whole group to use (lots more on how to use channel messaging to its fullest potential here). While the only chat-like conversation you can have in a team is in the form of private 1-on-1 chats, the Posts tab in a channel really creates the feeling of a shared workspace and allows everyone in the focus group to contribute.
The Files tab is your document database. Any files your channel is actively working on, or any important documents such as invoices and contracts that the group frequently needs to use, can be compiled here. The best part is that any documents uploaded to the Files tab are automatically stored in that channel’s unique and secure SharePoint drive. You can even share that SharePoint’s link with external users (by clicking “Copy link” on the top toolbar of the tab).
The Wiki tab is a bit of a dark horse, but it can actually come in handy if you want to do some real time collaboration on a few general documents. A wiki page is really any collection of knowledge that multiple people can contribute to. You can keep a list of your team’s policies and best practices, or compile your group’s shared knowledge on a topic in one document for quick reference. The Wiki's comment function lets you brush up each other’s contributions to the document so you’re all happy with the finished product.
Some obvious pitfalls of the default Teams wiki is that you can’t comfortably import or export content without jumping through a lot of unnecessary hoops. What’s more, anyone on the team can edit or delete content in the built-in Wiki tab, and that’s not something you can change. Read more about why you should install a third party wiki for your channels here.
Perfect Wiki has taken into account all the functions that the Teams built-in Wiki sorely lacks, and we made them our key features. Get to know us and find out how we can make your channels’ knowledge collaboration a breeze here.
Add Files as Separate Tabs in Channels
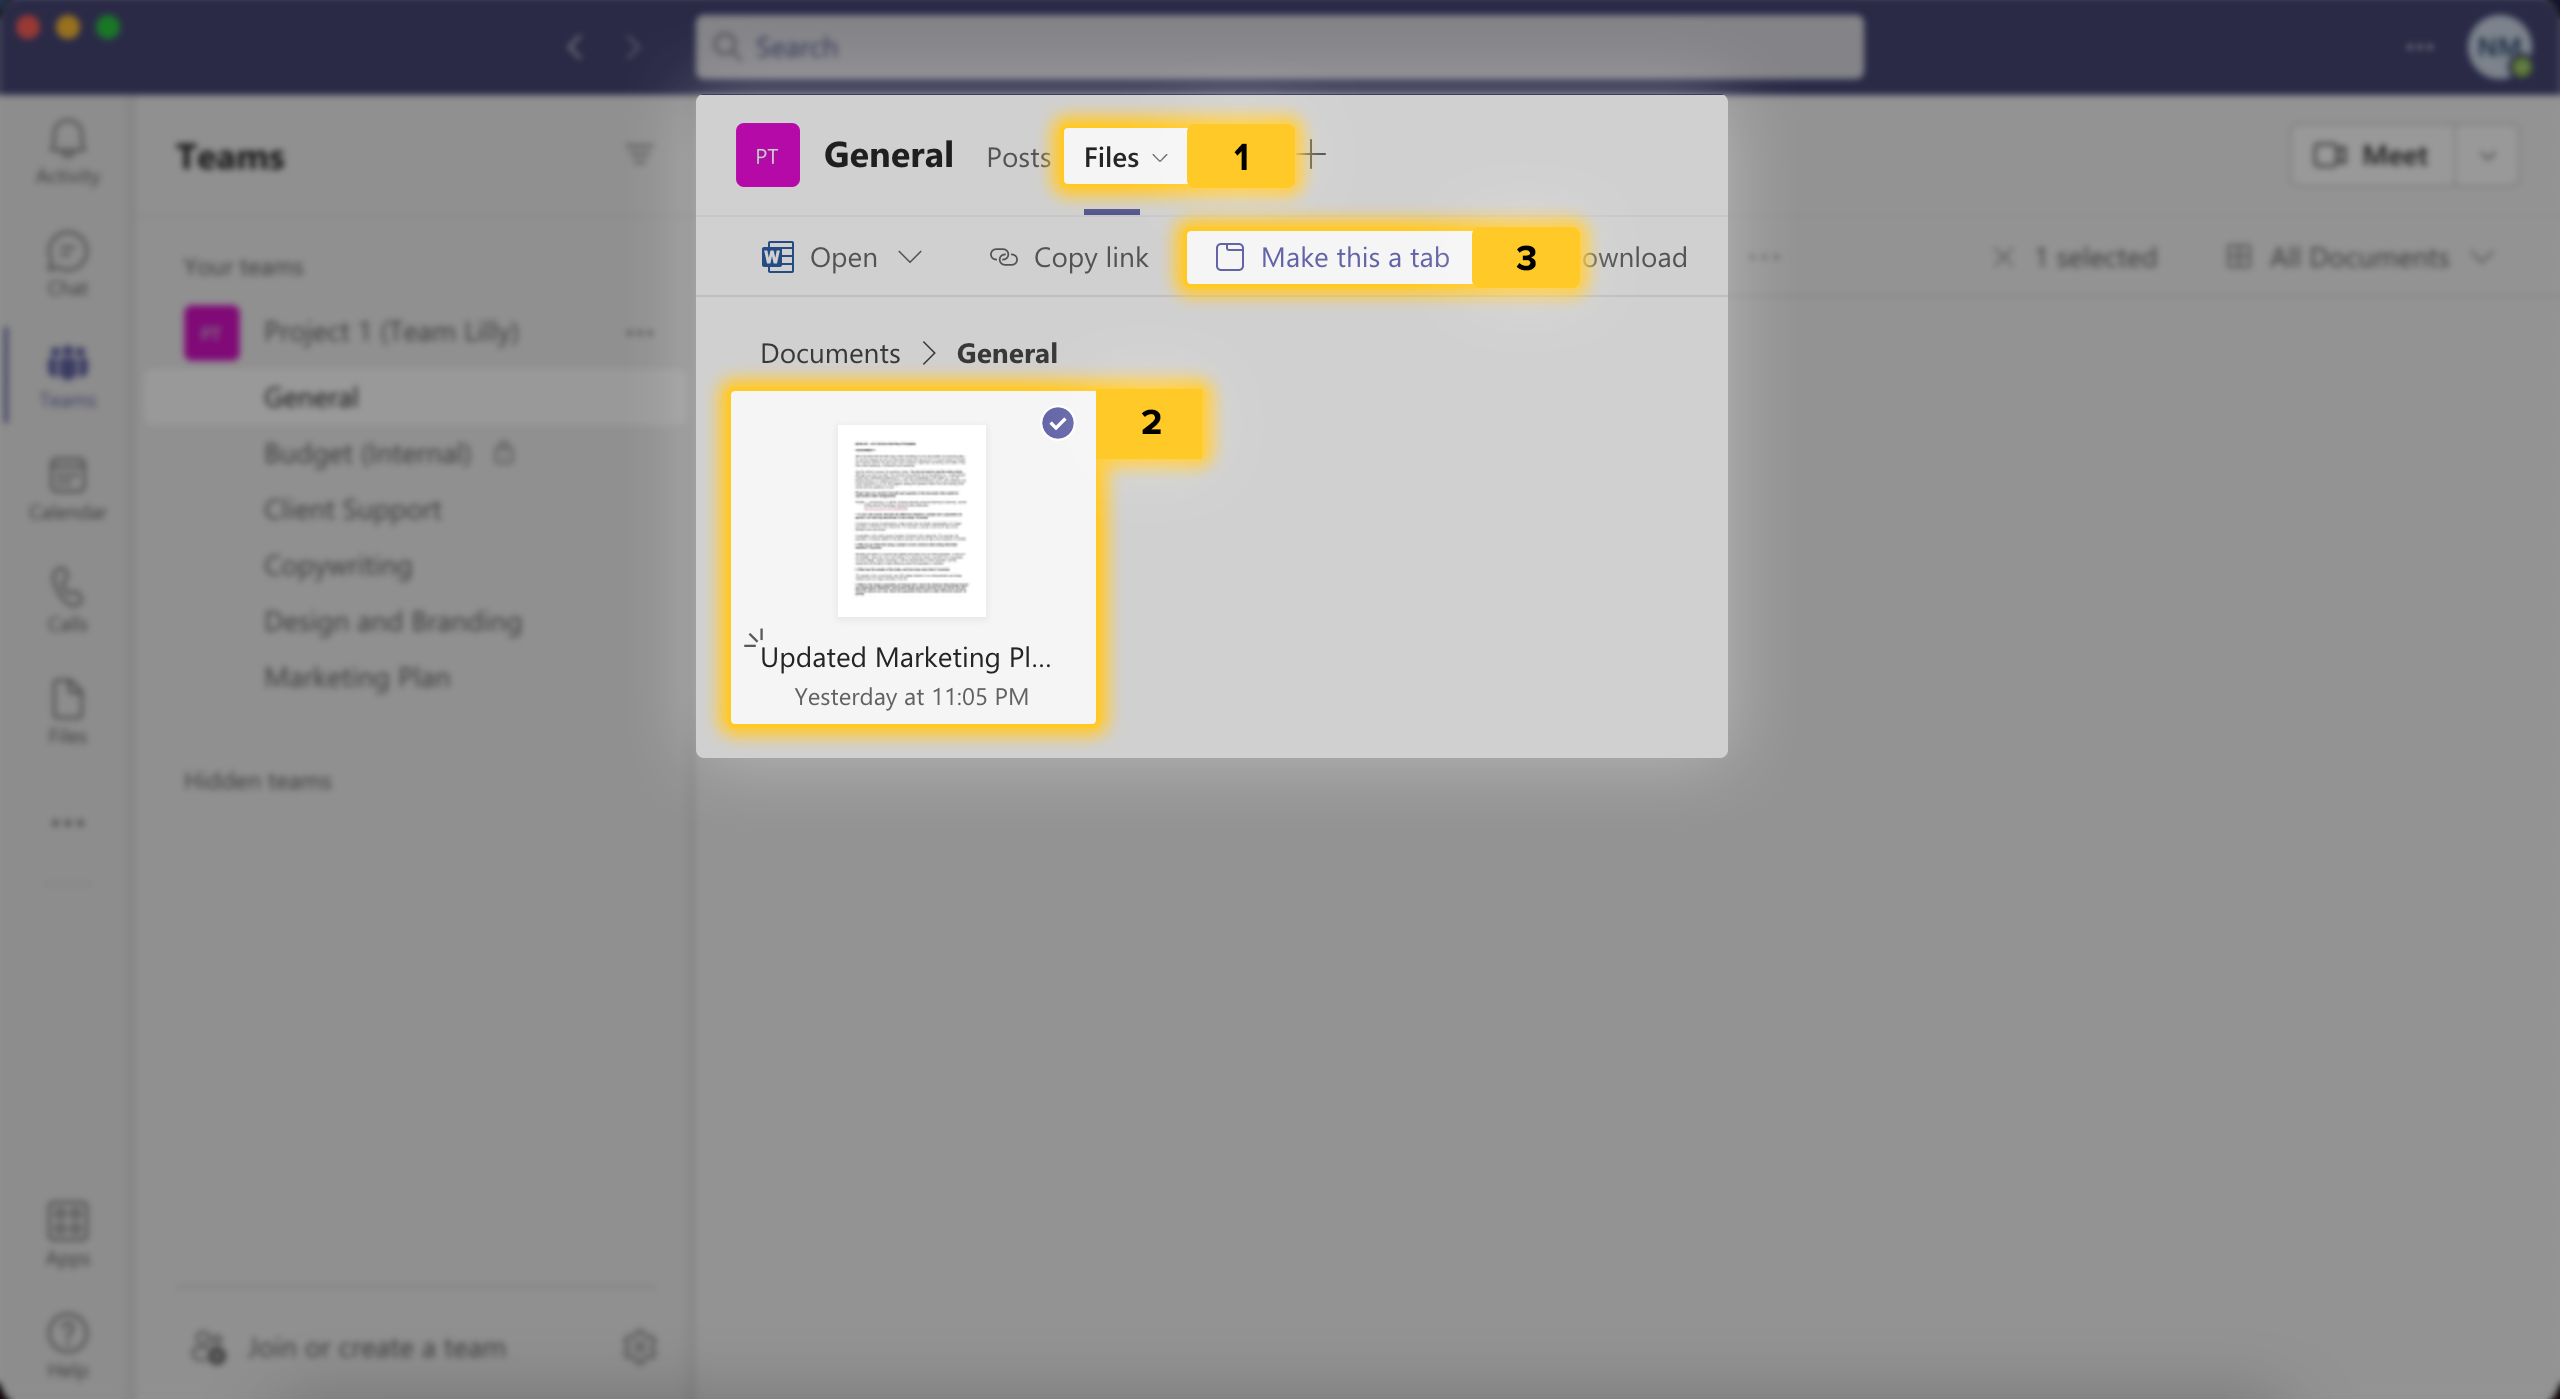
Do you have one specific document your channel members need to have on hand constantly, such as a working contract? You can make that document a tab of its own! Simply upload it to your Files tab first, click on the white circle hovering over the document, and select “Make this a tab” on the top toolbar.
Now you can view and edit that document in one click, and it stays in the channel’s SharePoint folder even if you remove it as a tab.
Other Important Channel Features
If you play around in the team and channel Settings, you’ll see that they are actually super customizable to your needs and preferences. Let’s take a closer look at what you can do from the “More options” menu of a Microsoft Teams channel:

Hide channels
You and your team members can hide any channel from your team dashboard (which could get full very quickly if you’re a member of multiple teams at once). Just go to “More options” > “Hide”, and that channel will be moved into a “Hidden channels” section at the bottom of the channels list in that team.
Don’t worry, you can always bring back the channel by clicking “Show” next to it. And you will still be able to view all the posts and documents that were added while the channel was hidden.
Pin channels
Have a channel you’re particularly active in? Go to “More options” > “Pin”, and it will be bumped up to the very top of your list of teams. It will also be the first page you see when you open your MS Teams workspace.
Manage notifications
Hiding or pinning channels works great for organizing your visual Teams workspace, but if you need to change how many notifications you’re getting (and if you’re an admin, it’s probably loads), you can manage your notifications for select channels.
Simply go to “More options” > “Channel notifications” and switch notifications off. You will still receive a nudge if someone mentions you in a post or responds to your messages, but other activity in the channel will stay out of your way.
Note
: Turning off notifications will only disable them for
you
. Other users will continue to receive notifications from all channels.
This function, like the previous two, is always reversible.
Archive channels
Let’s say you created a channel for a short-term project that was completed, and you want to archive the channel (in other words, you want it out of the way, but not deleted).
This is something only an admin like you can do in Teams. You will have to archive channels through the Admin Center https://admin.microsoft.com. Do it in less than a minute, here’s how:
- Go “MS Teams Management” in the Admin Center
- Select “Manage” next to the team where the channel is located
- Tick the box next to that channel
- Select “Archive” on the top toolbar
Now that channel is in the archives! All the data and conversations are saved, and you can bring it back from the archives if you need it. Your team members will be able to see it in the “Archives” team and if they look it up in the Search bar.
Note
: You can’t hide or archive General channels.
What You Can’t Do with Teams Channels (Yet)
Knowing the limitations of channels is just as important as knowing their features, so you don’t spend hours searching for a function that doesn’t exist. We covered most of these in previous sections, so here’s a quick recap:
You can’t split your team into channels. All team members are participants in all the channels. The only way to sort of modify participation is to create private channels, or for your users to disable notifications from select channels.
You can’t hide or archive the general channel. The general channel stays put, and you can’t assign specific moderators for it either. So we say put it to good use and make it a notifications hub for your team (see how to set up a notification post here).
You can’t move channels between teams. Channels can’t be separated from their parent team, so if you want to move files or users in a cluster, you will have to do it manually. The ends don’t usually justify the means, so we recommend adding users from other teams to the existing team (“More options” > “Add member”).
You can’t delete the built-in tabs. The Posts, Files, and Wiki tabs stay put, and as we mentioned, it’s better to use a third party wiki for your knowledge collaboration in channels. For example, Perfect Wiki can be added as a separate tab to any channel, it seamlessly integrates with your Microsoft Teams workspace, and it has a set of intuitive features and FREE templates that help you create a truly useful set of company best practices.
And note that you can’t add members to select channels. If you want someone from another team, or a guest user, to have access to a specific channel, you will have to add them to the whole team. That means they will have access to all the standard channels. It’s not ideal, but c’est la vie.
2. Channel Messages
Now that we’ve covered the basics, we’ll walk you through the channel feature you will probably be using the most — messaging in the Posts tab.
Channel Messages vs Teams Chats
The Microsoft Teams Chat is the one on the left sidebar of your Teams workspace. You can have one-on-one private chats or create group chats here, but the big drawback is that you’re pretty limited in what apps you can use, and the content of your group chat isn’t accessible to the whole team.
With channel messaging in Posts, however, you can add functions that make the workspace your own, and everything you share and collaborate on will be visible and accessible to the whole team whenever they need it. So you won’t have to endlessly forward messages and files from your private chats to other users.
| Chats | Channel Messages |
|---|---|
| “Open forum” conversations | Structured conversations |
| Unthreaded, group chat format | Threaded, topic-based format |
| Reply in the general chat space only | Reply to an existing post or start a new thread |
Each channel’s message space is a focused group chat that everyone in the channel (and everyone on the team!) can use to:
- Create posts
- Send announcements
- Reply to messages
- Schedule meetings
- Share files and links
- Connect bots and websites
There are 2 ways to create messages in the Posts tabs of your channels:
- Create a new post by hitting “New conversation” at the bottom of the Posts tab
- Reply to an existing post by hitting “Reply” under the post.
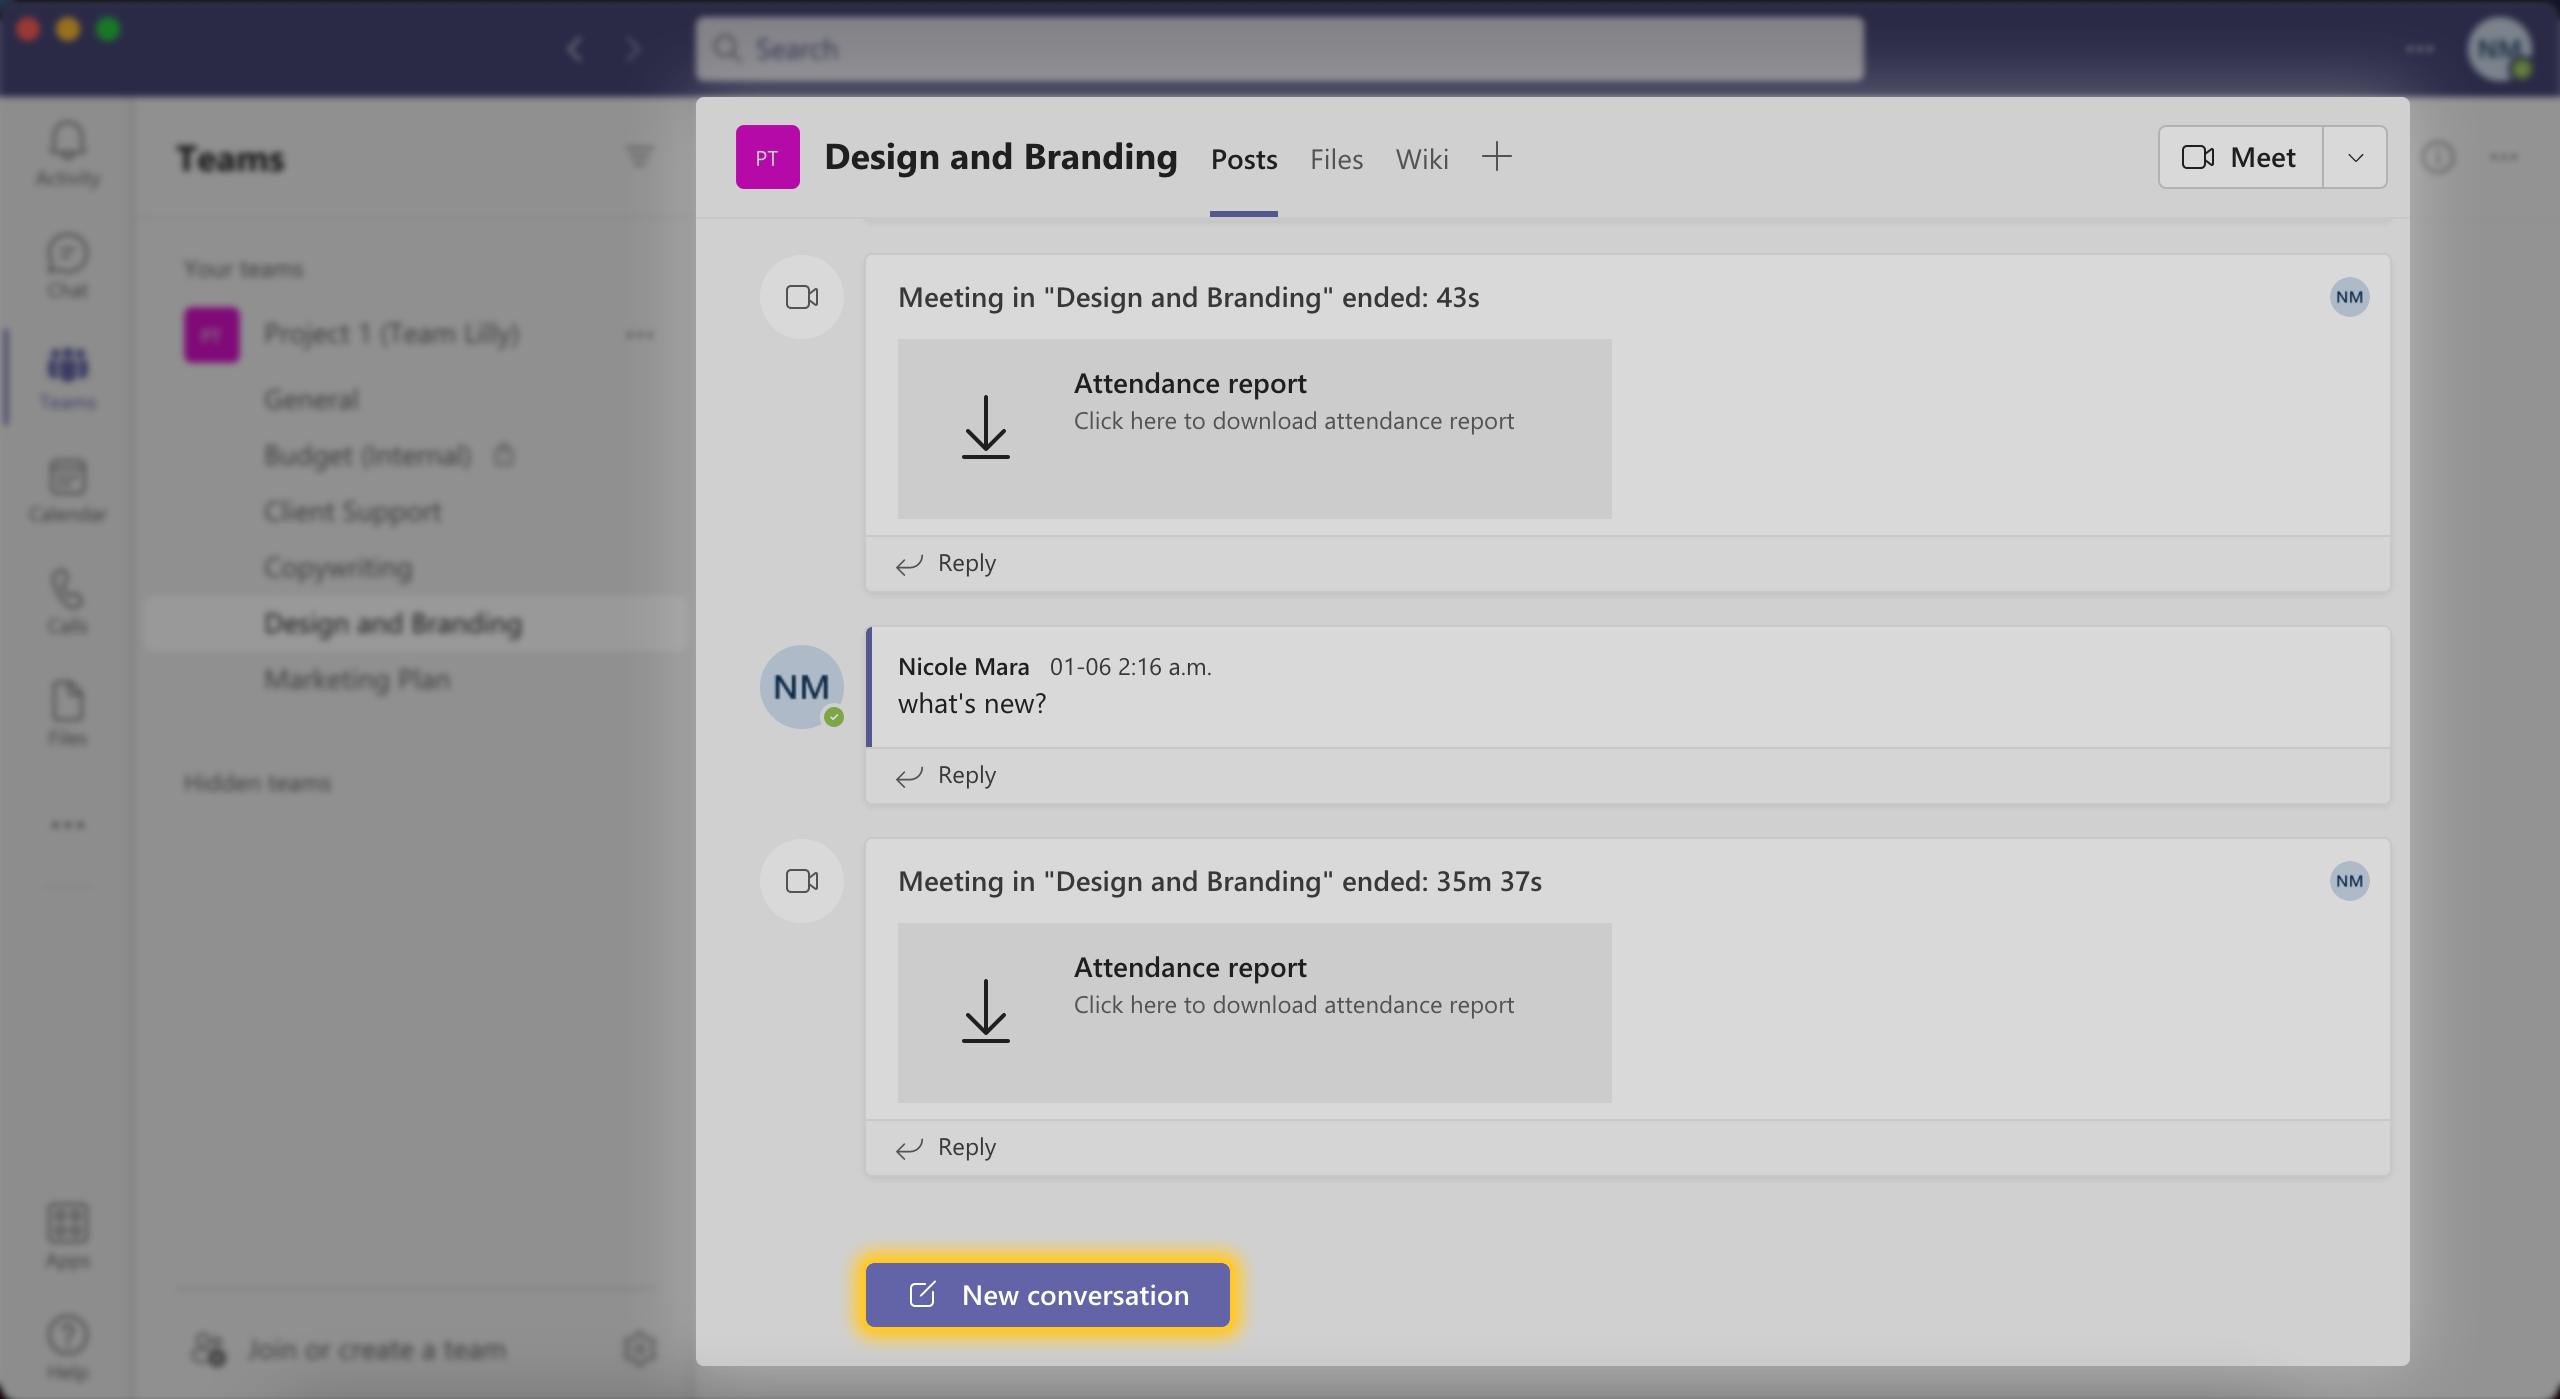
When you reply directly to a post made in your channel’s messages, you create a thread — a continuous conversation on a focused topic. As an admin, you want to make sure this is how your team members are using the Posts tab. By replying to an existing post instead of creating a new one, you and your employees can easily keep track of the conversation and any files shared in the thread.
Note
: If you restrict who can create posts in a channel, only the moderators and the team owner will be able to start new conversations.
Now let’s see how you can make your channel group chat fit your team’s specific needs with Formatting.
Message Formatting
Here’s an example. Say you want to send an announcement to your Design and Branding channel in your team and let them know their visual work is up and running on your website.
You’re going to want to do more than just send a block of text, right?
That’s where message formatting comes in. The bottom toolbar of your post in progress has a lofty “Format” option that lets you customize your message and make it stand out in the group chat.
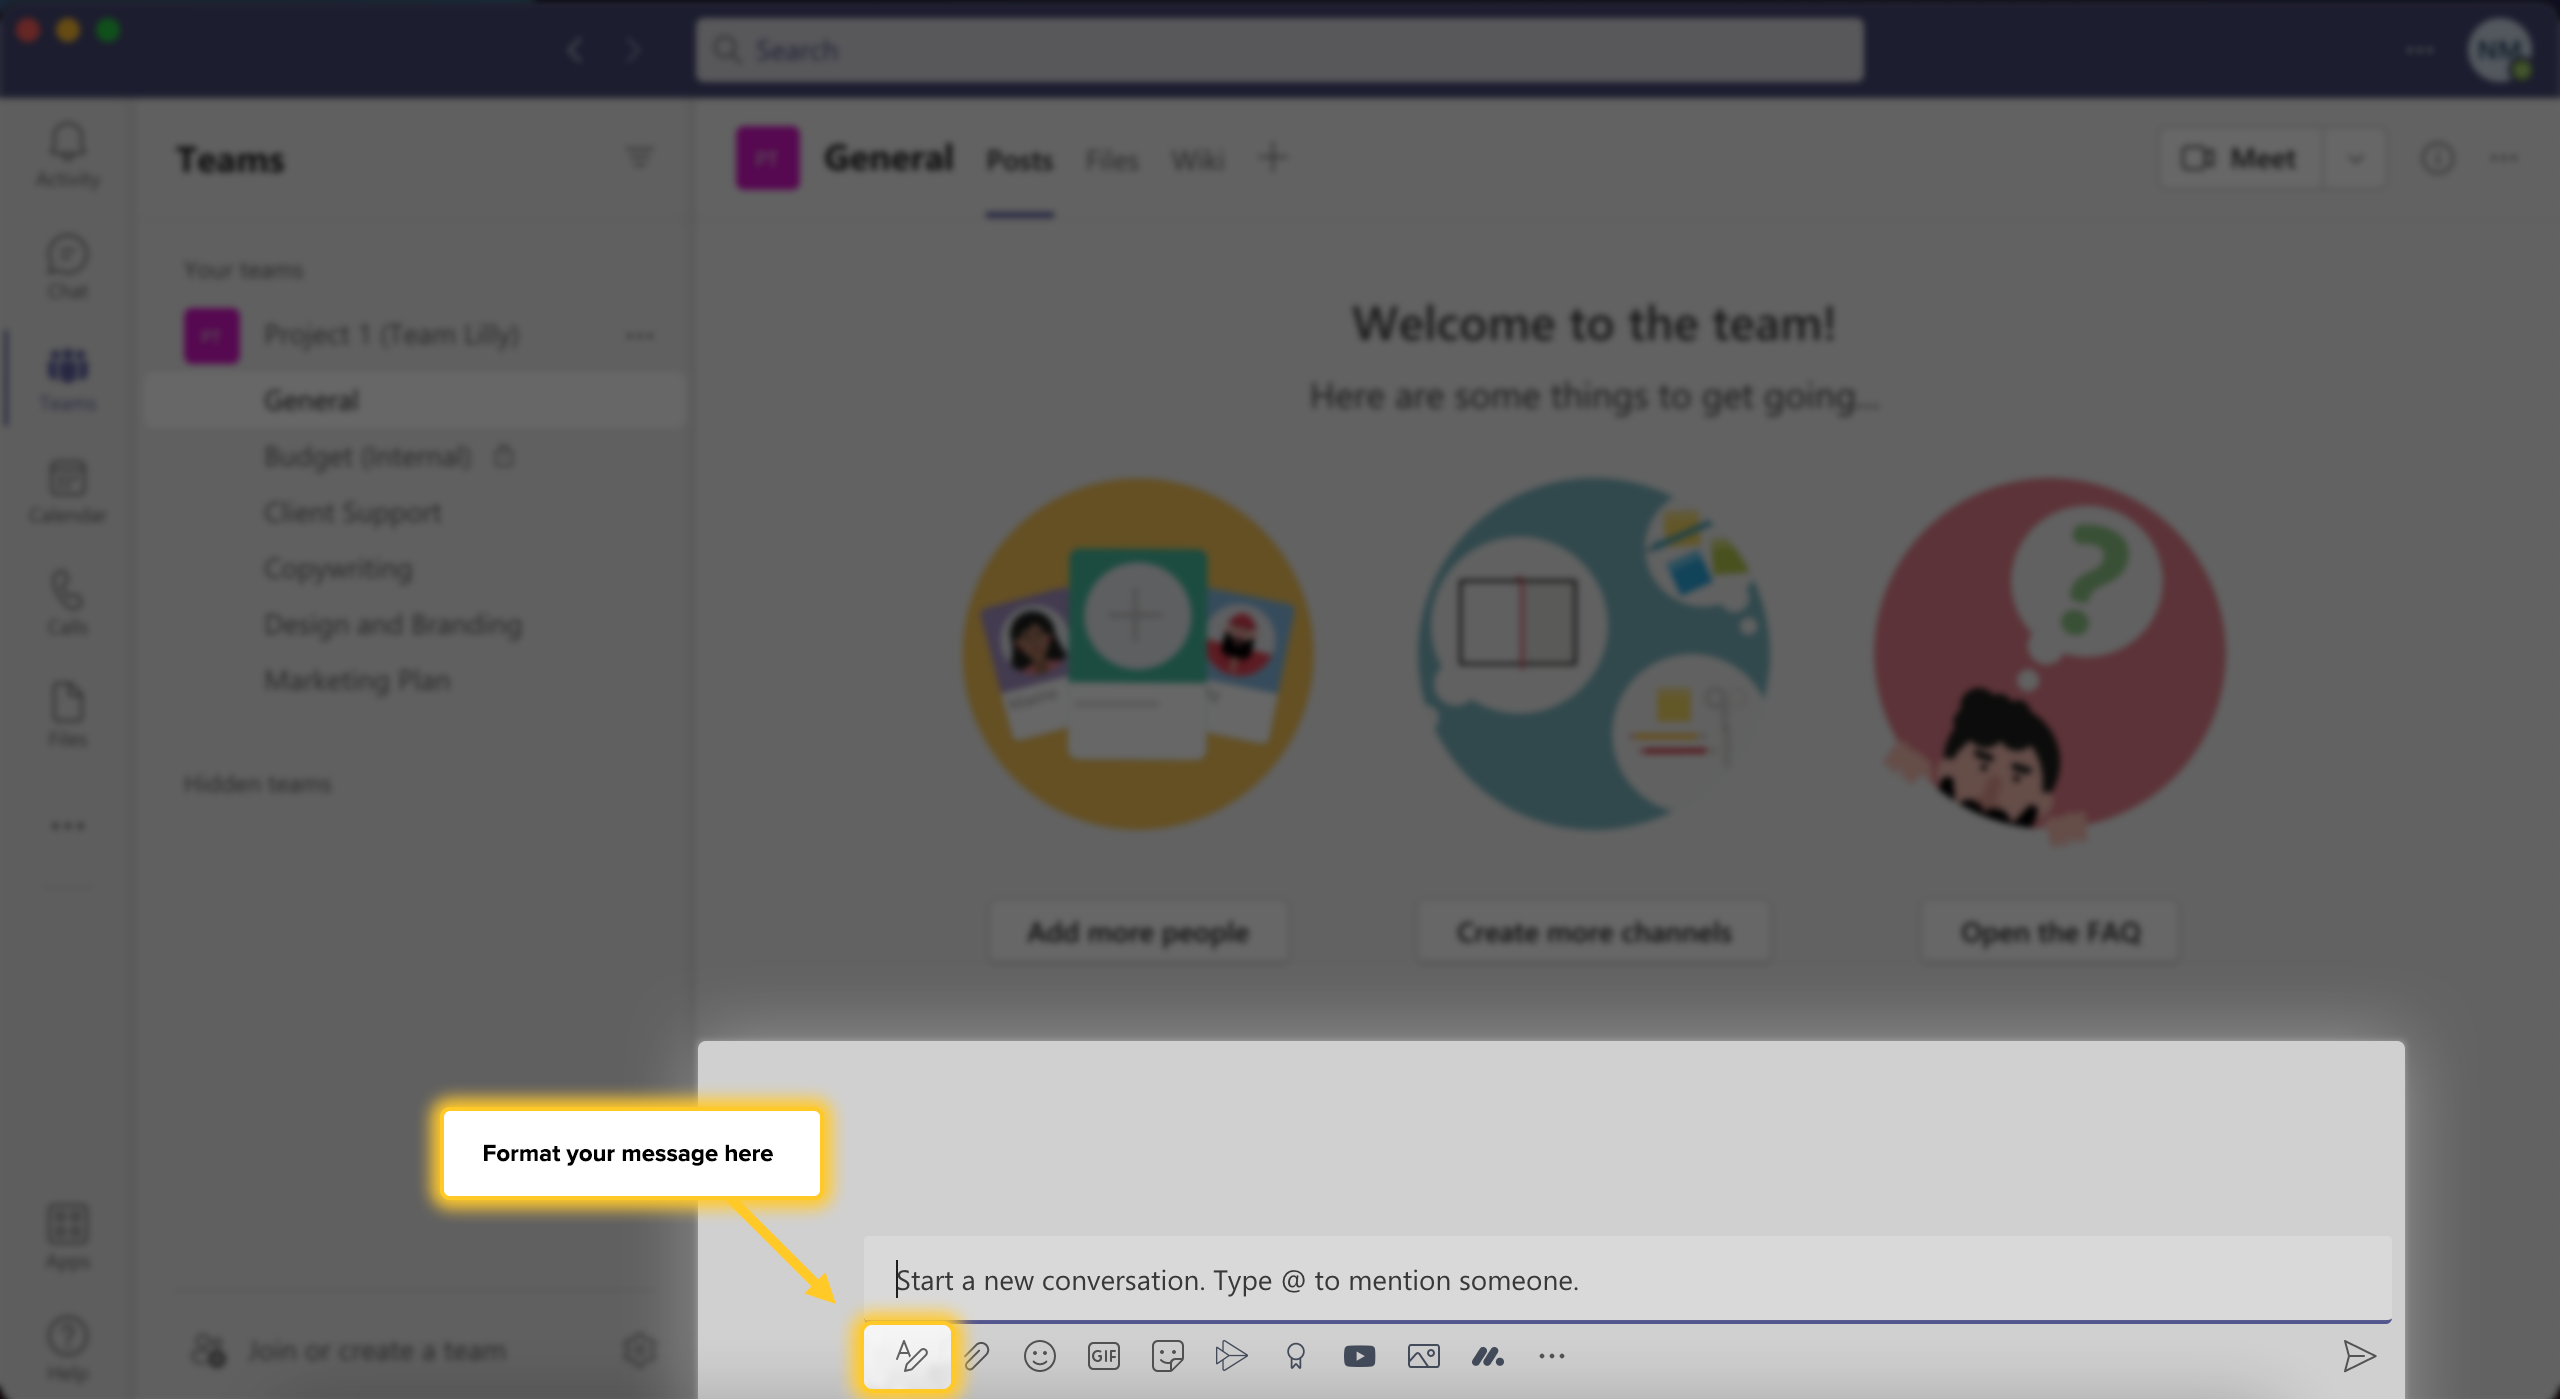
The “Format” function lets you:
- Use bolds and italics in your text
- Choose a font
- Create lists and paragraphs
- Make your message an announcement
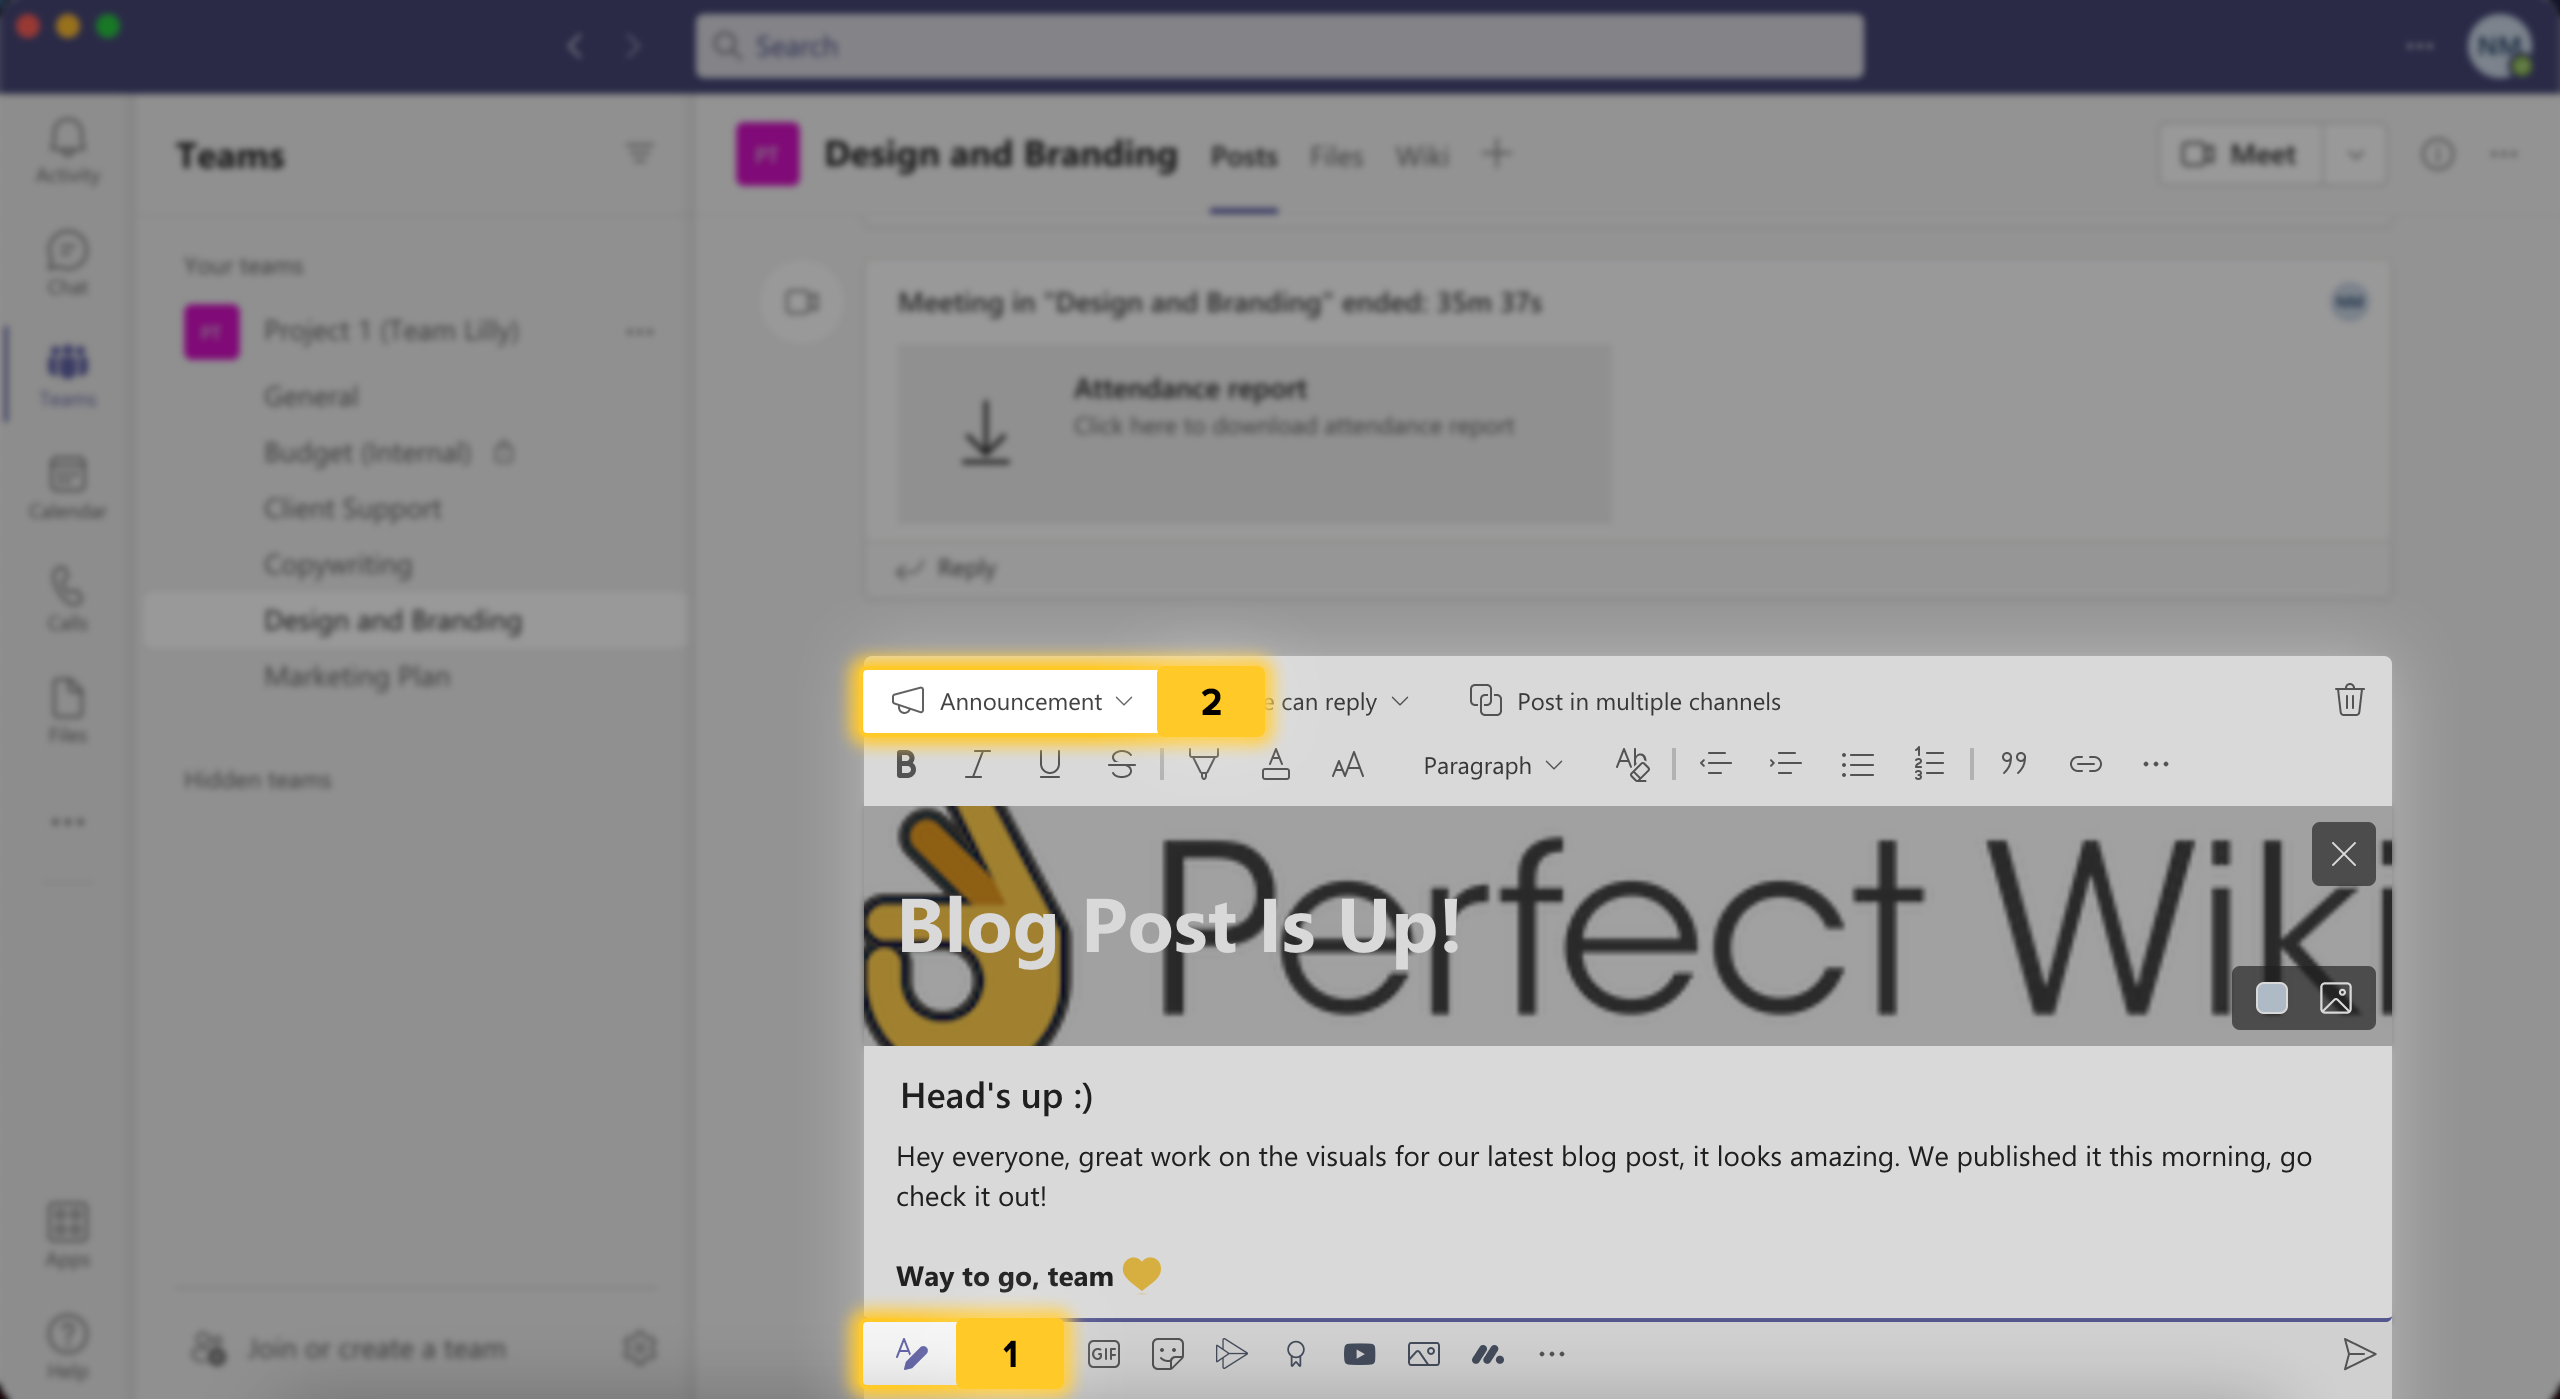
If you want to make an announcement, you will get a banner and title for the post like the one above. Everyone in the channel will be notified when you post it (so we say save announcements for the really important group-wide notices).
And did you know that you can modify who can respond to a post right from the post itself? Hit “Everyone can reply” on the top toolbar of your compose box, and you can choose between:
- Everyone can reply, or
- You and moderators can reply
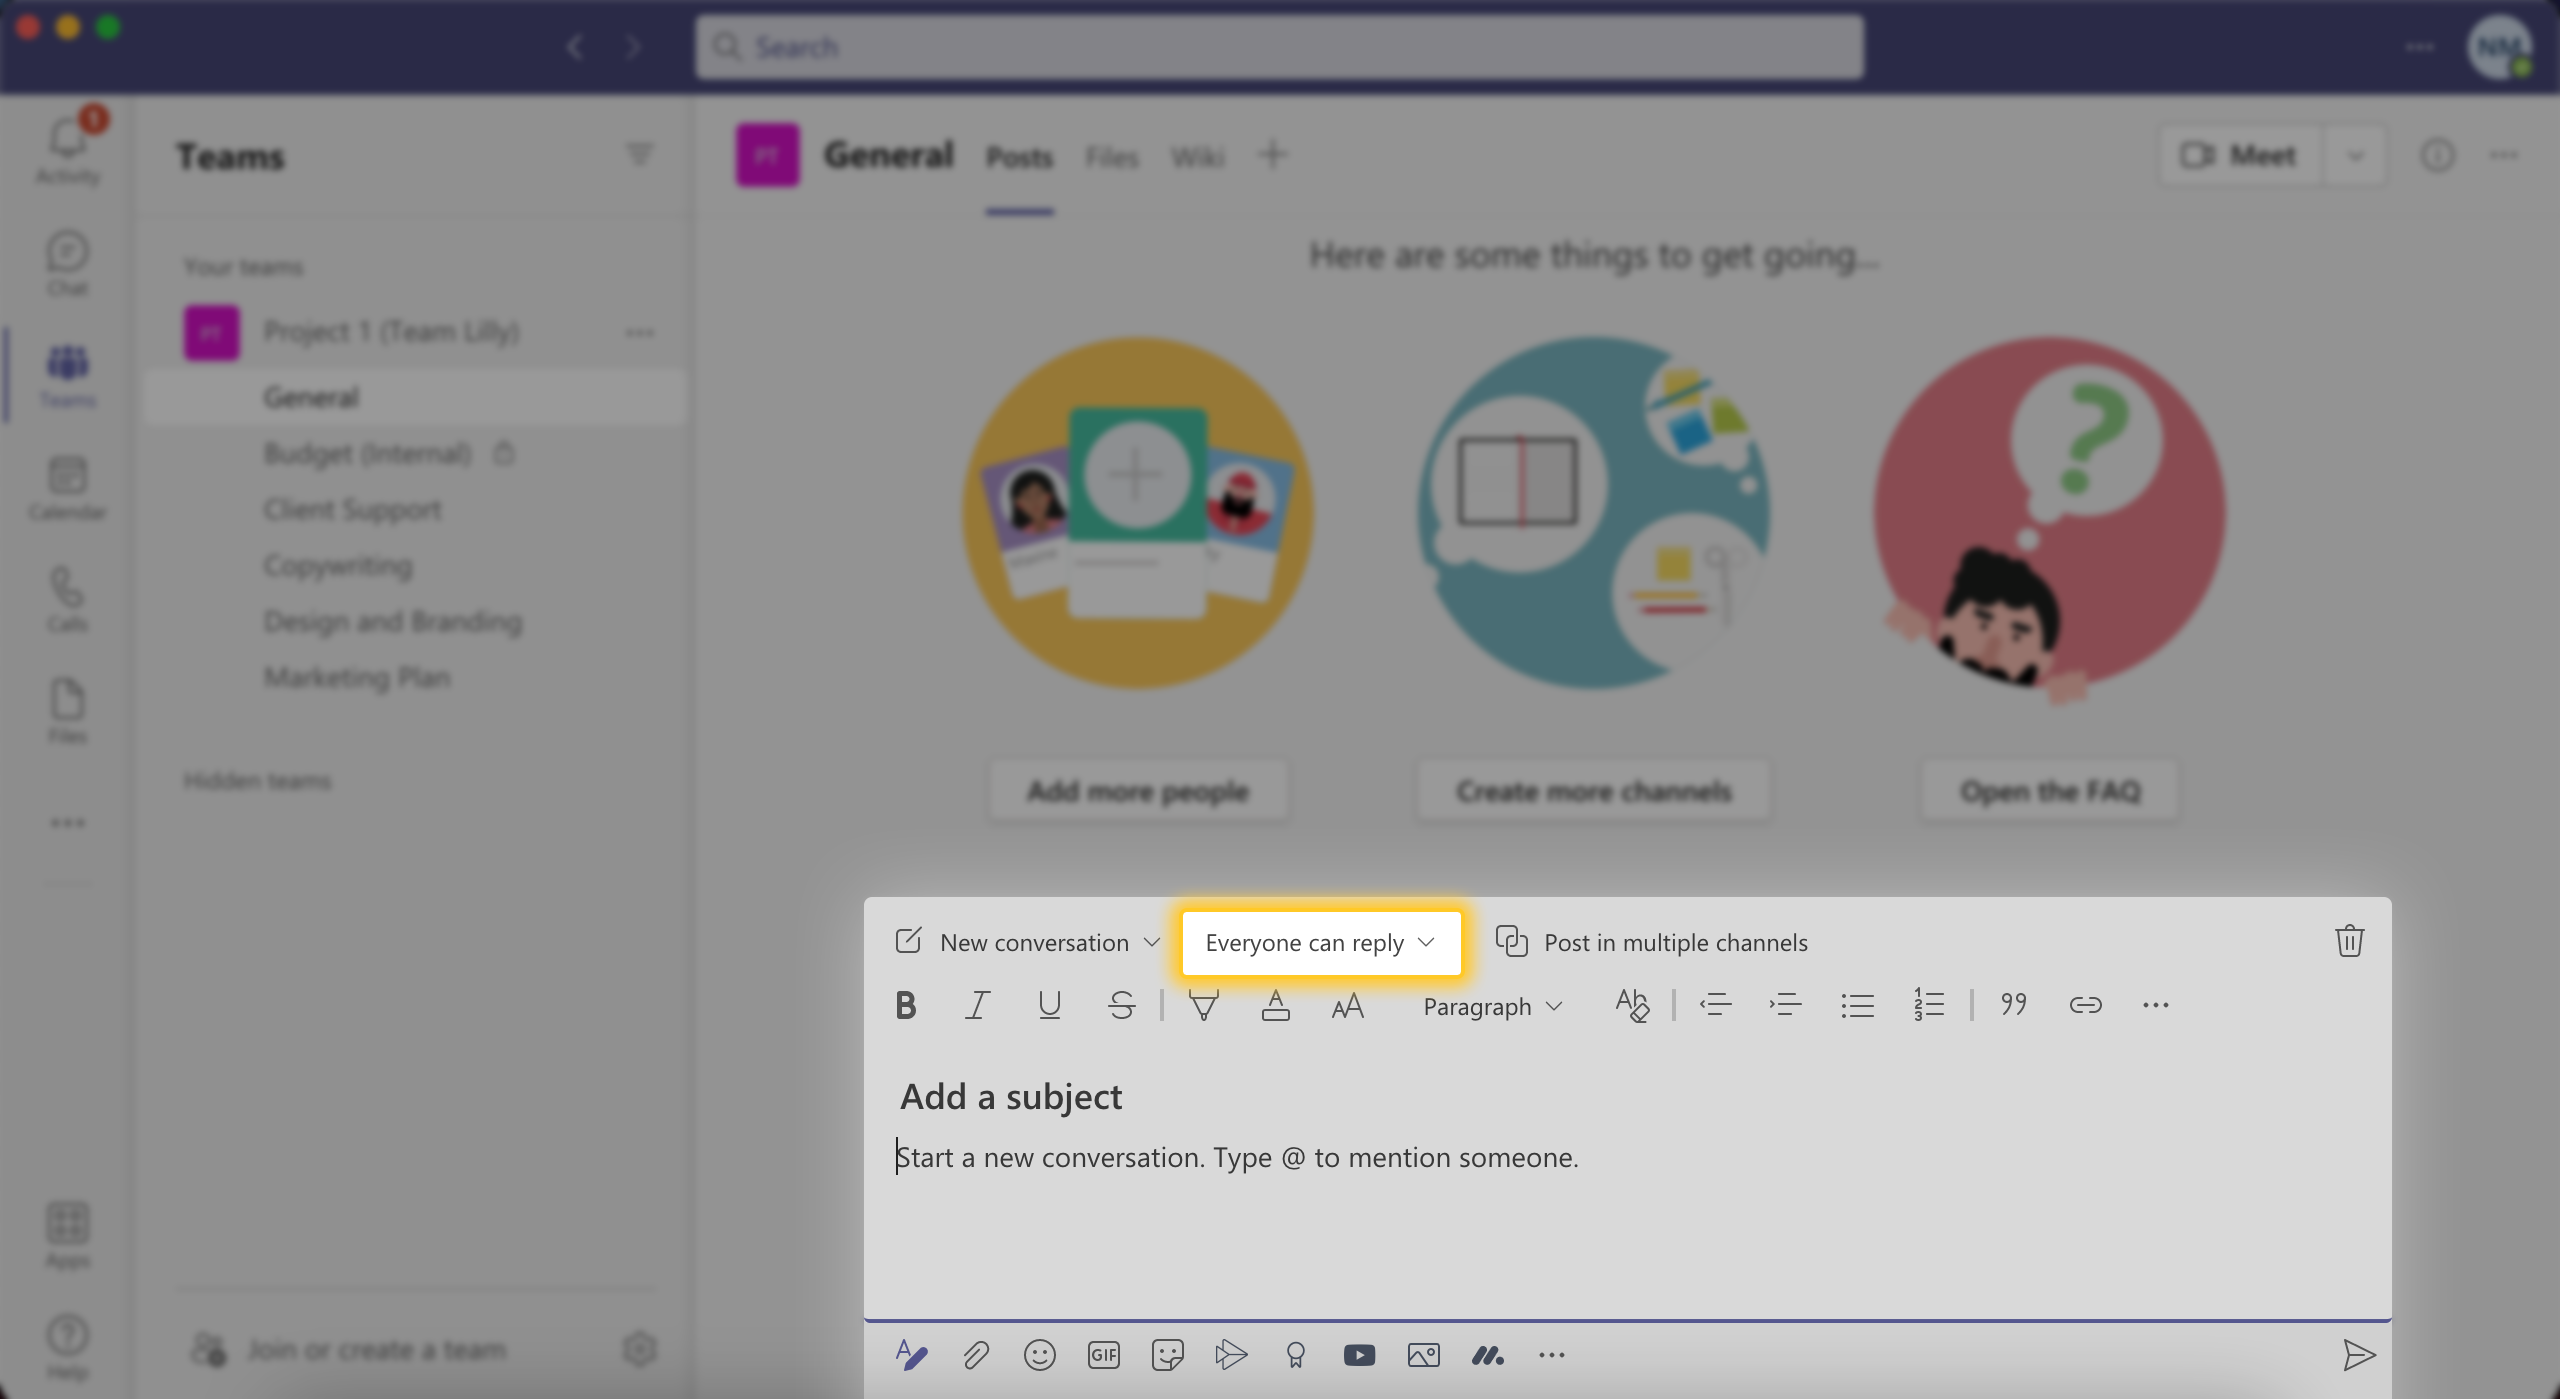
Note that this will only apply to that specific message, so if you want to permanently change who can respond to posts in a channel, see how to do that here.
Add Extensions to your Message Toolbar
You can do way more with messages than just create eye-catching posts. The “Messaging extensions” menu in your compose box opens up a whole world of apps and tools that you can add to your message toolbar.
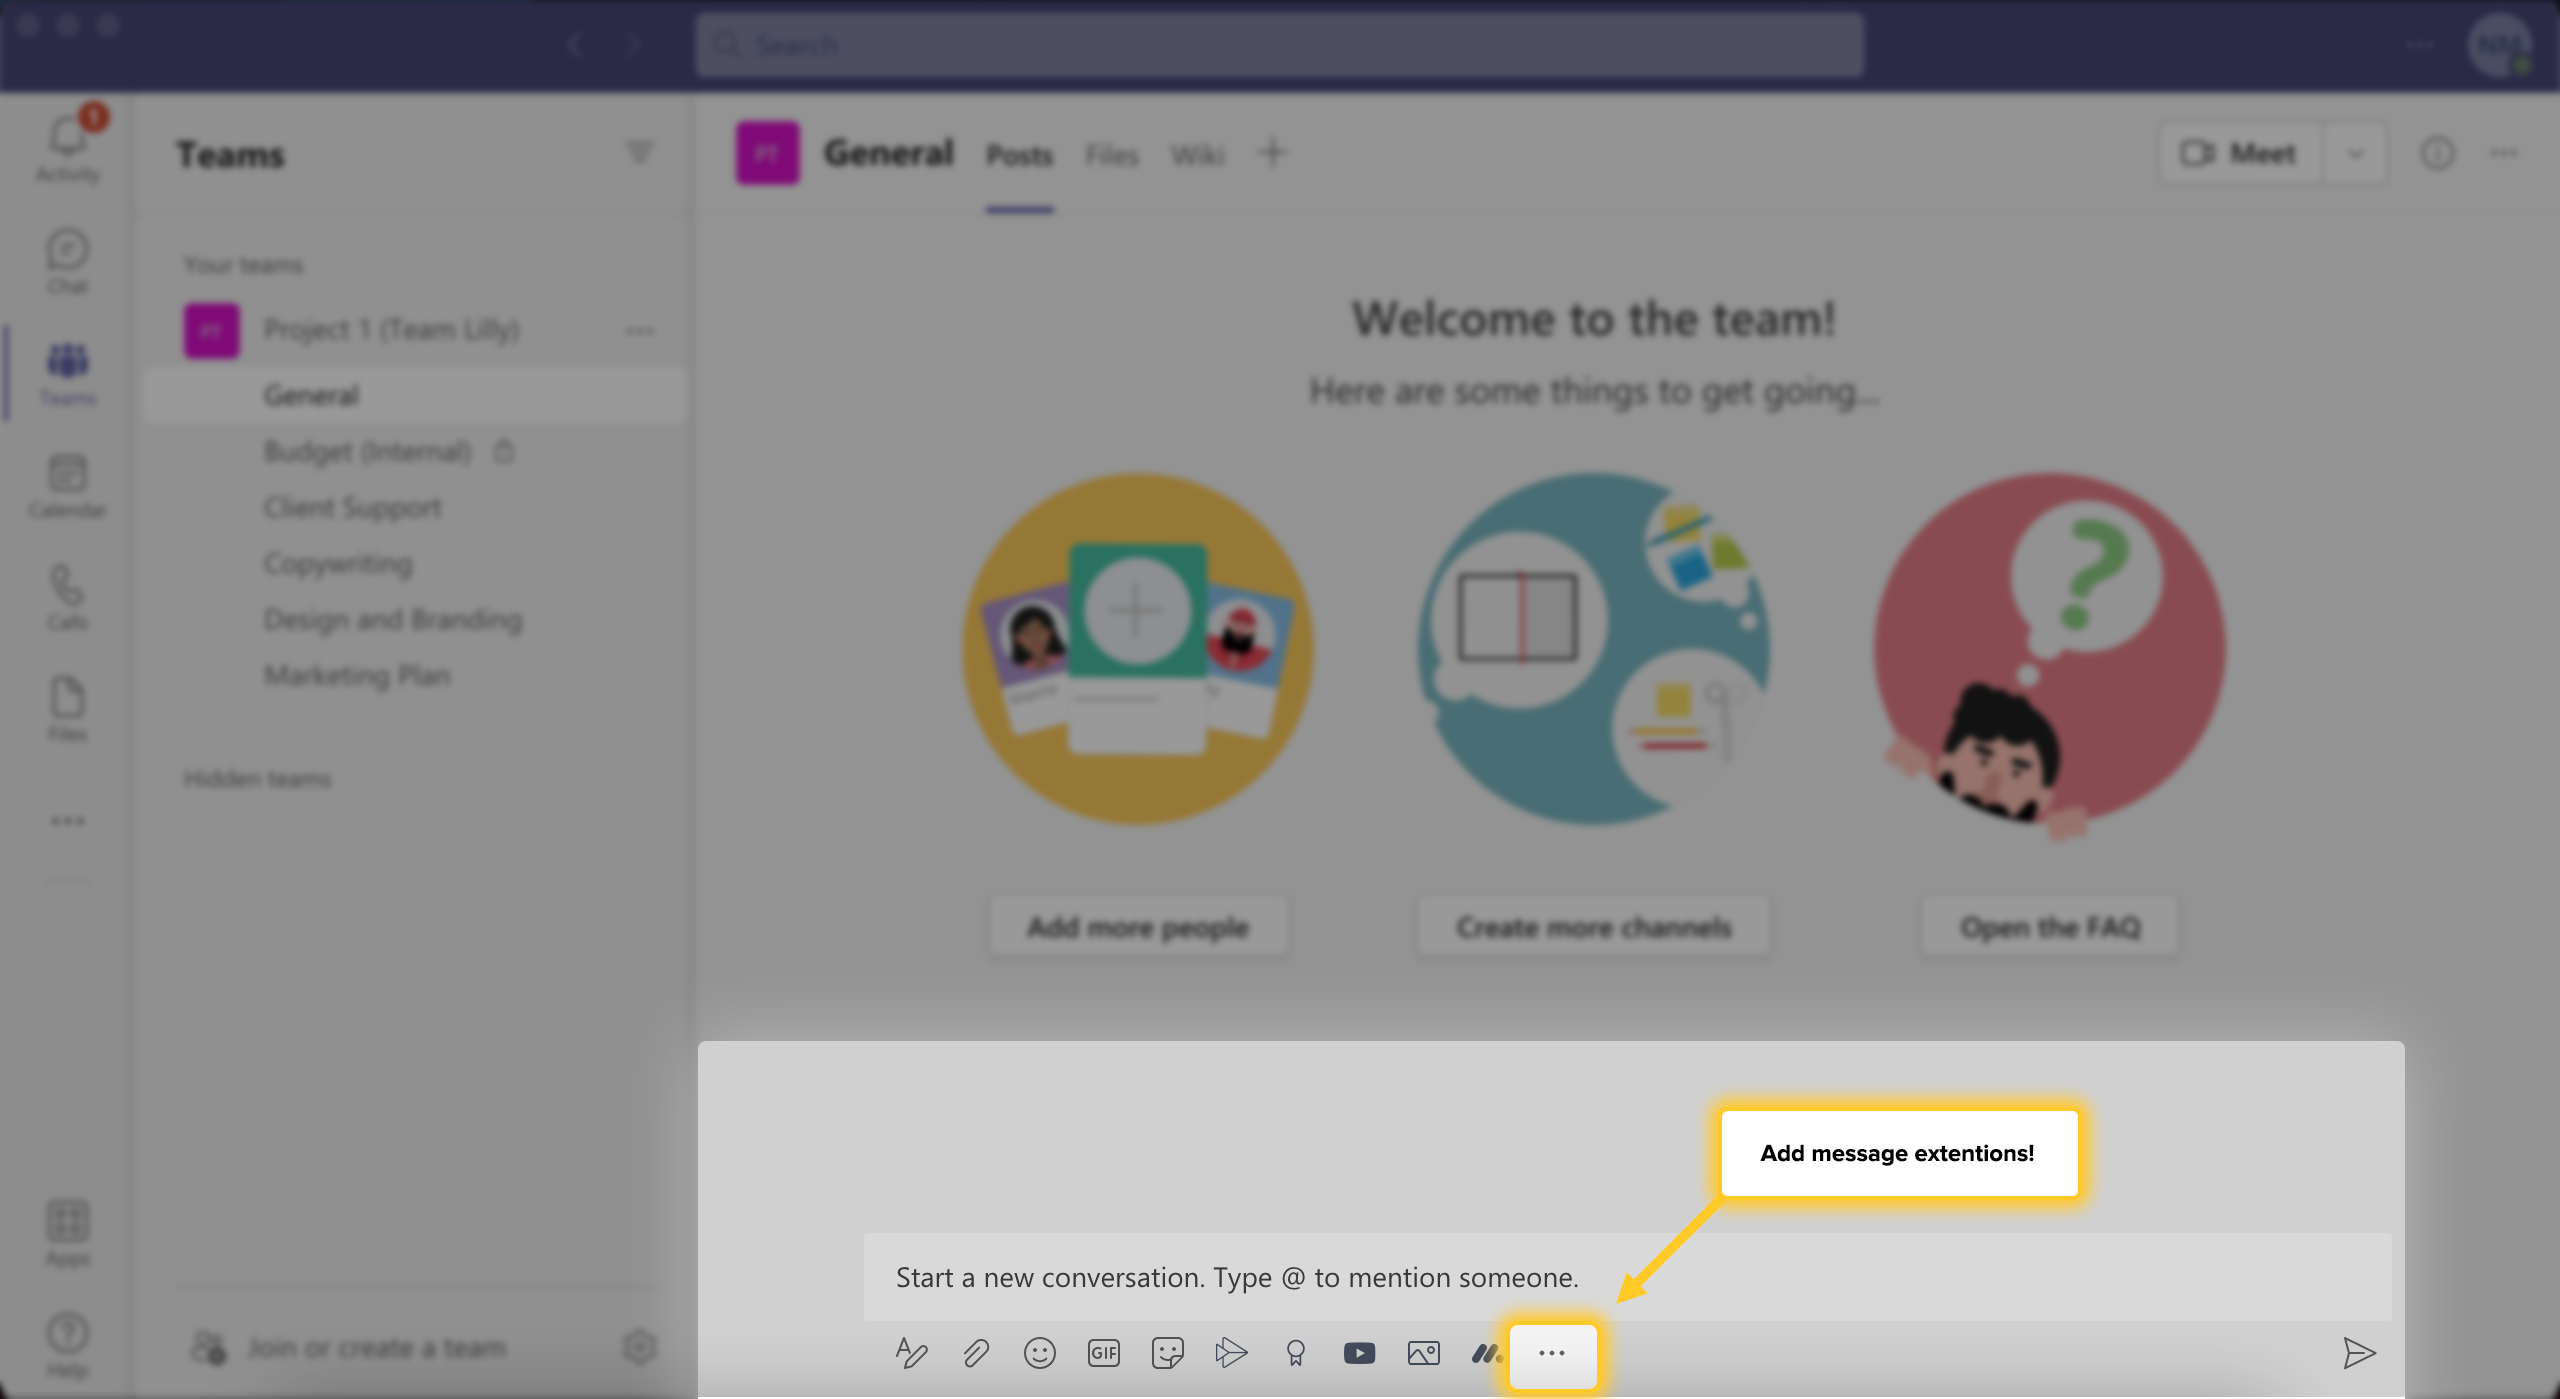
Do you want to send YouTube videos to your channel members? Add YouTube as an extension in seconds, and you can search for and embed full videos without leaving the group chat to search for them in your browser.
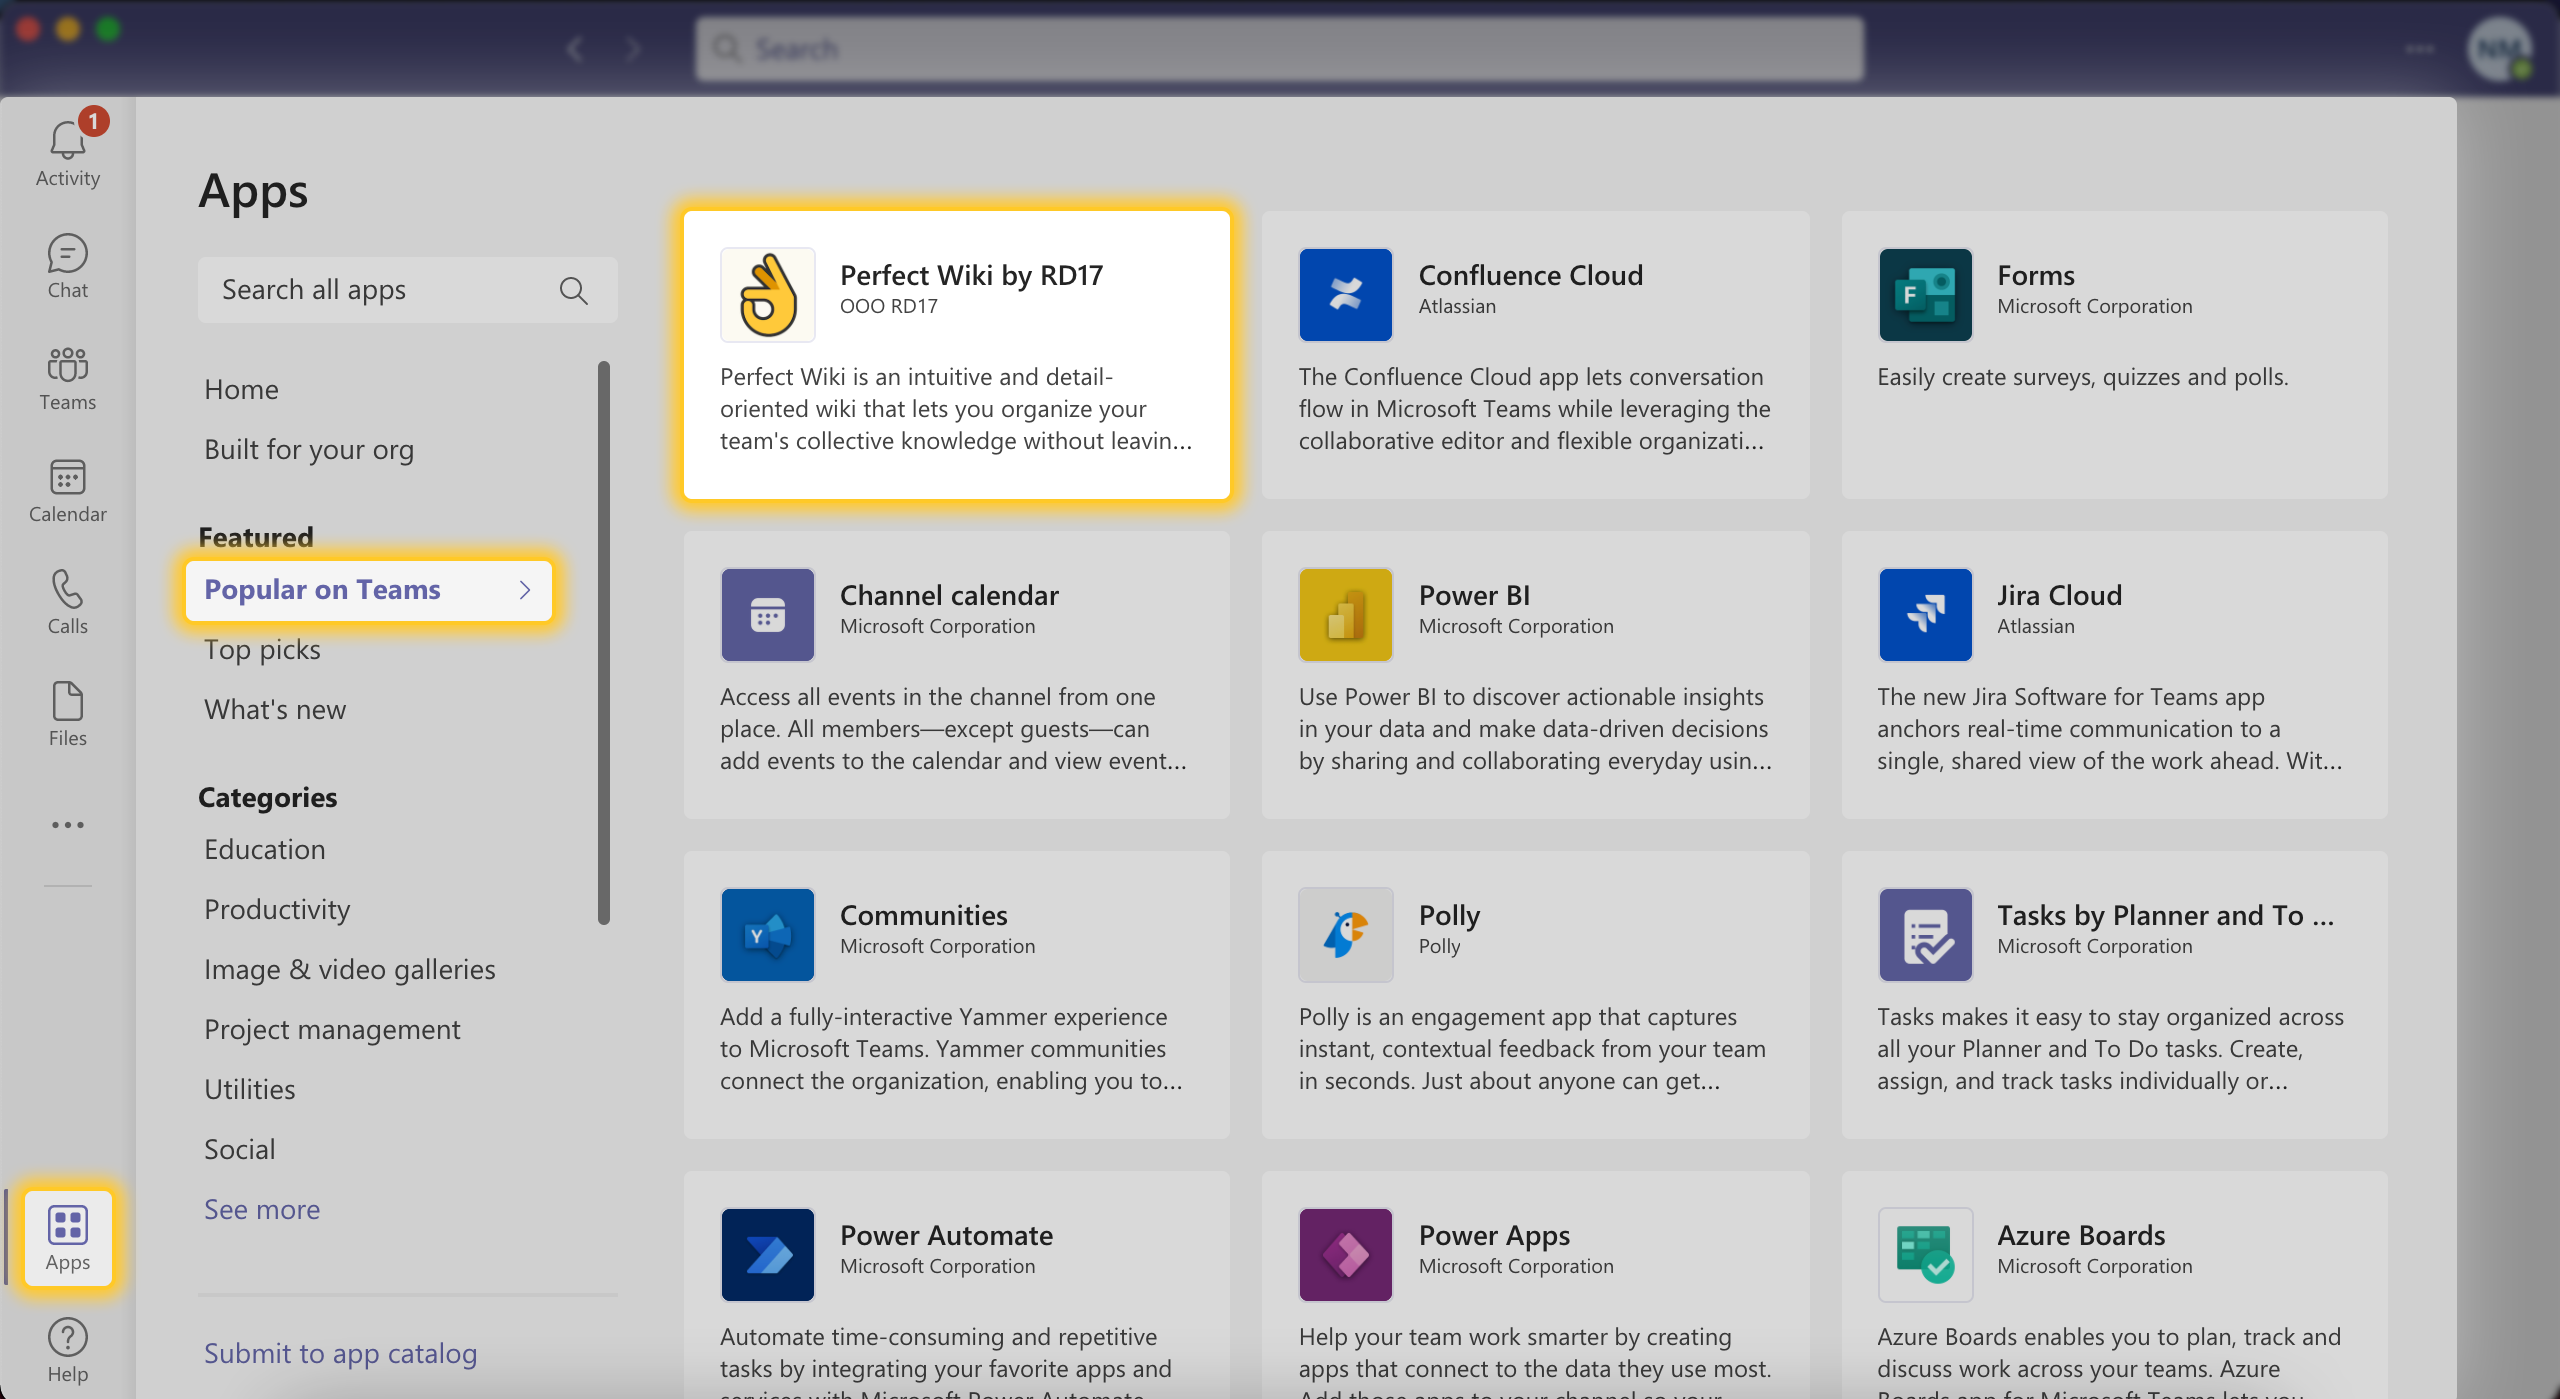
The app options are pretty extensive, and can really allow you to complete a ton of collaborative tasks right in the channel group chat. You can add tools that will:
- help you run a survey or poll (e.g. Forms)
- coordinate channel meetings (e.g. Channel Calendar)
- search for and embed images from the web (e.g. Images)
Note
: The extensions you add will only be visible and accessible in your message toolbar. If another user wants to embed videos or send a calendar, they will need to add that extension to their toolbar.
Apps developed by Microsoft will have a “Microsoft Corporation” label, are included in your Microsoft 365 subscription, and do not require any extra sign-in actions. Simply hit “Add” and it will appear in your toolbar!
If you and your team use external productivity apps and you want to use it with your channel mates, you will all have to sign in to that app. Your channel members will get a prompt from that app in their private inbox, and once they sign in they can interact with the extension in the channel group chat.
The great thing about Perfect Wiki is that you and your members don’t have to sign in before using it. All you have to do is add it as a tab to any channel of your choice (yep, private channels too) and you can start collaborating with your team instantly.
Pro tip
: You can remove an extension from your toolbar by right clicking on it and selecting “Unpin”.
Mention Members
To catch the attention of a specific person or a few people in a channel, type “@” and then their name as it’s displayed in Teams. They will get a notification regardless of whether they have that channel hidden or if they have notifications turned off.
Message to Multiple Channels at Once
If you have an announcement that you want to make to more than one channel, but not to EVERYONE on the team?
You can make a post to multiple channels at once. Here’s how:
- Click “New conversation”
- Hit the “Format” button on your compose box toolbar
- Hit “Post in multiple channels” at the top
- Go to “Select channels” and choose one or more channels
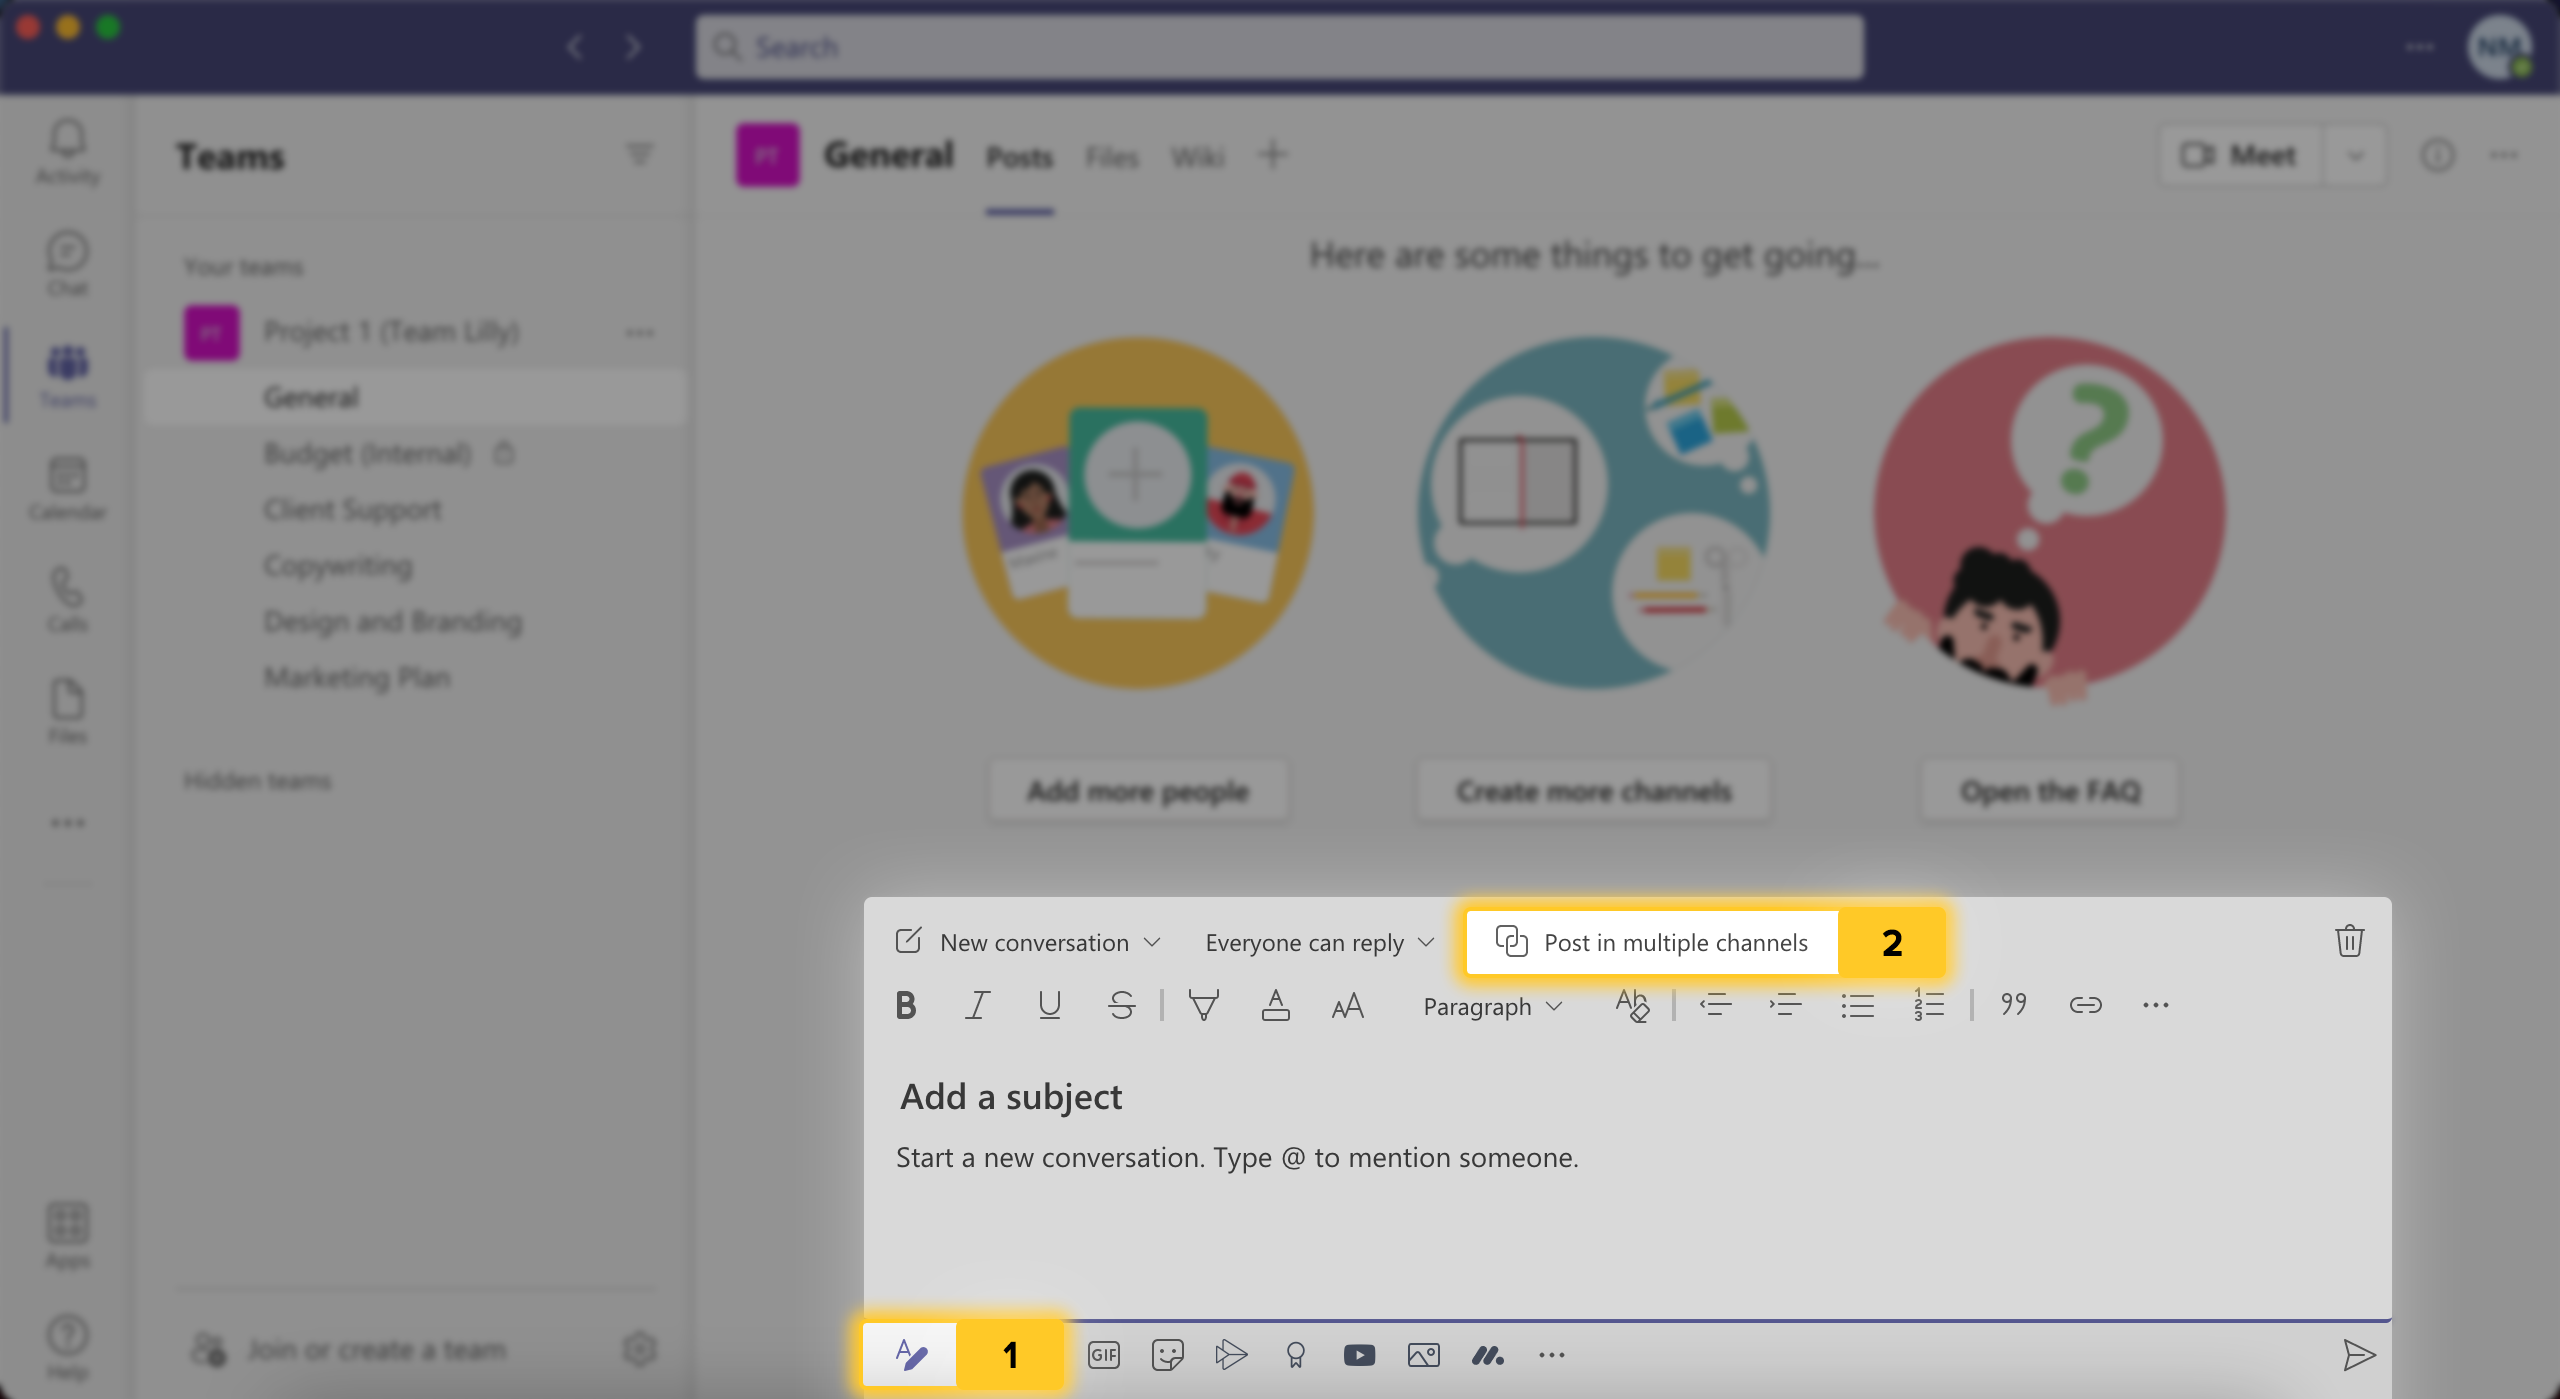
All the channels that receive the post will be able to interact with it and respond.
FYI, you can also do this retroactively. Here’s how:
- Click on the “More options” ellipses on the message you sent
- Click “Edit”
And after that, follow the same steps we outlined above for doing this from the compose box.
When you make a post to multiple channels, the responses don’t transfer. So you can really only cross-post a message or announcement on its own, but the response thread that comes from it stays bound to whatever channel it’s happening in.
Channel Emails: Communicate with External Users
Sometimes you end up working with a client or external user that can’t (or won’t) communicate with you in Microsoft Teams, and mostly uses email. But if most of your workflow happens in channels, it doesn’t make sense to forward emails to your team members and have them switch around between workspaces.
You can bridge that digital gap by getting a channel’s email. All you have to do is:
- Go to a channel’s “More options” menu
- Select “Get email address”
- Copy the address and forward it to external users
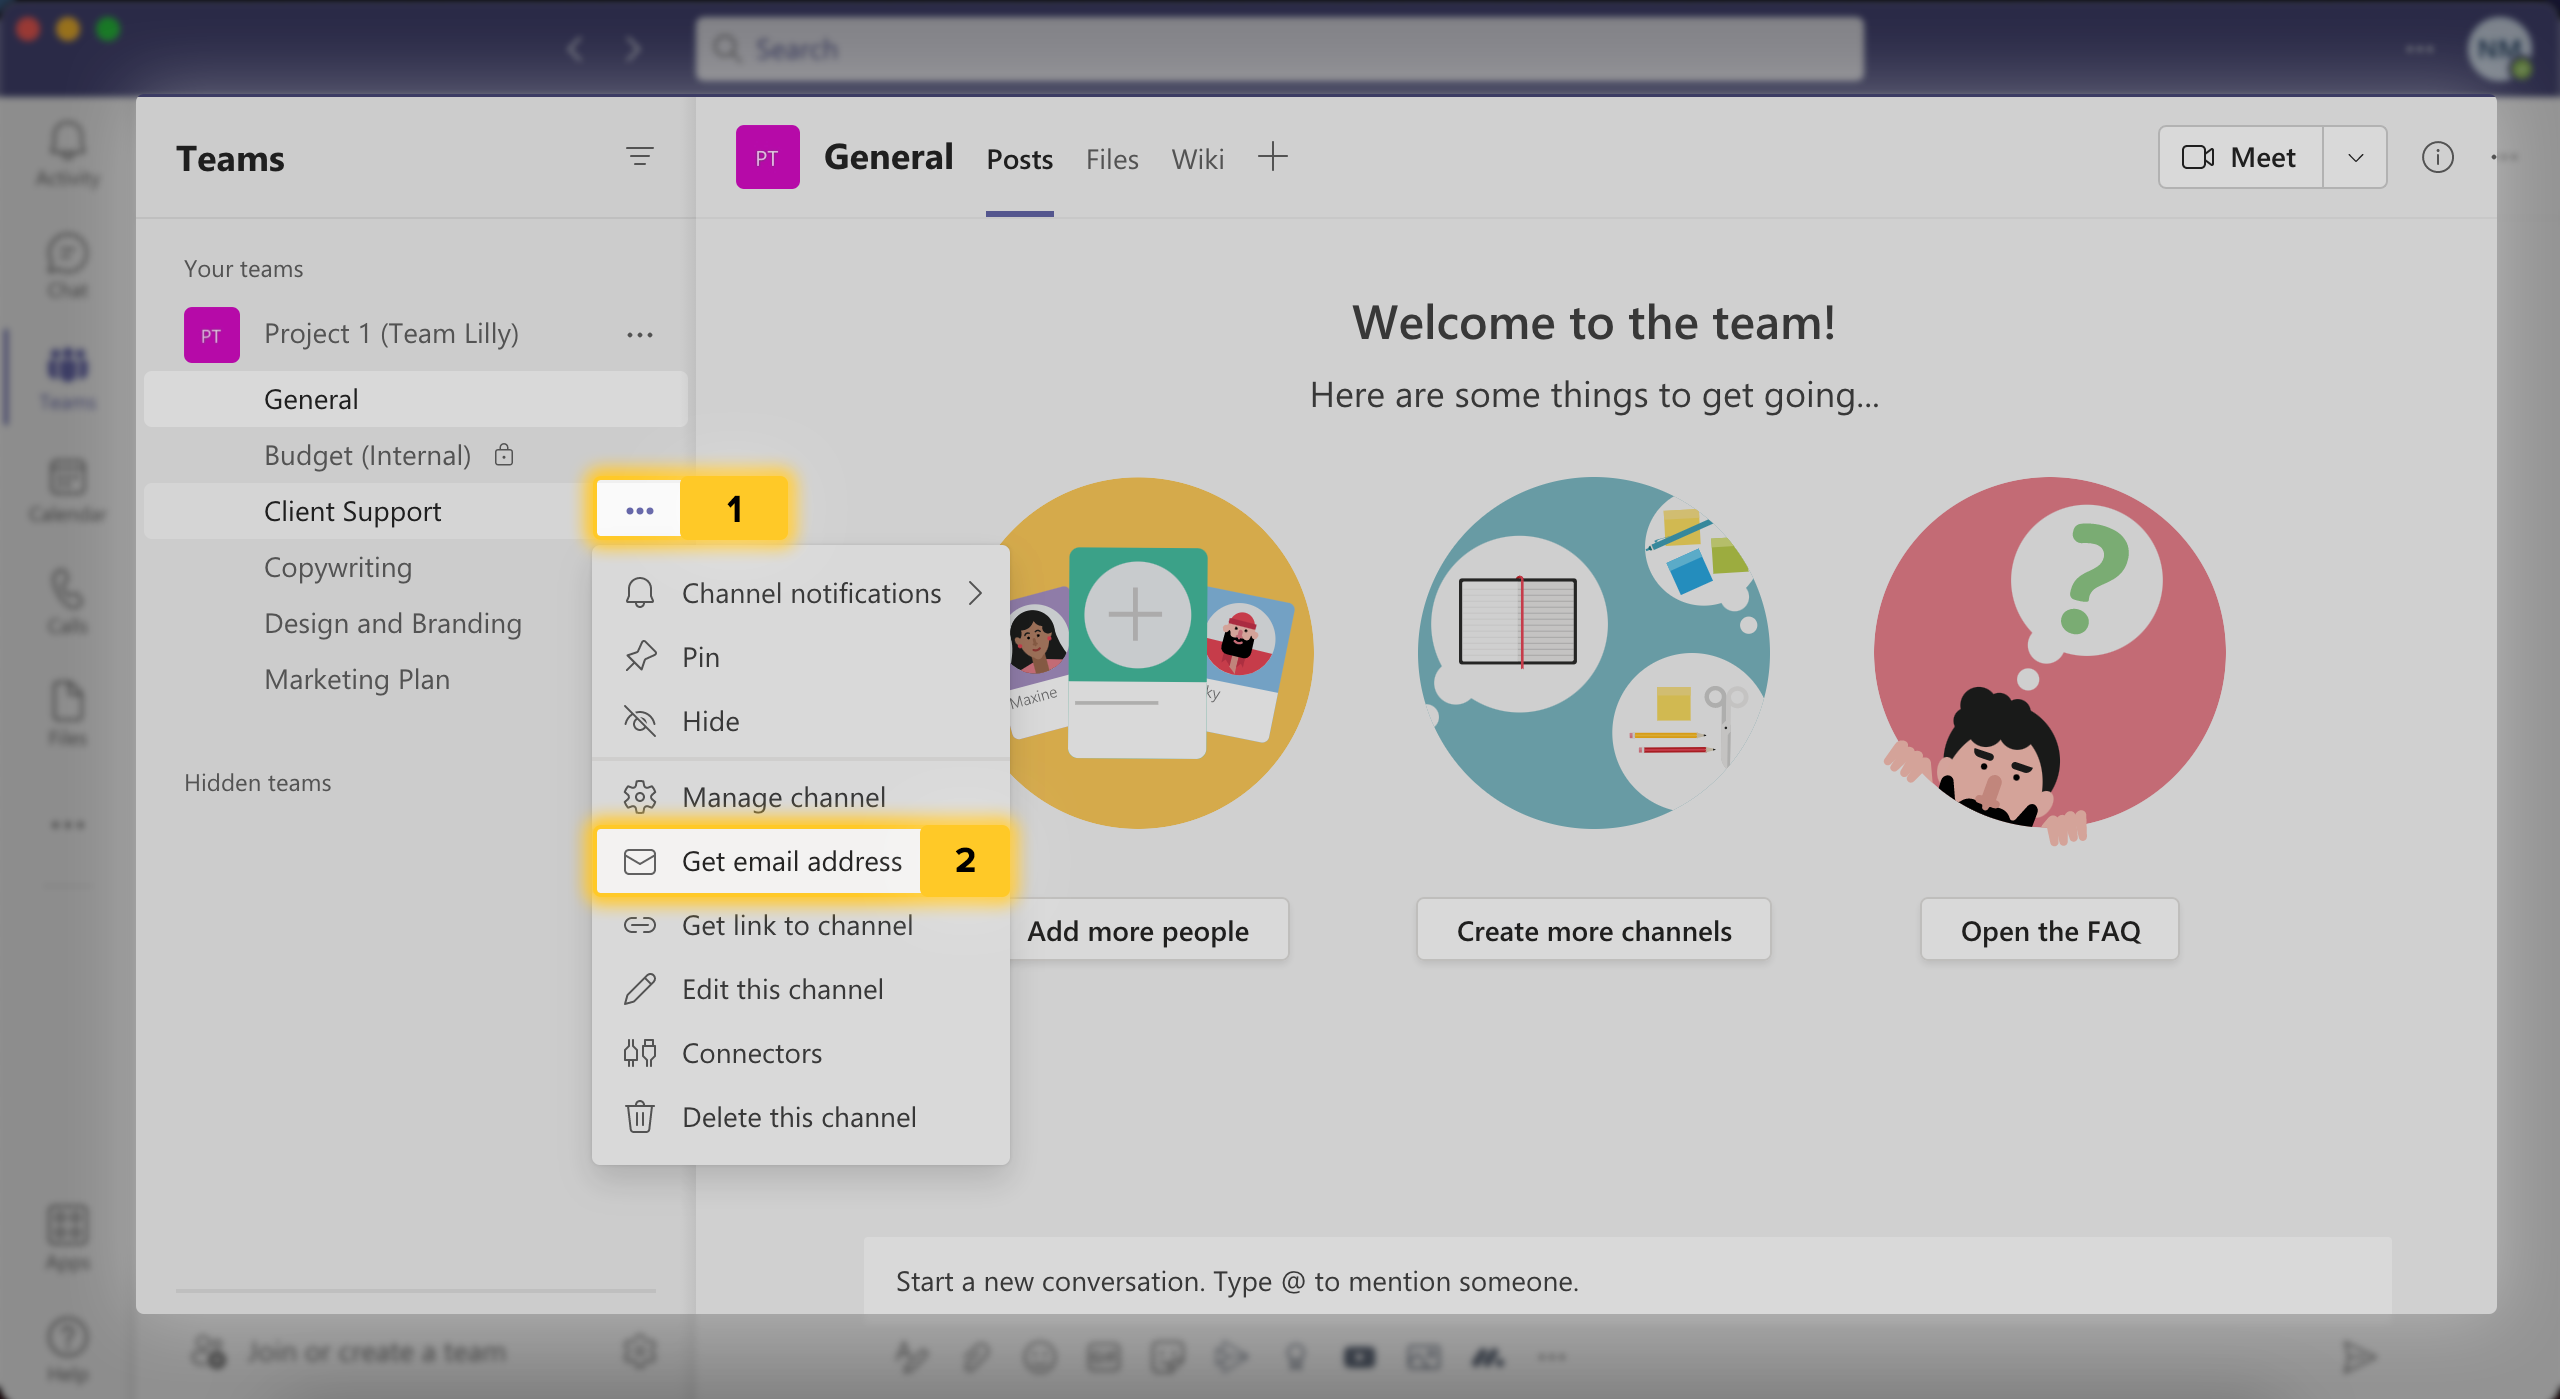
Using a channel’s email is also handy when you yourself have a thread or message in your email that you want a channel group to see.
The channel members will be able to respond to the email in the Posts tab of the channel, but those responses won’t be sent out as emails back to the sender. So it’s really just a way to get emails to your channel group since that’s where all the work is happening.
You’re likely wondering if there’s any other way for channel users to collaborate that is more real-time and personable, and the answer is absolutely — through channel meetings. Let’s take a look at how to use them and some best practices.
3. Channel Meetings
Plenty of companies have adapted to virtual meetings in the last couple years (gosh, has it really been that long?) as the go-to way to sync tasks remotely. If you’re in the same boat, we’re here to tell you that you don’t even have to leave your channel to have a productive virtual meeting.
The big advantage of channel meetings is you can meet with your focus group right where they are, without having to create a separate group chat or invite users individually.
Start and Schedule Meetings
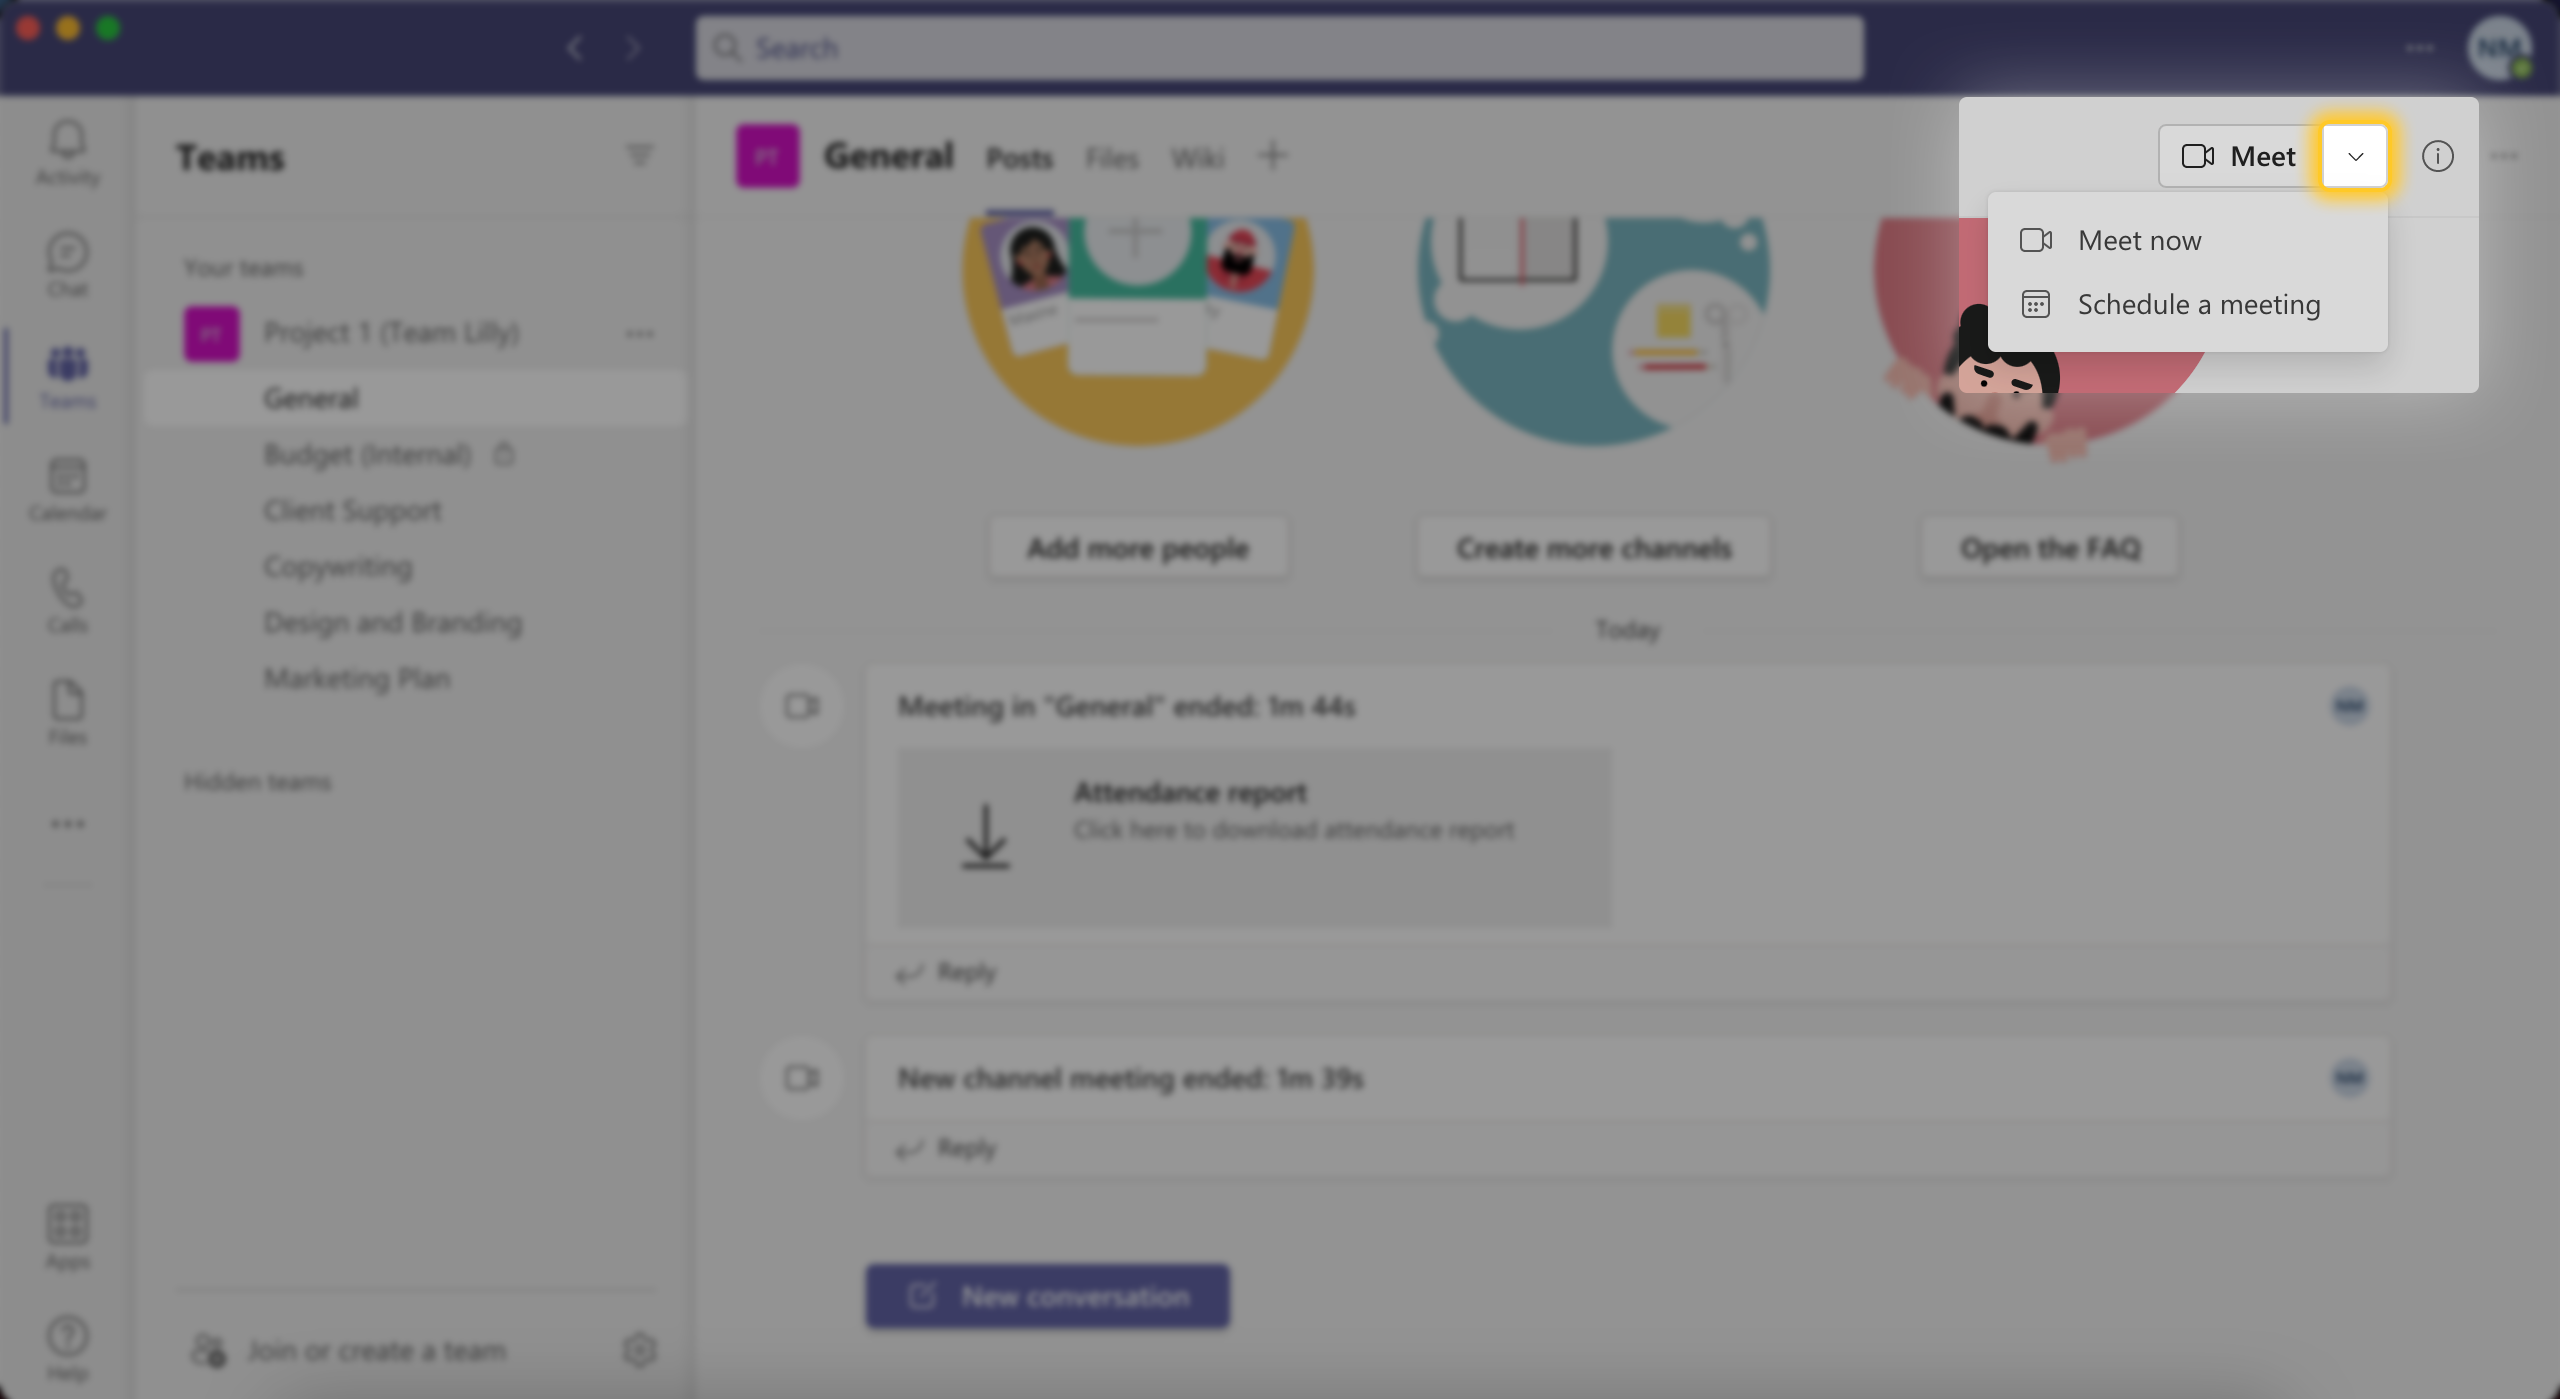
To start a meeting in a channel on the spot, go to “Meet” > “Meet now” at the top of your chosen channel screen.
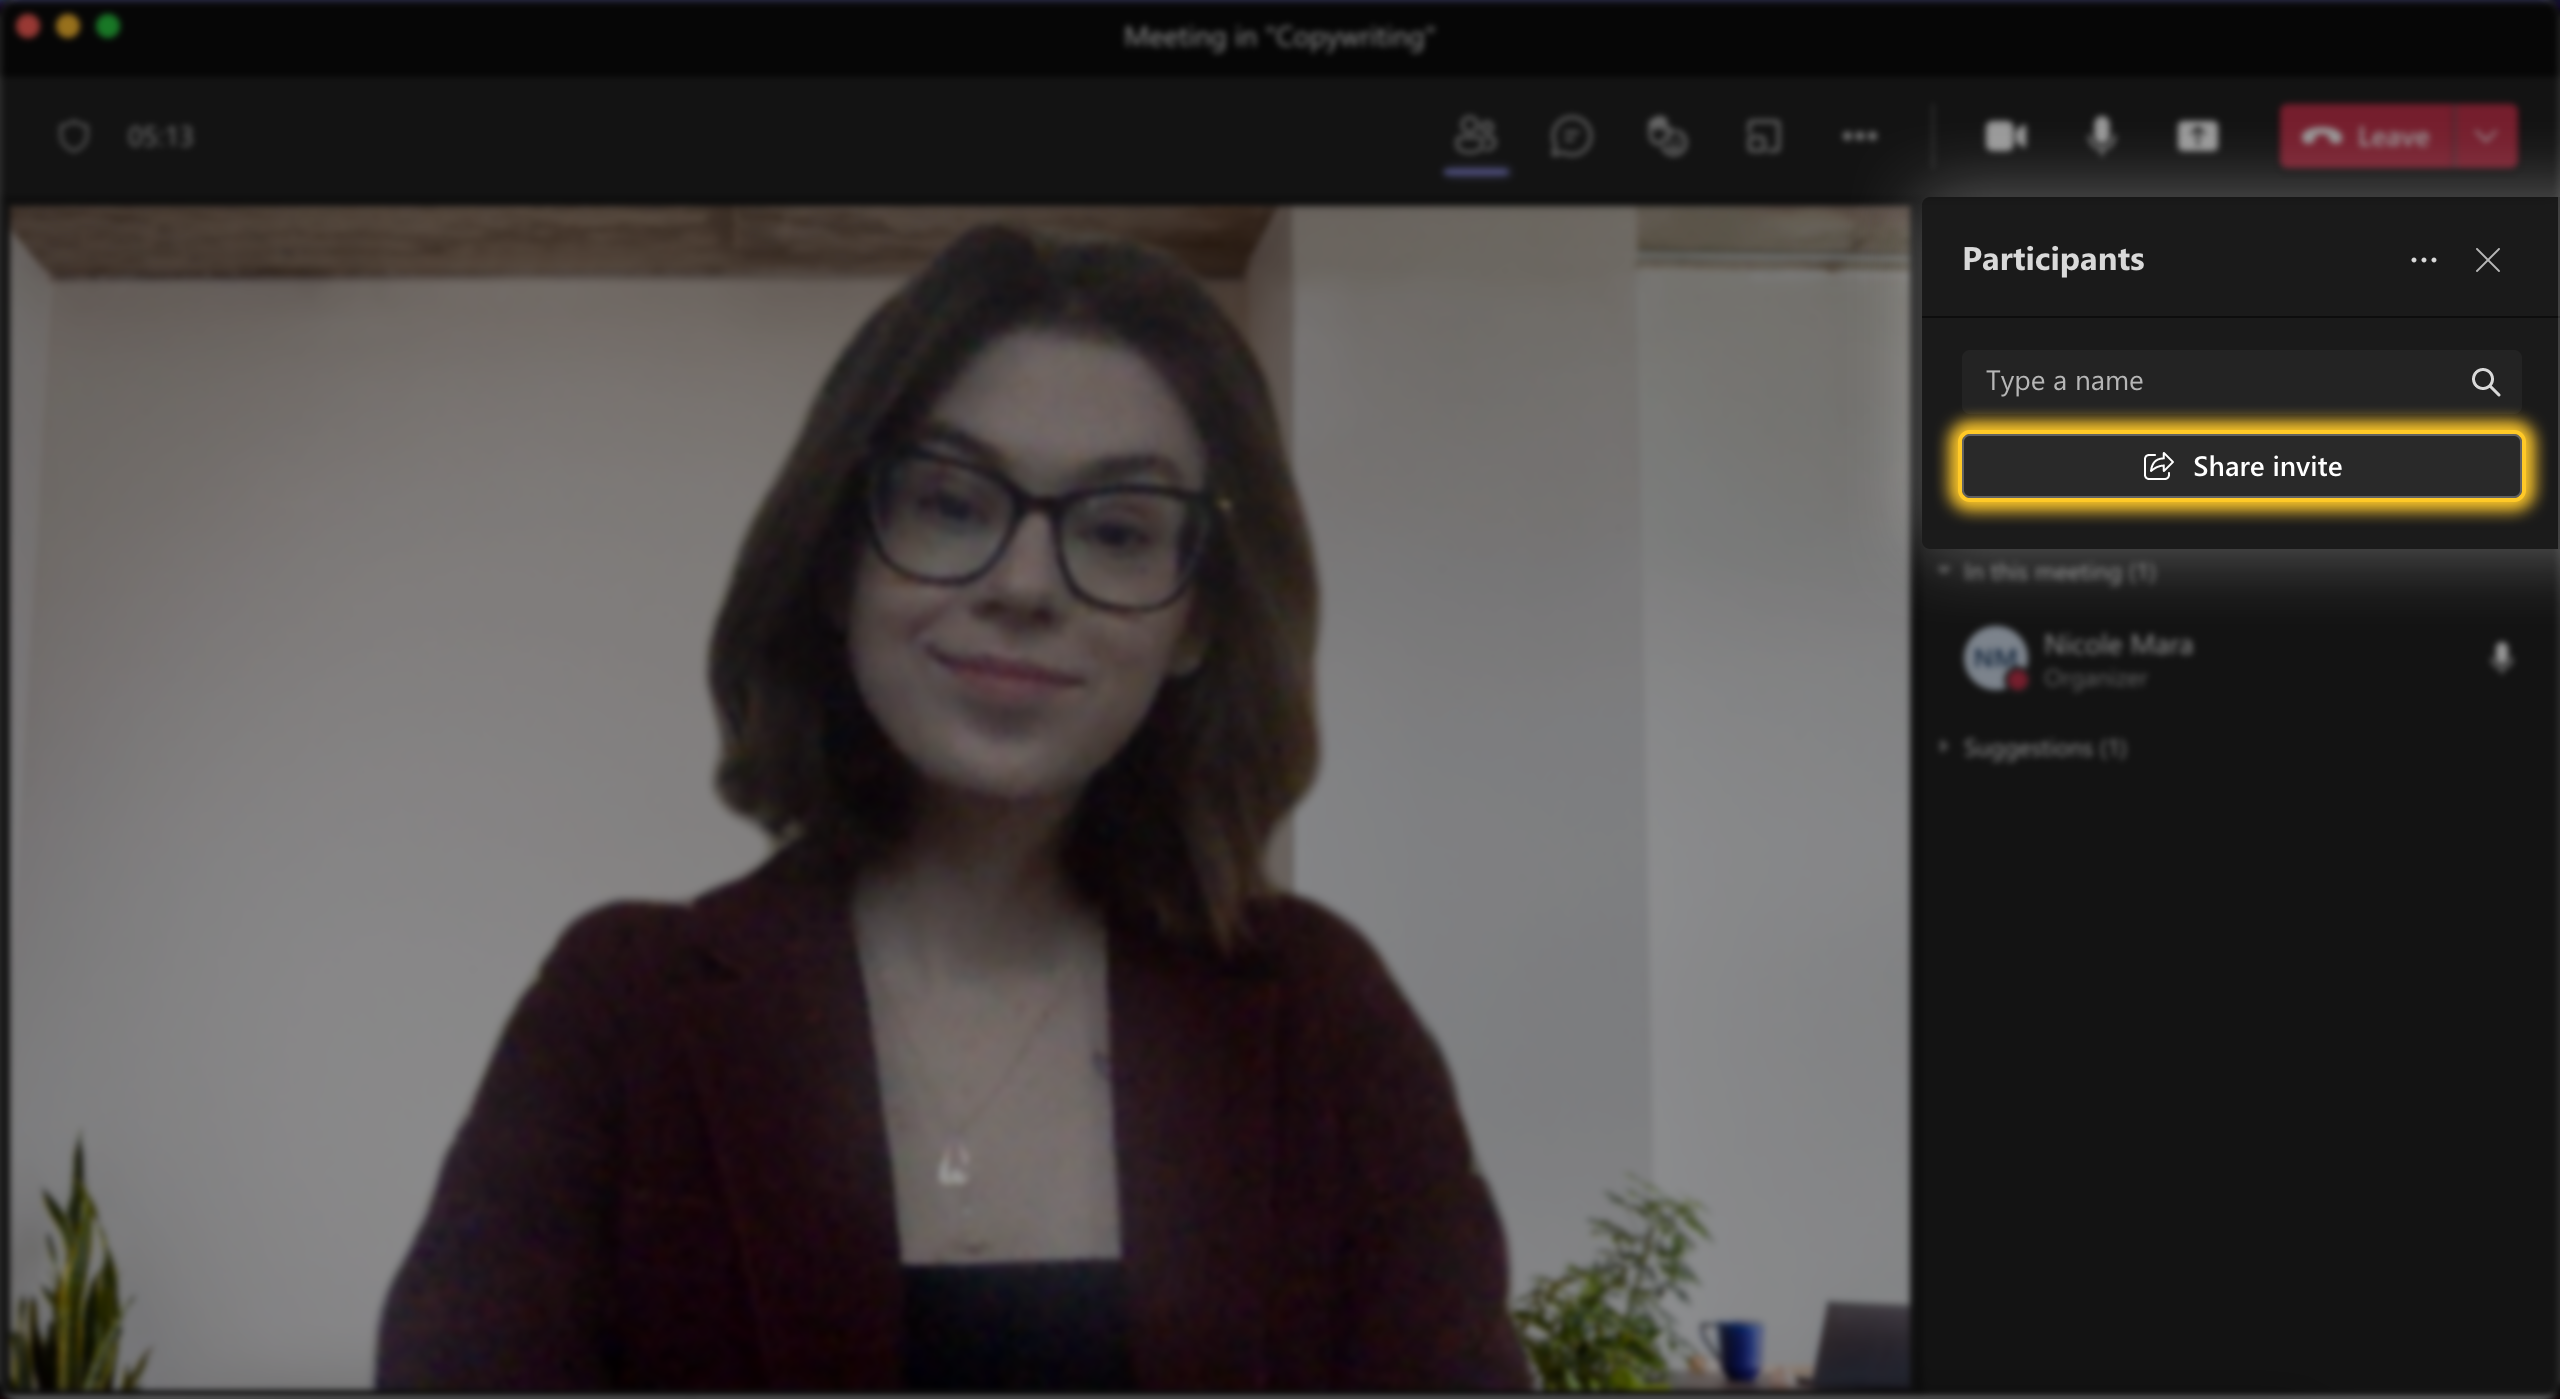
Once the meeting has started, you can add participants from the meeting window by:
- sending them a meeting link, or
- inviting them one by one.
Note
: You can invite users from other channels and teams, and even external users! Just send them the link before or even during the meeting by clicking
“Share invite”
on the left toolbar of the meeting in progress.
To schedule a meeting for a channel, go to “Meet” > “Schedule a meeting”, and you will be redirected to the Microsoft Teams calendar where you can customize the meeting details.
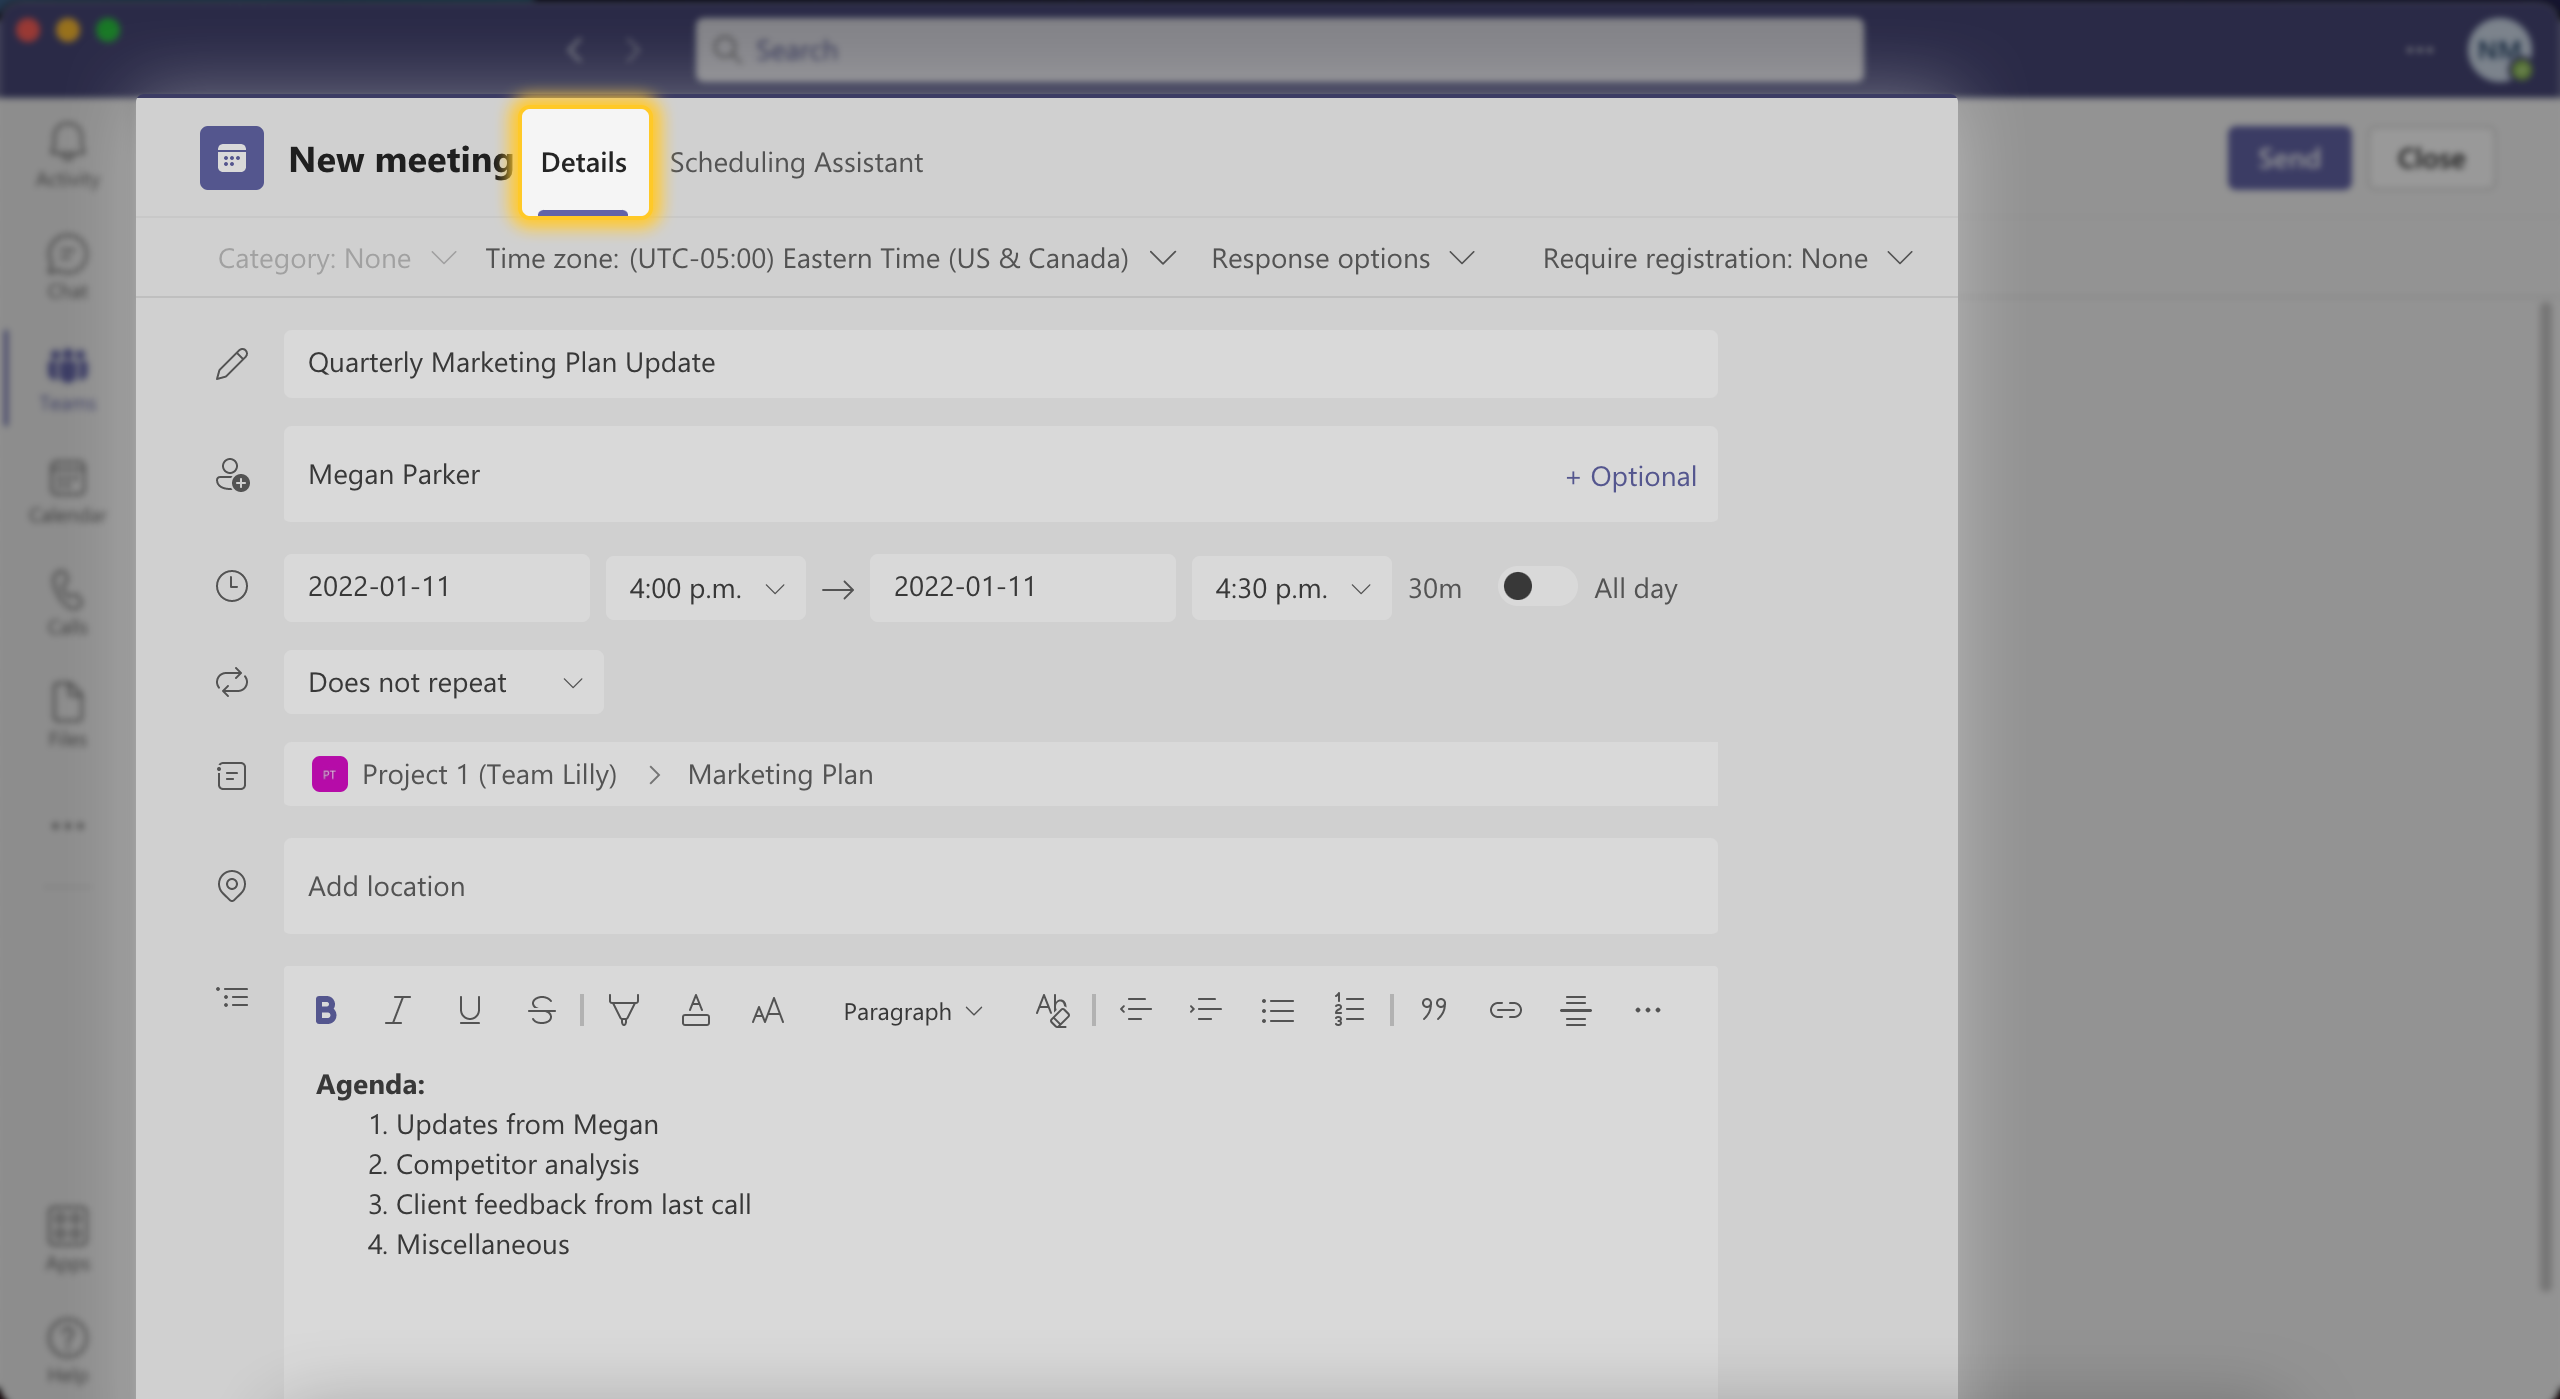
In the “Details” window, you can specify:
- required and optional attendees
- one or more channels you want as participants (the meeting notice will go out to all these channels)
- the agenda for the meeting and any relevant links or files that need to be reviewed for the meeting
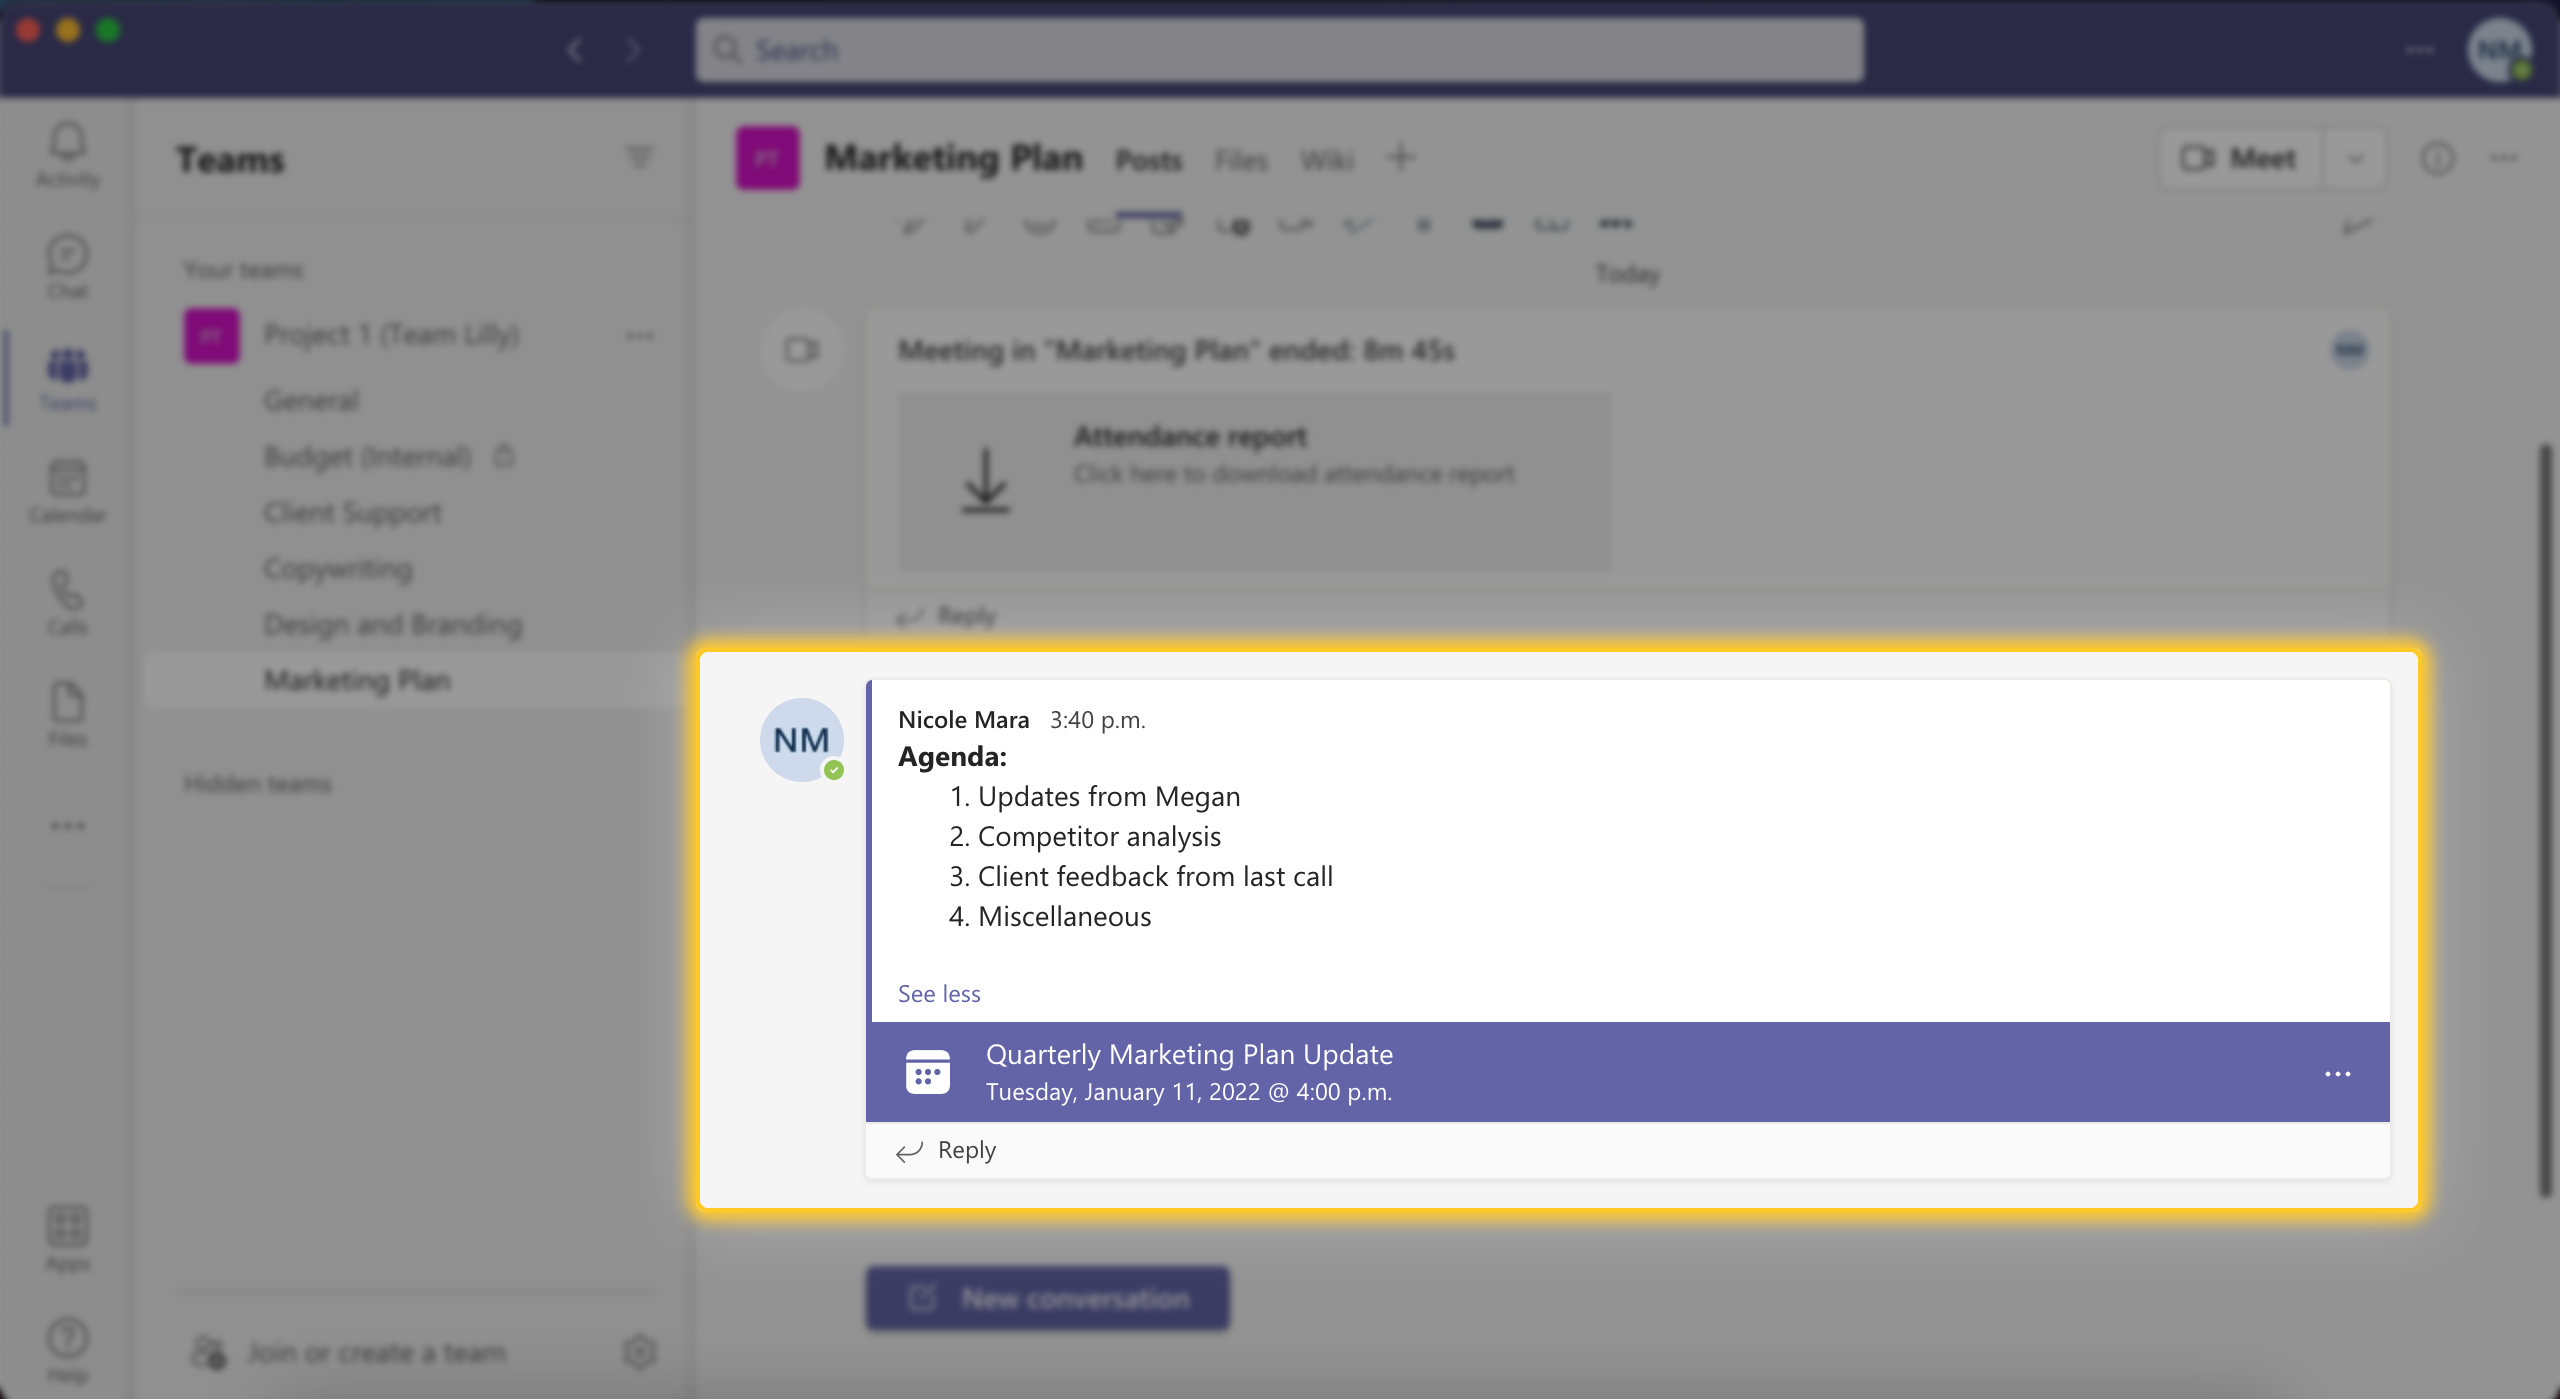
Once you schedule the meeting by hitting “Send”, it will be added to all the attendees’ Teams calendars, and they will receive a post in the channel with the meeting agenda and attachments:
Who Can Start Meetings
By default, any member of a channel or team (just not guest users) can start and schedule a meeting in a channel. It’s great for when you want to take a back seat and let your channel users collaborate on their own, but if you want a bit more control over virtual meetings, you can change meeting restrictions in the Microsoft Teams Admin Center https://admin.microsoft.com.
Note
: Only Teams users with an admin login can use the Admin Center.
Once in the Admin Center, you can change who can start and schedule meetings in a team or on an individual basis. Go to “Meetings” > “Meeting policies”, and select a team, an individual, or a select group of people that the changes will apply to.
To limit meeting capabilities:
- Click on the group or person
- In “General”, flip the “Off” switch next to the capabilities you want to limit (in this case it’s “Allow Meet Now in channels” and “Allow channel meeting scheduling”)
You can limit the use of almost any meeting function in the Admin Center, from screen sharing to scheduling meetings in private channels. So if you want channel video meetings to be as close as possible to in-person office meetings (i.e. organized and led by you), you can make that happen by restricting random and unscheduled meetings by channel members.
Record and Share Meetings
Let’s say you want to schedule a meeting with your Design and Branding channel, but one of the members is having connectivity problems and can’t join the meeting. Fret not, you can record and share the meeting to the channel once it’s over!
To record a meeting in progress, go to “More options” > “Start recording” in the meeting’s top toolbar. All participants will be notified that the meeting is being recorded, and the recording will automatically stop and save when you end the meeting.
You don’t even have to bother with sending the recording out — it will automatically appear for your viewing pleasure in the channel where the meeting was held.
Note
: All team members will see that a meeting is in progress in that channel’s Posts thread, and your user icon will have _“In a call”_ next to it. So you can conduct your meetings without disruptions from members on the outside!
Other Useful Meeting Features
We’ve really just scratched the surface of what you can accomplish in channel meetings. But just to give you that extra boost of confidence, here are a couple uber-handy meeting features that just make sense.
Work right in the channel chat
Your channel’s message space appears right in the meeting. It’s almost too good to be true — you can carry on the conversation from your Posts tab as you’re conducting the meeting, and anything you or another attendee posts will be saved in the chat after the meeting.
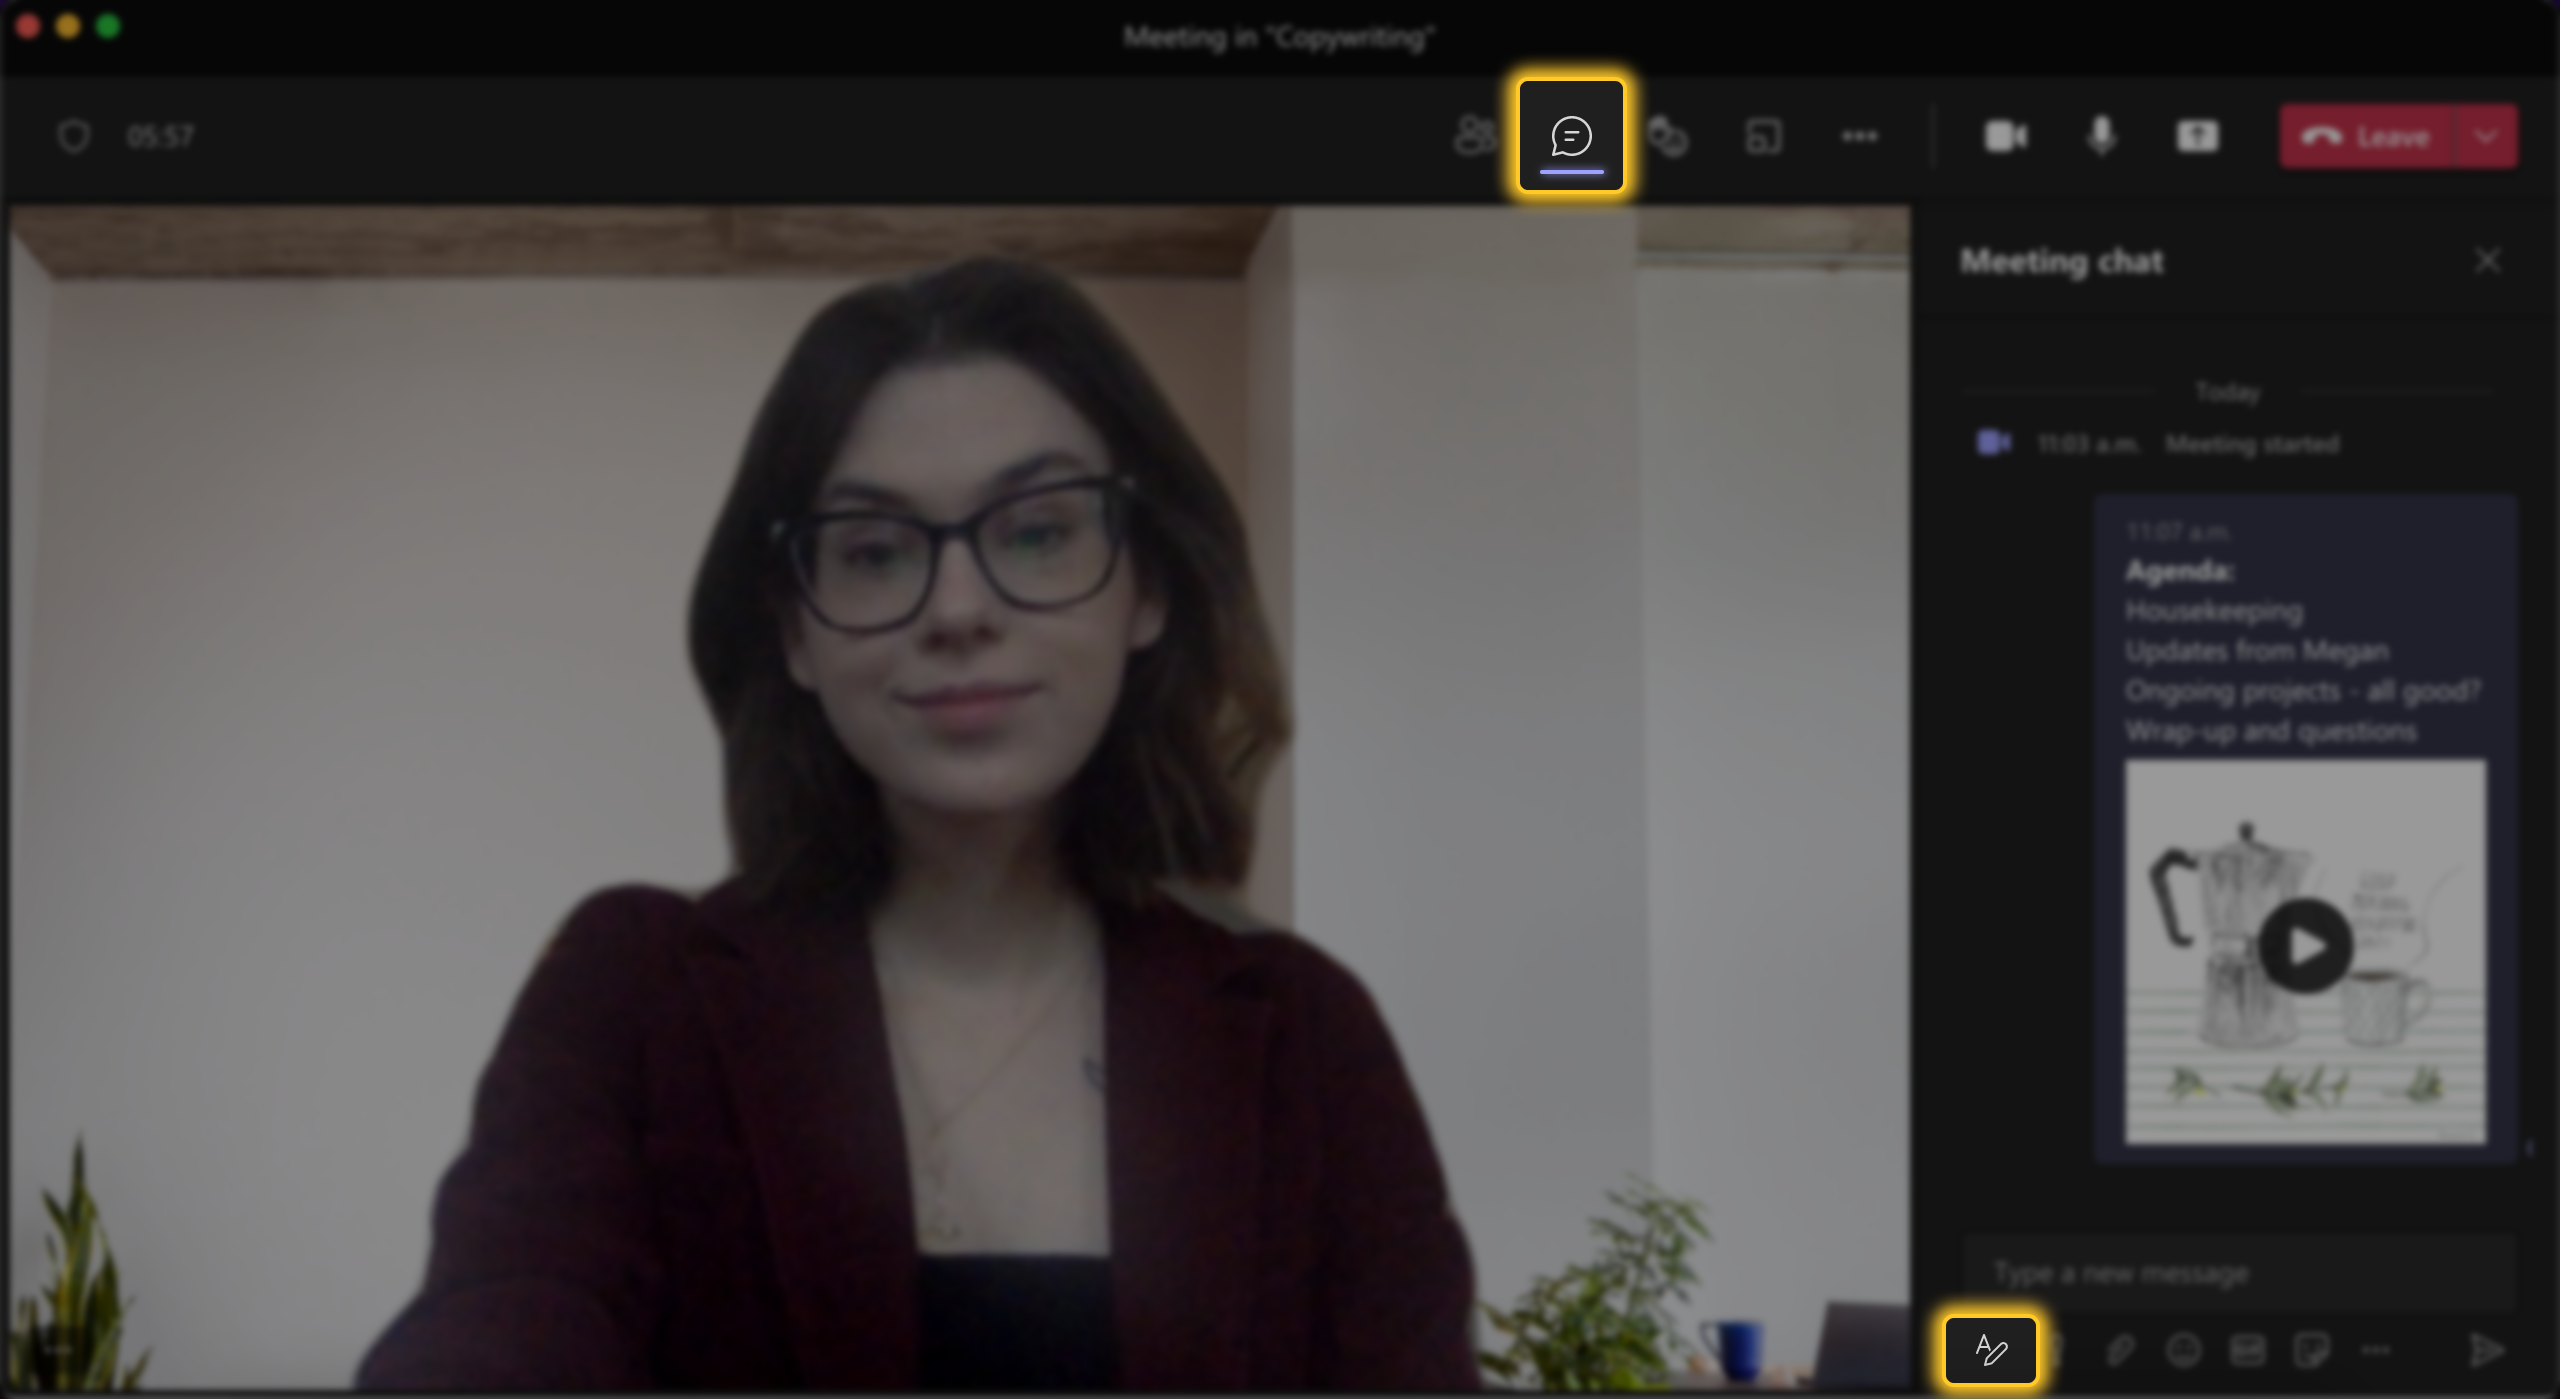
Embed videos and use apps
You don’t have to awkwardly link YouTube videos in slide decks anymore — channel meetings let you search and send videos right from the meeting chat (which is the channel chat carried over).
All you have to do is:
- Hover over the “Extensions” ellipses on your compose box toolbar
- Find the YouTube extension
- Find the video you want to send in the search bar
It will appear in the chat with a thumbnail, and participants can watch it in their browser or reference it after the meeting.
Add other apps from the “Extensions” menu to enhance your meeting—conduct surveys and polls right in the meeting with Forms, sync your team’s Microsoft Calendar to plan events and milestones, and collaborate on shared documents with OneNote.
Share your screen
From slide decks to web pages to pictures of your dog, you can share anything from your screen for the whole meeting to view. Just hit “Share content” on the top toolbar and choose from suggested screens or browse your device for a specific file or web page to display.
Other participants can share their screen as well (though you might want to go back to the ol’ Admin Center and limit who can share their screen in meetings).
Put the Scheduling Assistant to work
Just because everyone’s working remotely doesn’t mean they don’t have tight schedules or other meetings planned. To make sure your channel members can all attend a meeting, take a look at the channel’s shared Calendar in the meeting’s Scheduling Assistant.
Go to “Meet” > “Schedule a meeting” > “Scheduling Assistant” in your selected channel, add required and optional participants, and you’ll see everyone’s schedules together. The shared Calendar will show you if there’s any overlap, so you can schedule a meeting when everyone is free.
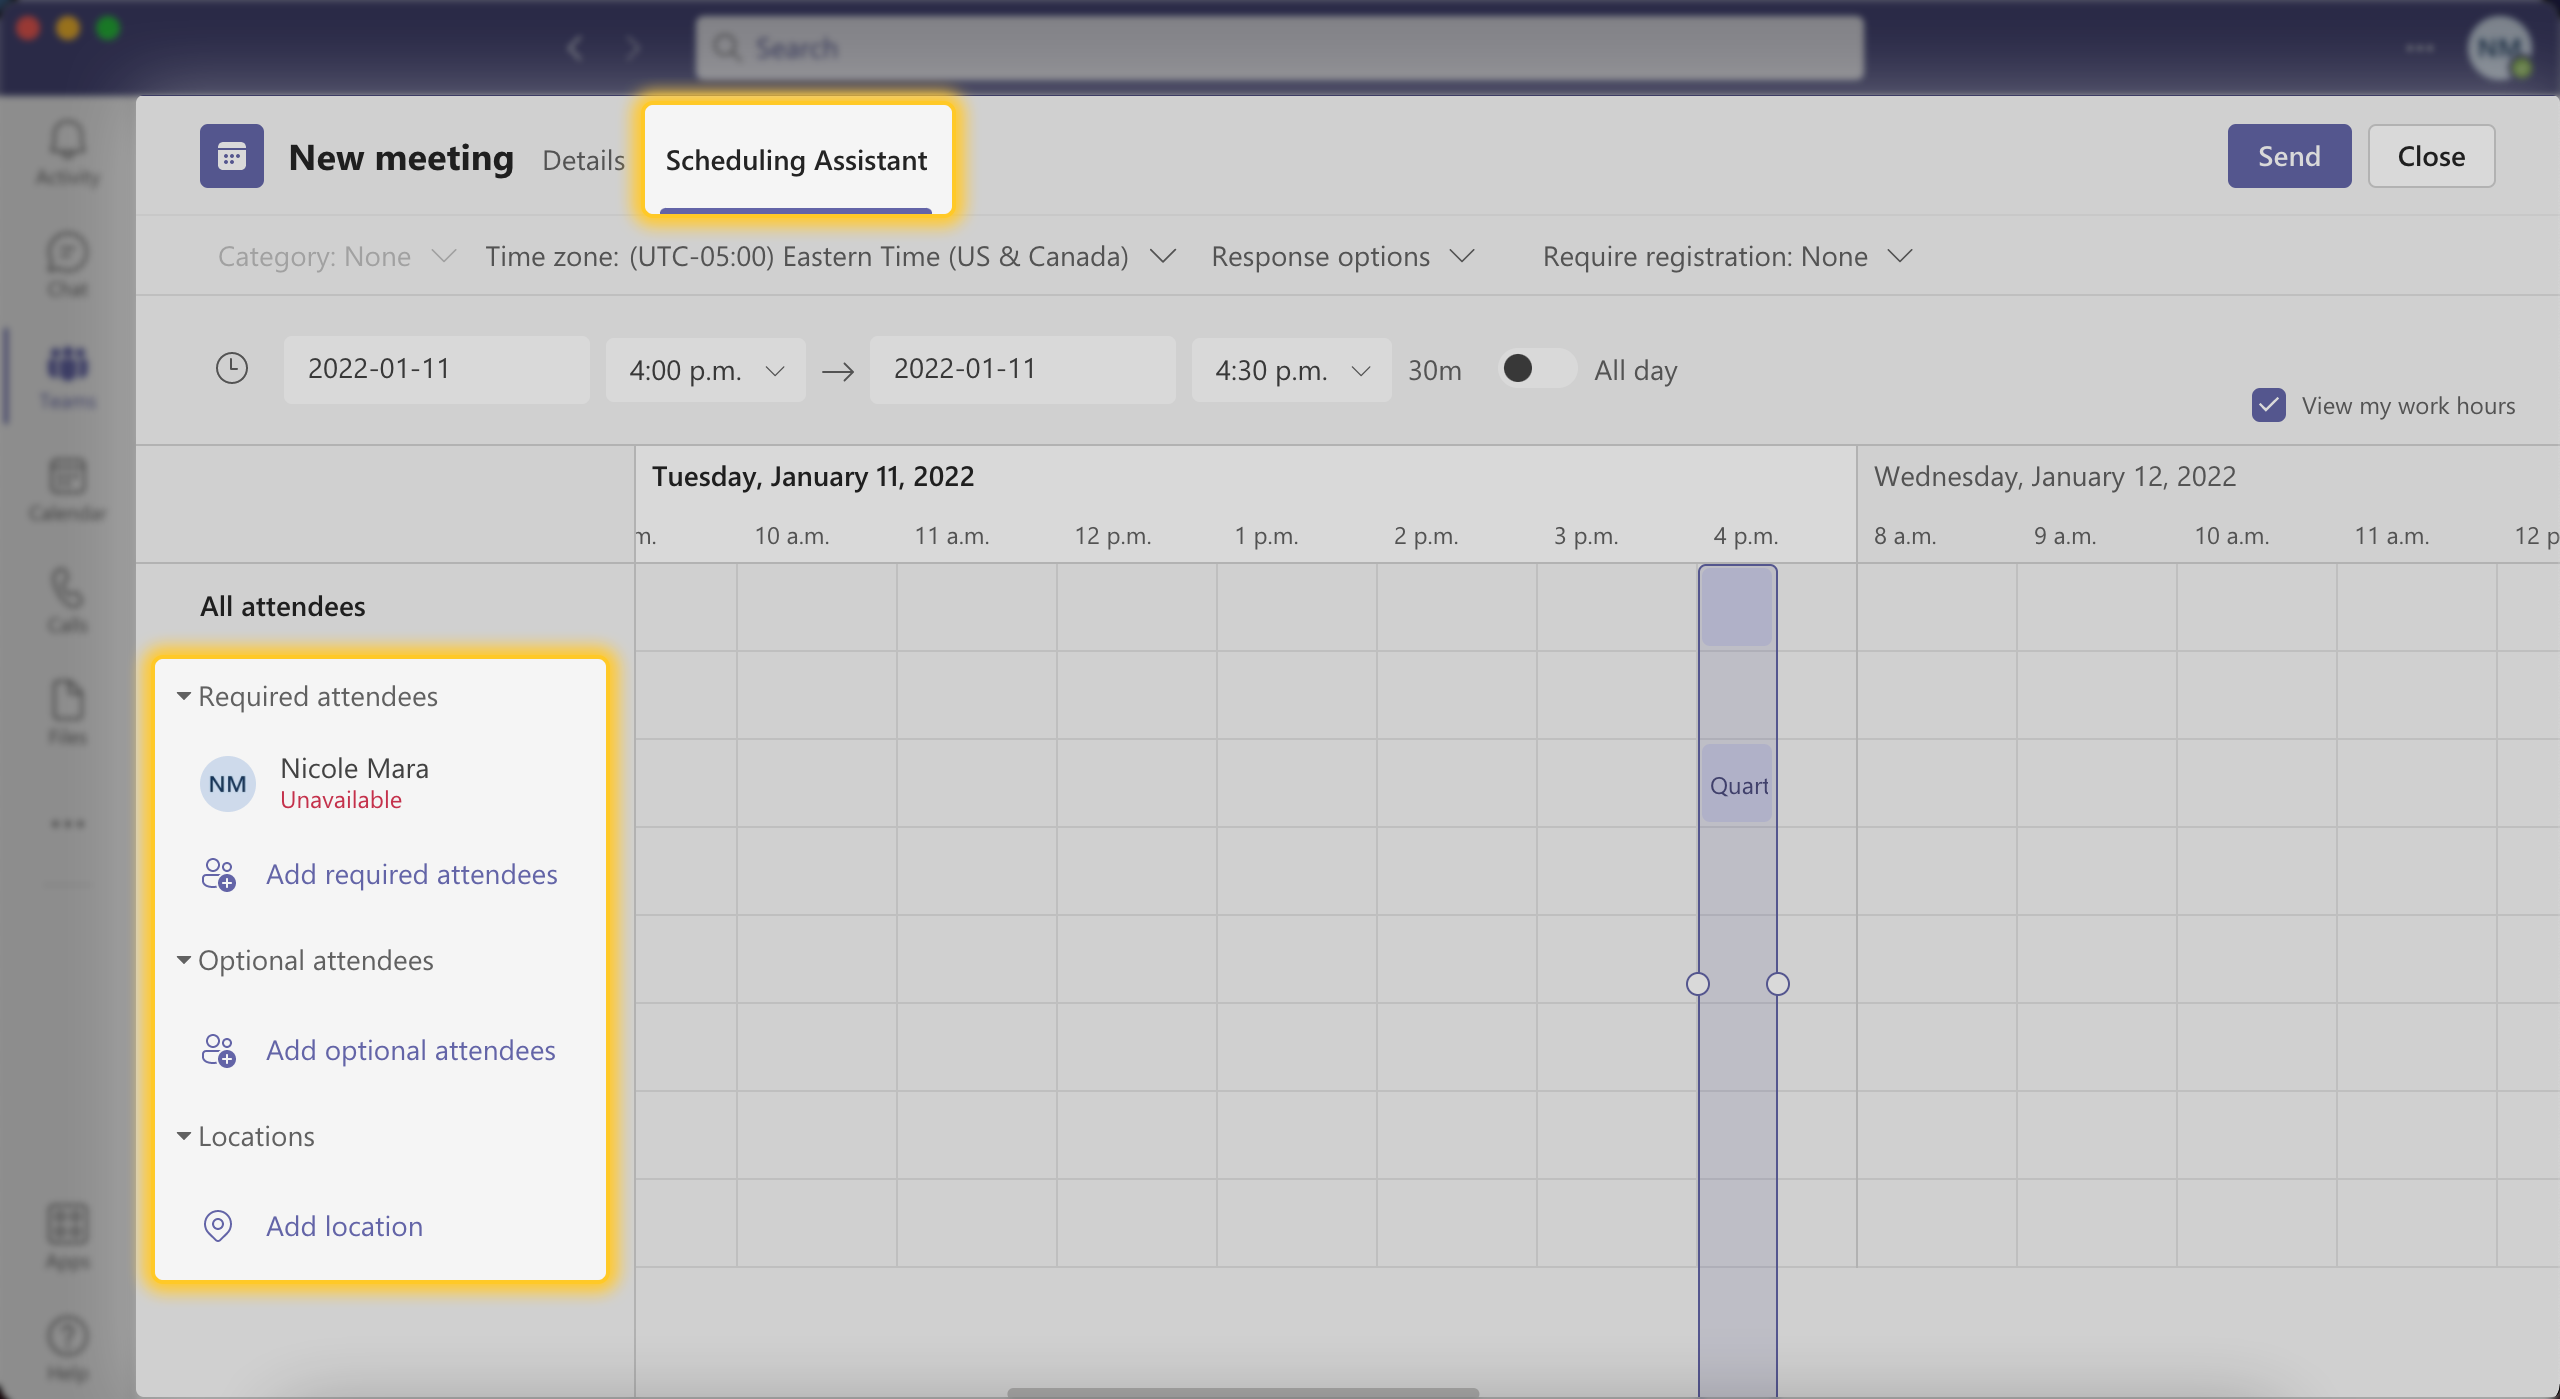
Now that you know how to create a flourishing multimodal workspace in team channels, we’ll show you how you can include external users in the fun.
3. Guest Users
A guest user in Teams is any external user that is not part of your organization and/or doesn’t have a Teams account.
When to Add Guest Users
Let’s say you are working with a client that doesn’t have a Teams account, but communication would be infinitely more efficient if they could participate in a channel conversation and have access to all your files and documents without you having to send them.
Great news—you can add them as a guest user to your team of choice.
Other people you might want to add as guest users:
- external vendors
- invited experts
- freelancers for specific projects
- interns or temporary employees
Note
: You can’t add a guest user to just one channel—they will have to be added to the whole team (so they’ll have access to all standard channels in a team).
Add Guest Users
To add a guest user to a team, go to the team’s “More options” > “Add member”. You will need to know the guest user’s email address in order to add them, and once you do they will receive an email and a one-time passcode to log in to your Teams workspace as a guest.
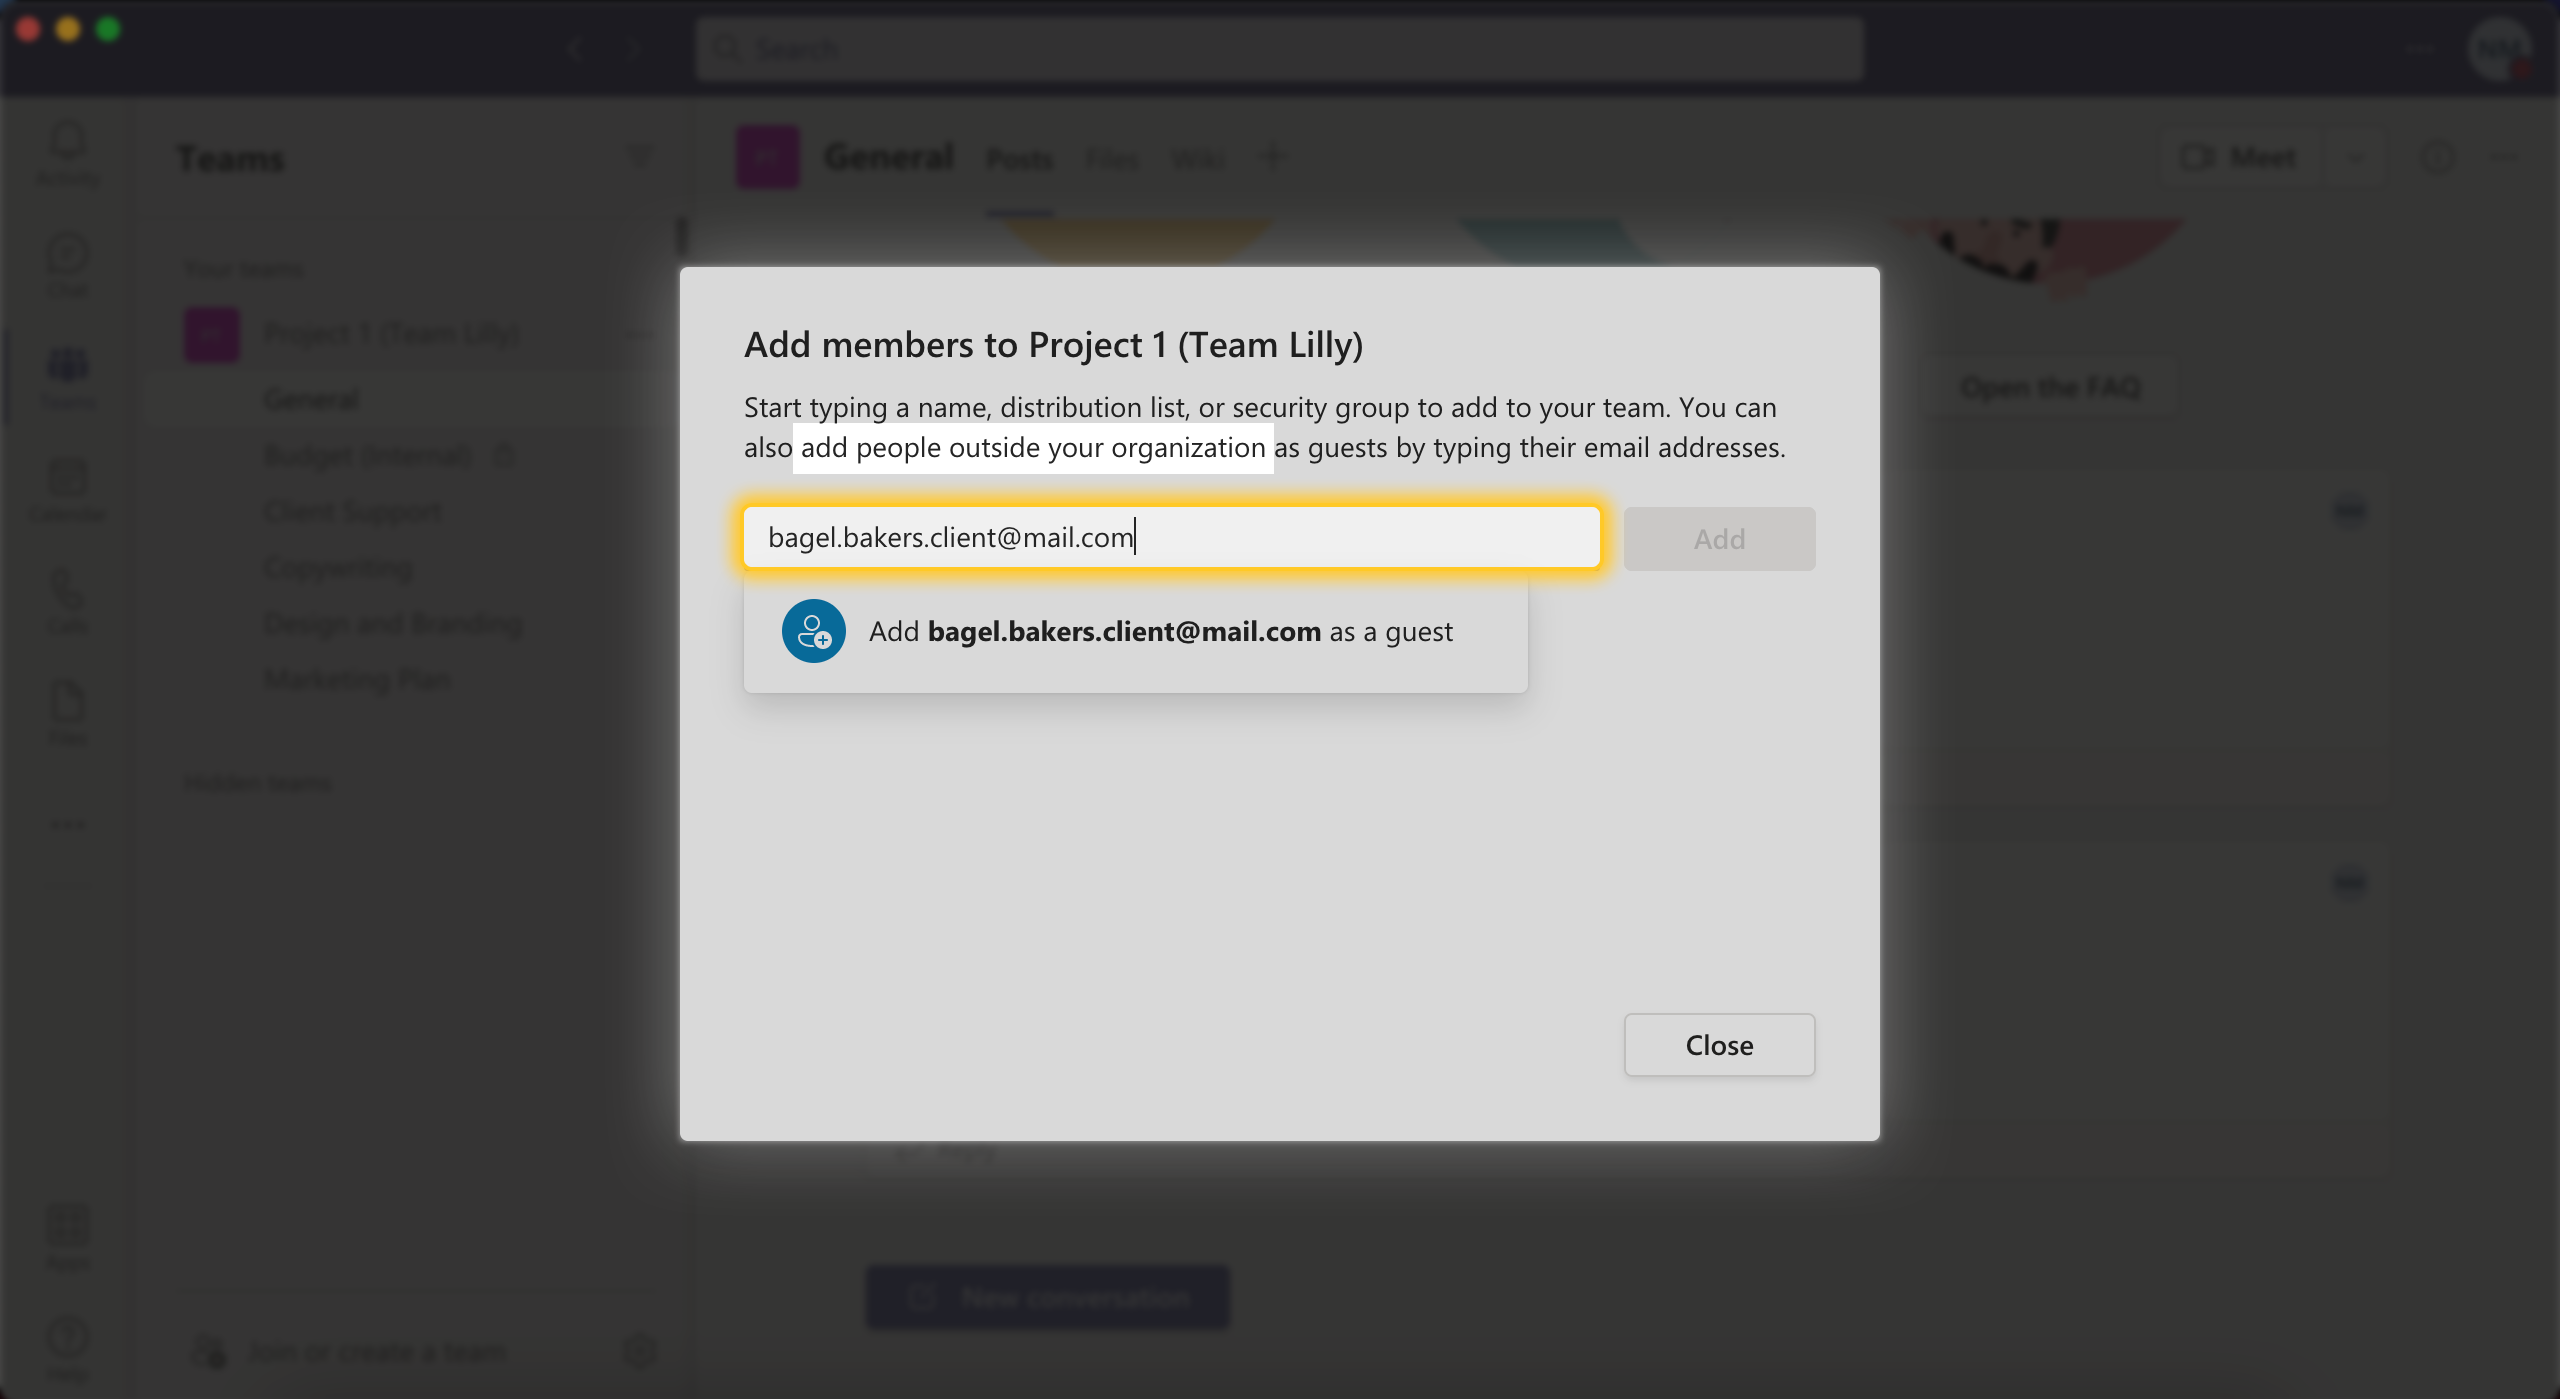
The guest user will have “Guest” next to their name visible to everyone in the workspace, so your team members will know to keep the conversation in public channel chats free from confidential company information.
Guest User Capabilities
Guest users will have a limited set of capabilities by definition, since they’re included in your workspace either temporarily or for a very specific purpose (e.g. reviewing a file or two in a channel).
The guest user function really exists to allow external users to hop in on conversations in the group chat, join meetings and calls, and view documents shared with them or stored in the team’s SharePoint.
However, as you can see in this breakdown of Teams user capabilities, guest users actually start off with almost the same set of permissions as regular team members. They can even create and delete channels in the team, which is a questionable default setting on Team’s part.
So if you want to change what guest users are allowed to do in your Teams environment, go to “More options” > “Manage team” > “Settings” > “Guest permissions”. From there you can restrict their ability to create and delete channels, but if you want to limit other functions, you’ll have to go back to the Admin Center and do it from there.
Now that you pretty much have a degree in Microsoft Teams channels use, we’re going to give you one last knowledge nugget: adding apps to your channels.
Your temporary hires with guest accounts can be a part of your Perfect Wiki workspace as well! They will be able to see all the wikis in the Perfect Wiki channel tab, so you can refer them to your company policies and best practices that you keep there.
4. Teams Apps: Adding Collaboration Tools to Your Channel
Teams Apps and When to Use Them
We’re all about helping you get as much of your teamwork done in one place (Microsoft Teams channels) as possible, and you can make it happen by adding MS Teams and external apps to your channel tabs.
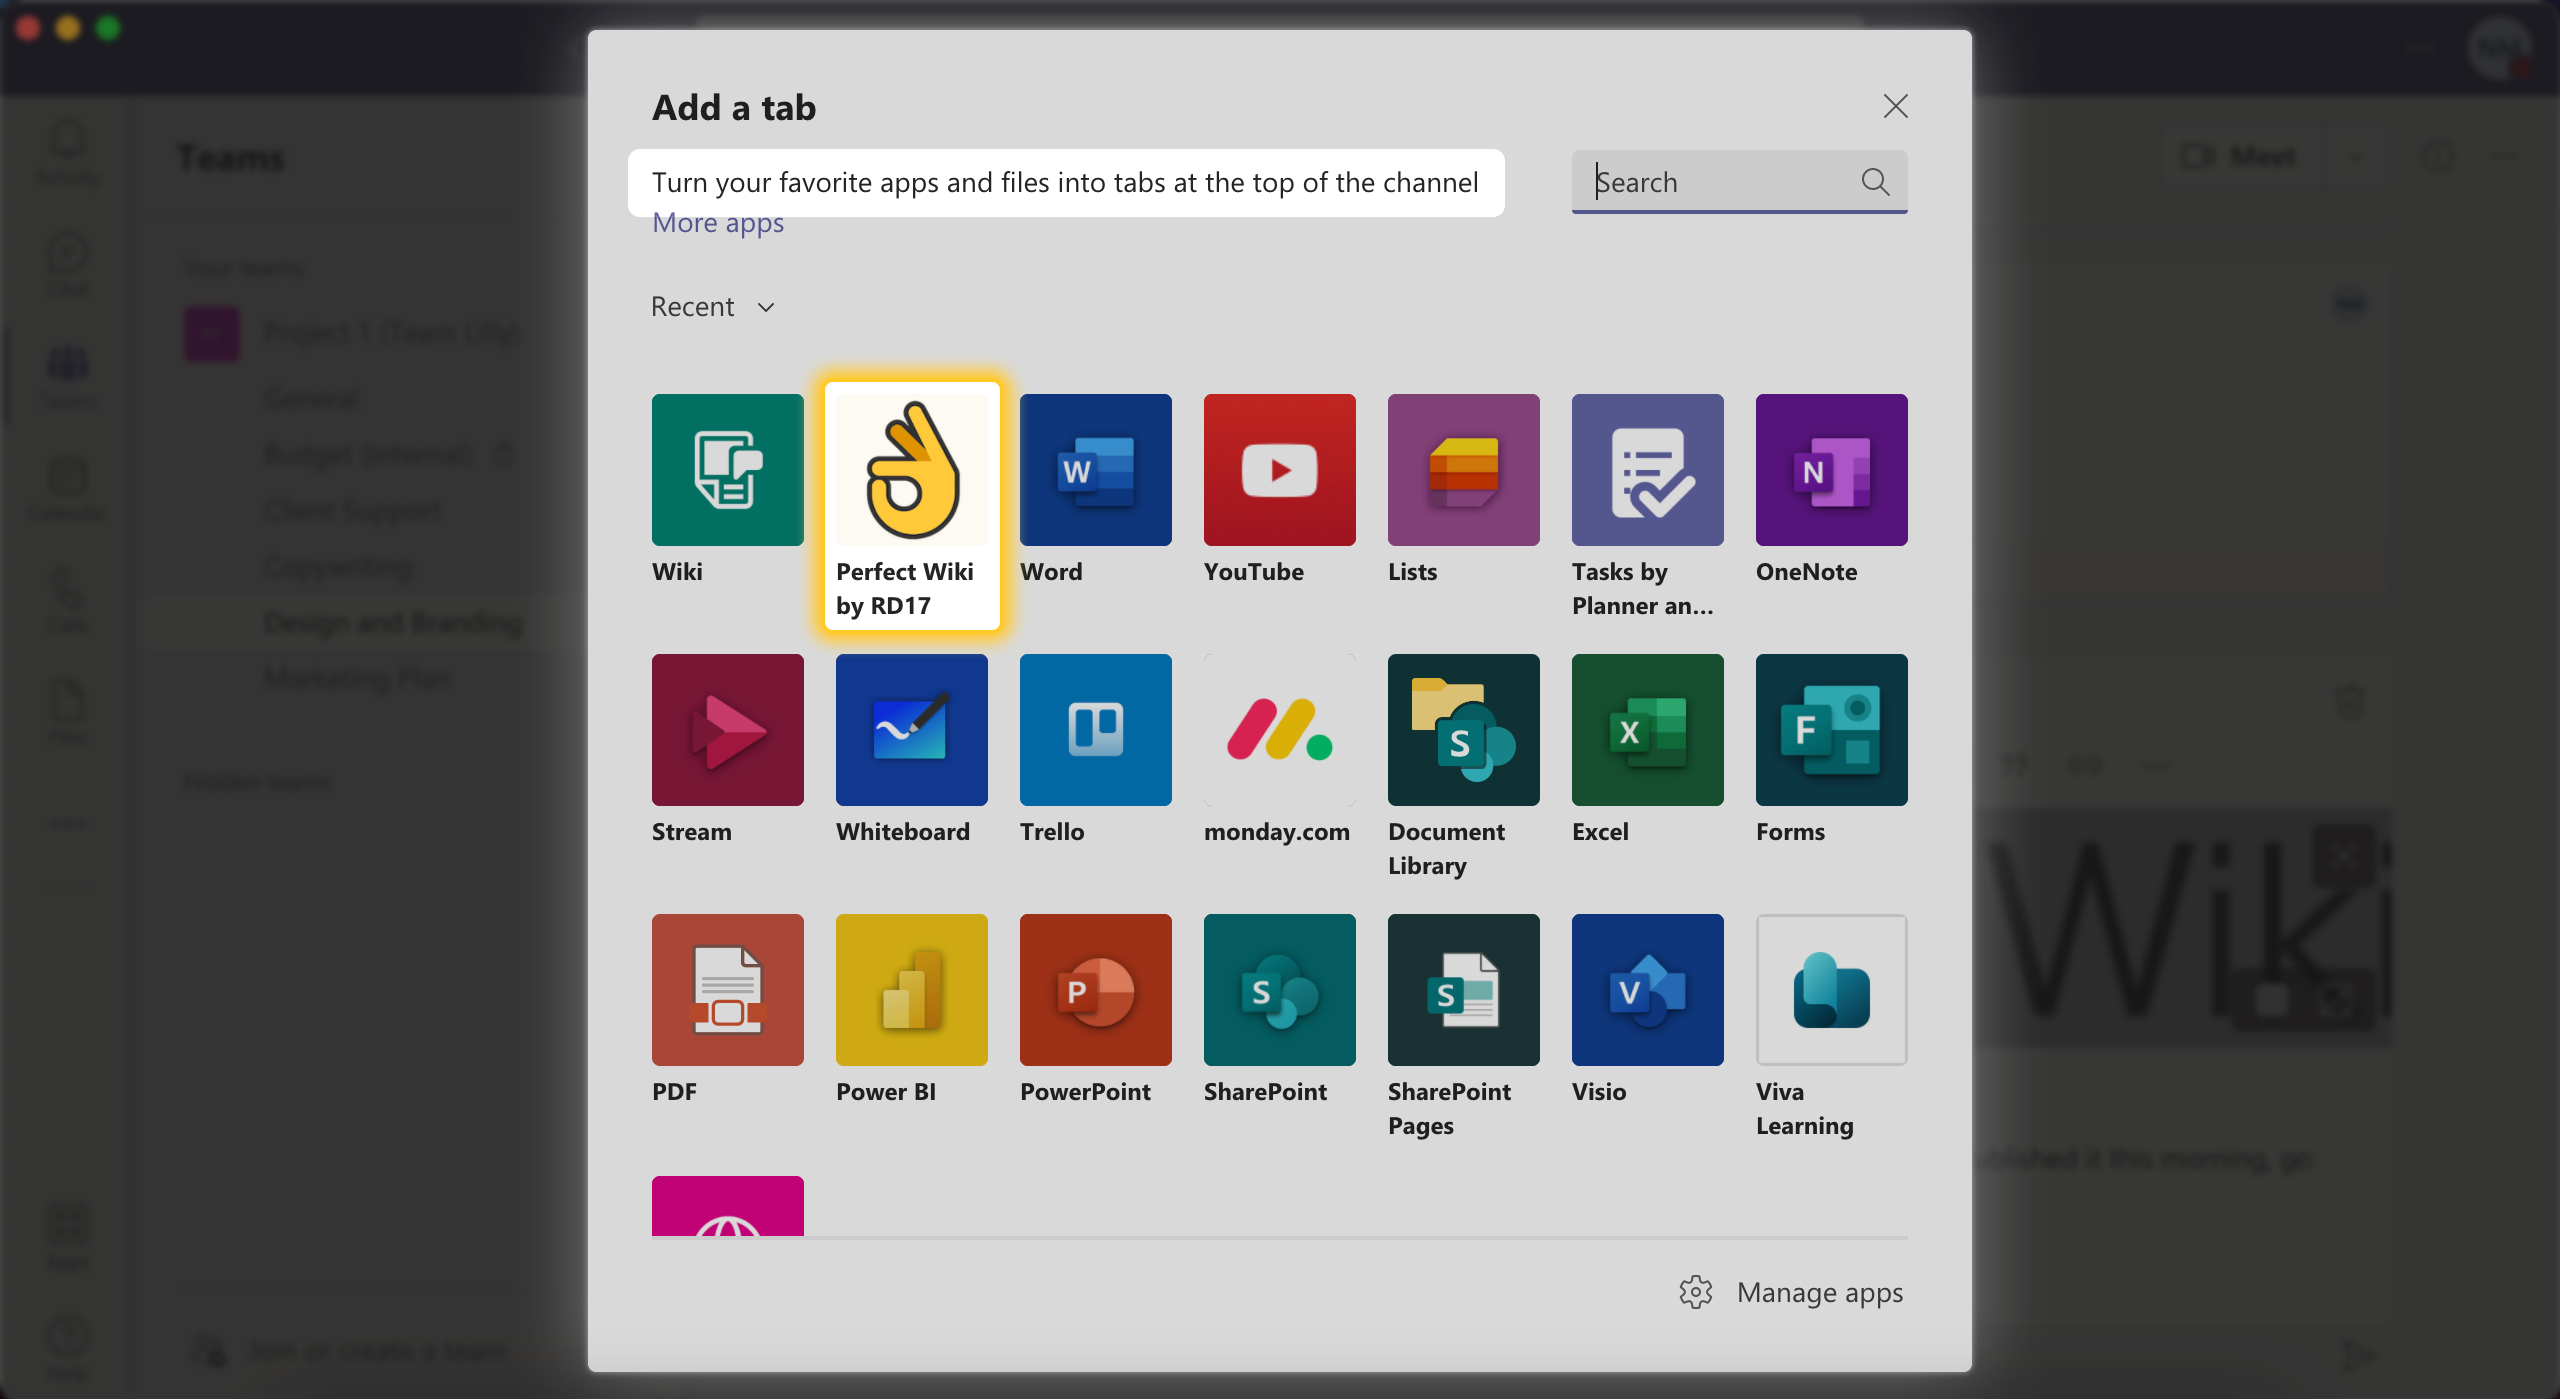
Think about the apps that your organization or focus group already uses on a daily basis.
They could be:
- Productivity apps (e.g. Lists)
- Web-based storage (e.g. Adobe Creative Cloud)
- Files or documents (see how to make them a tab here)
- Websites
- Collaboration tools (e.g. Lucidchart)
If you or your channel users want to create a shortcut to a frequently used app, you can add it as a separate tab in that channel.
Add Apps as Tabs to a Channel
To include an app in your channel tabs, hit the “+” sign next to the default tabs in your channel and select the app from the Microsoft Teams database.
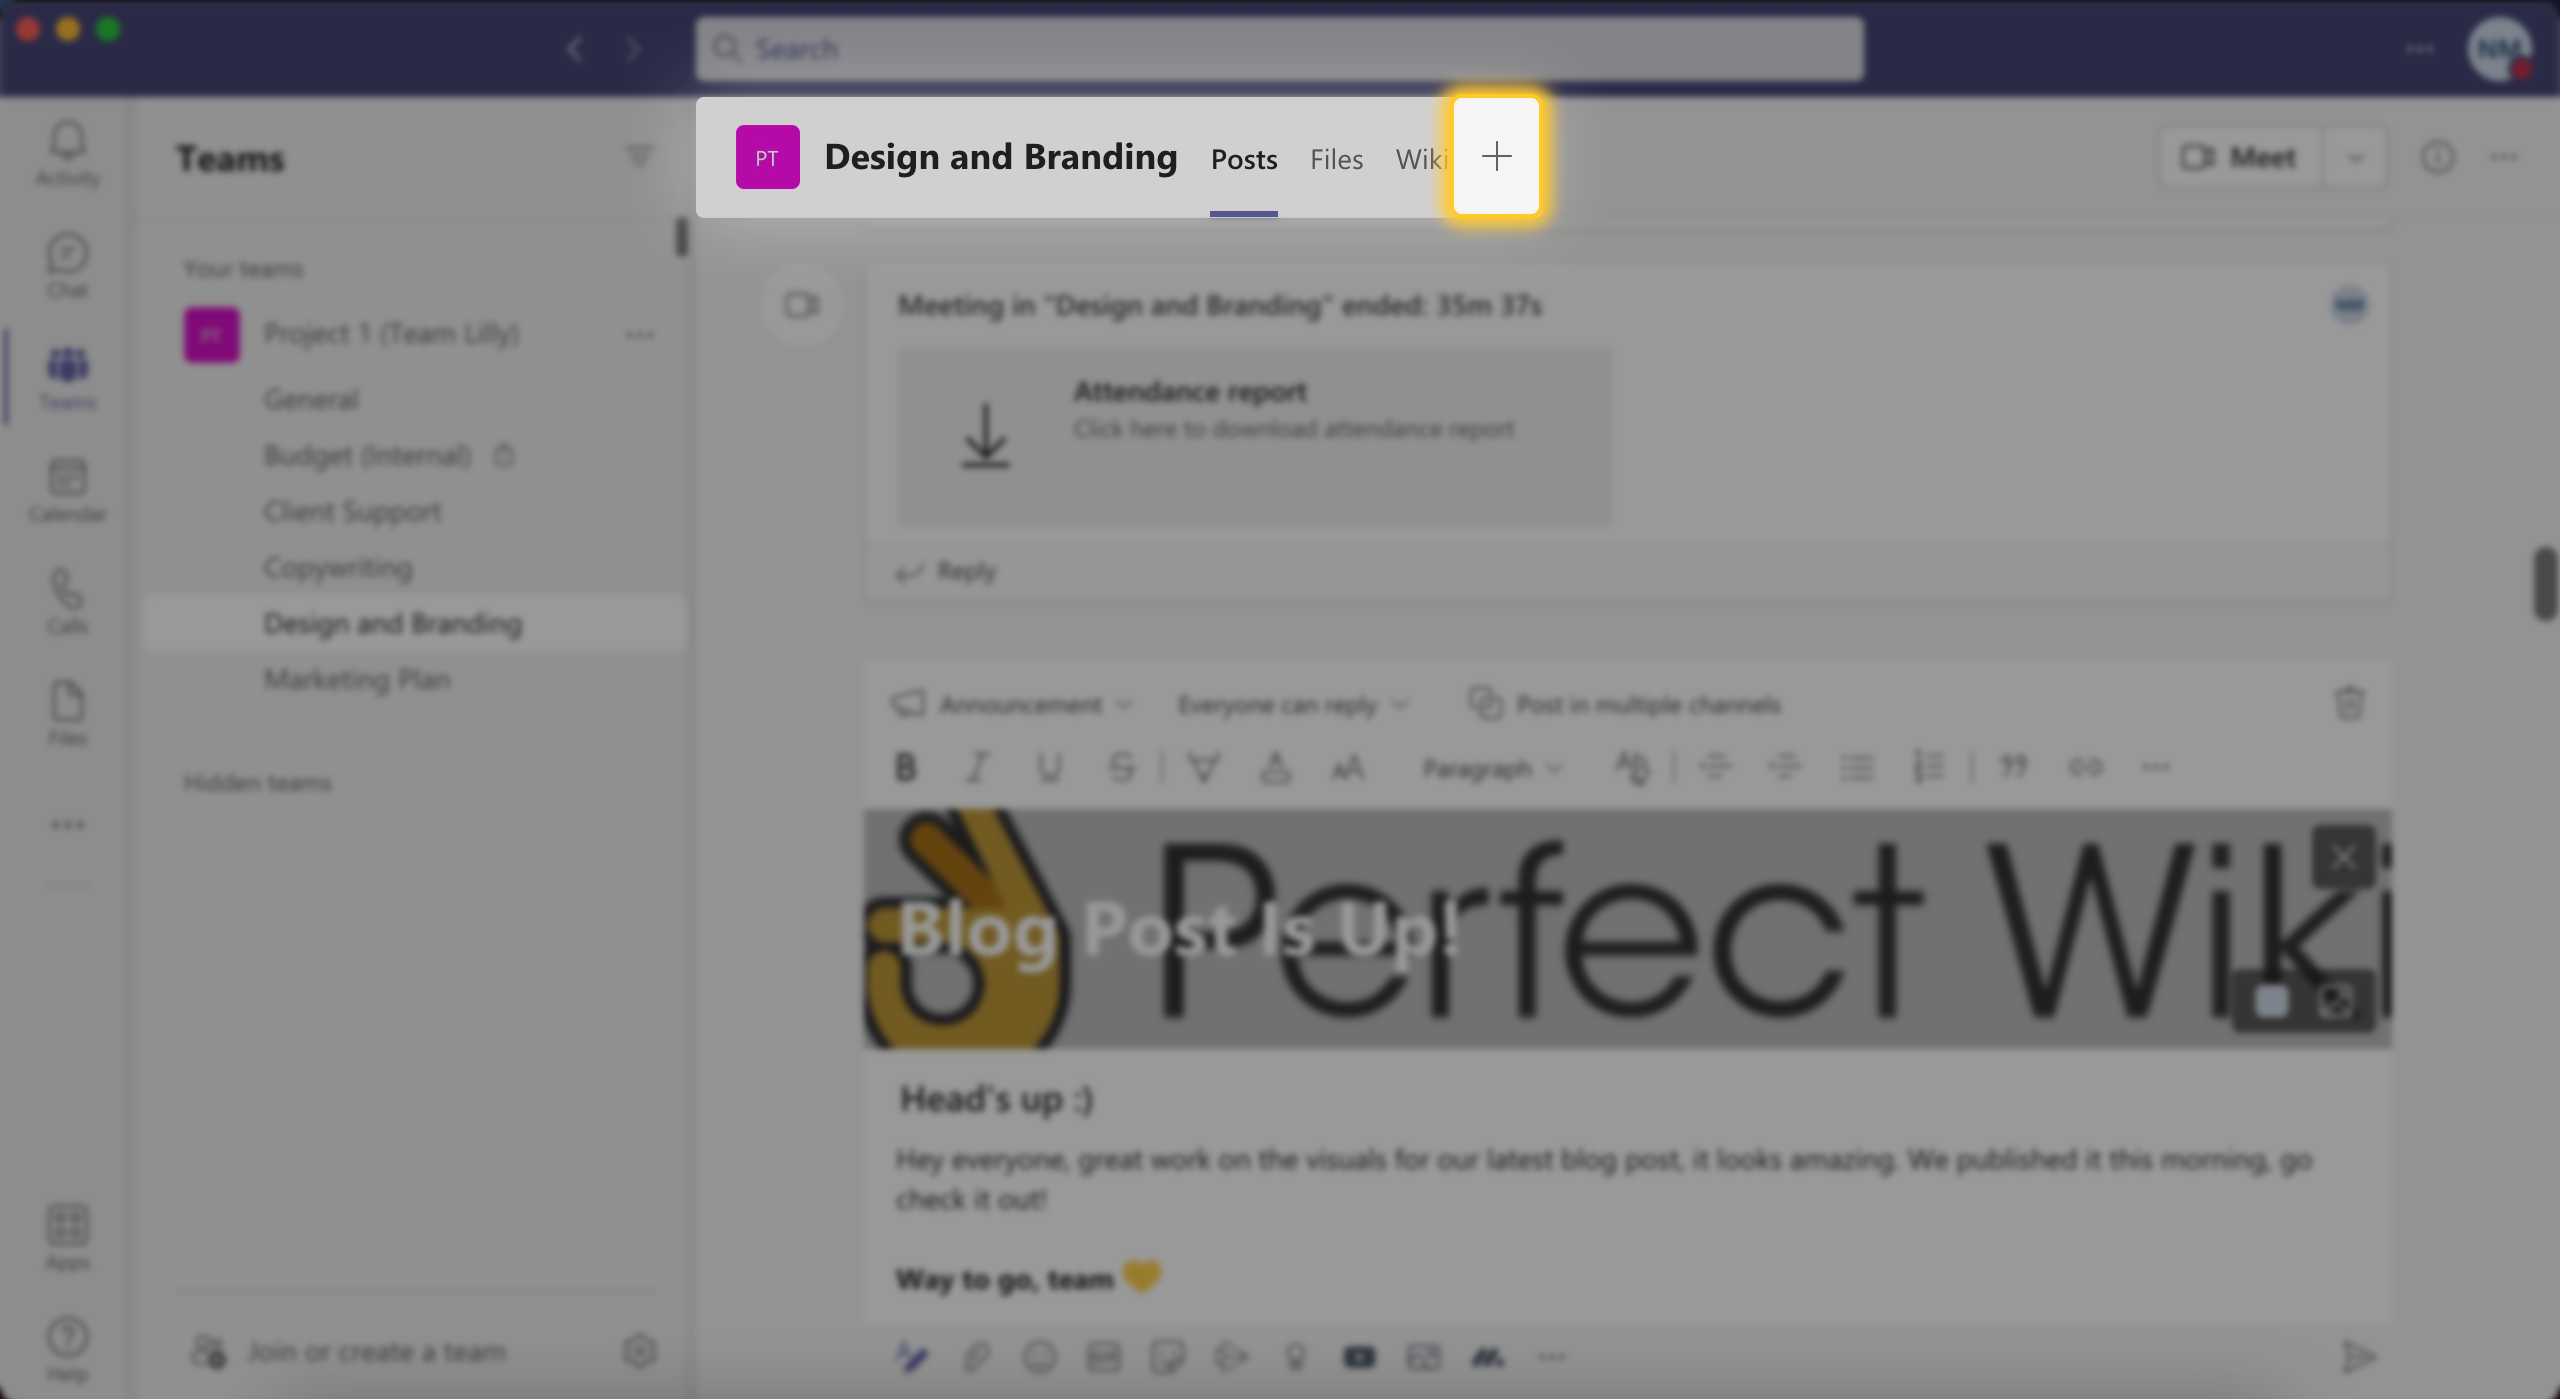
If the app is part of the Microsoft 365 bundle (e.g. Calendar or Forms), you can begin using it as soon as it’s added to your tabs. If it’s an external app (e.g. Adobe), the channel users will need to log in to the app before they can begin using it in MS Teams.
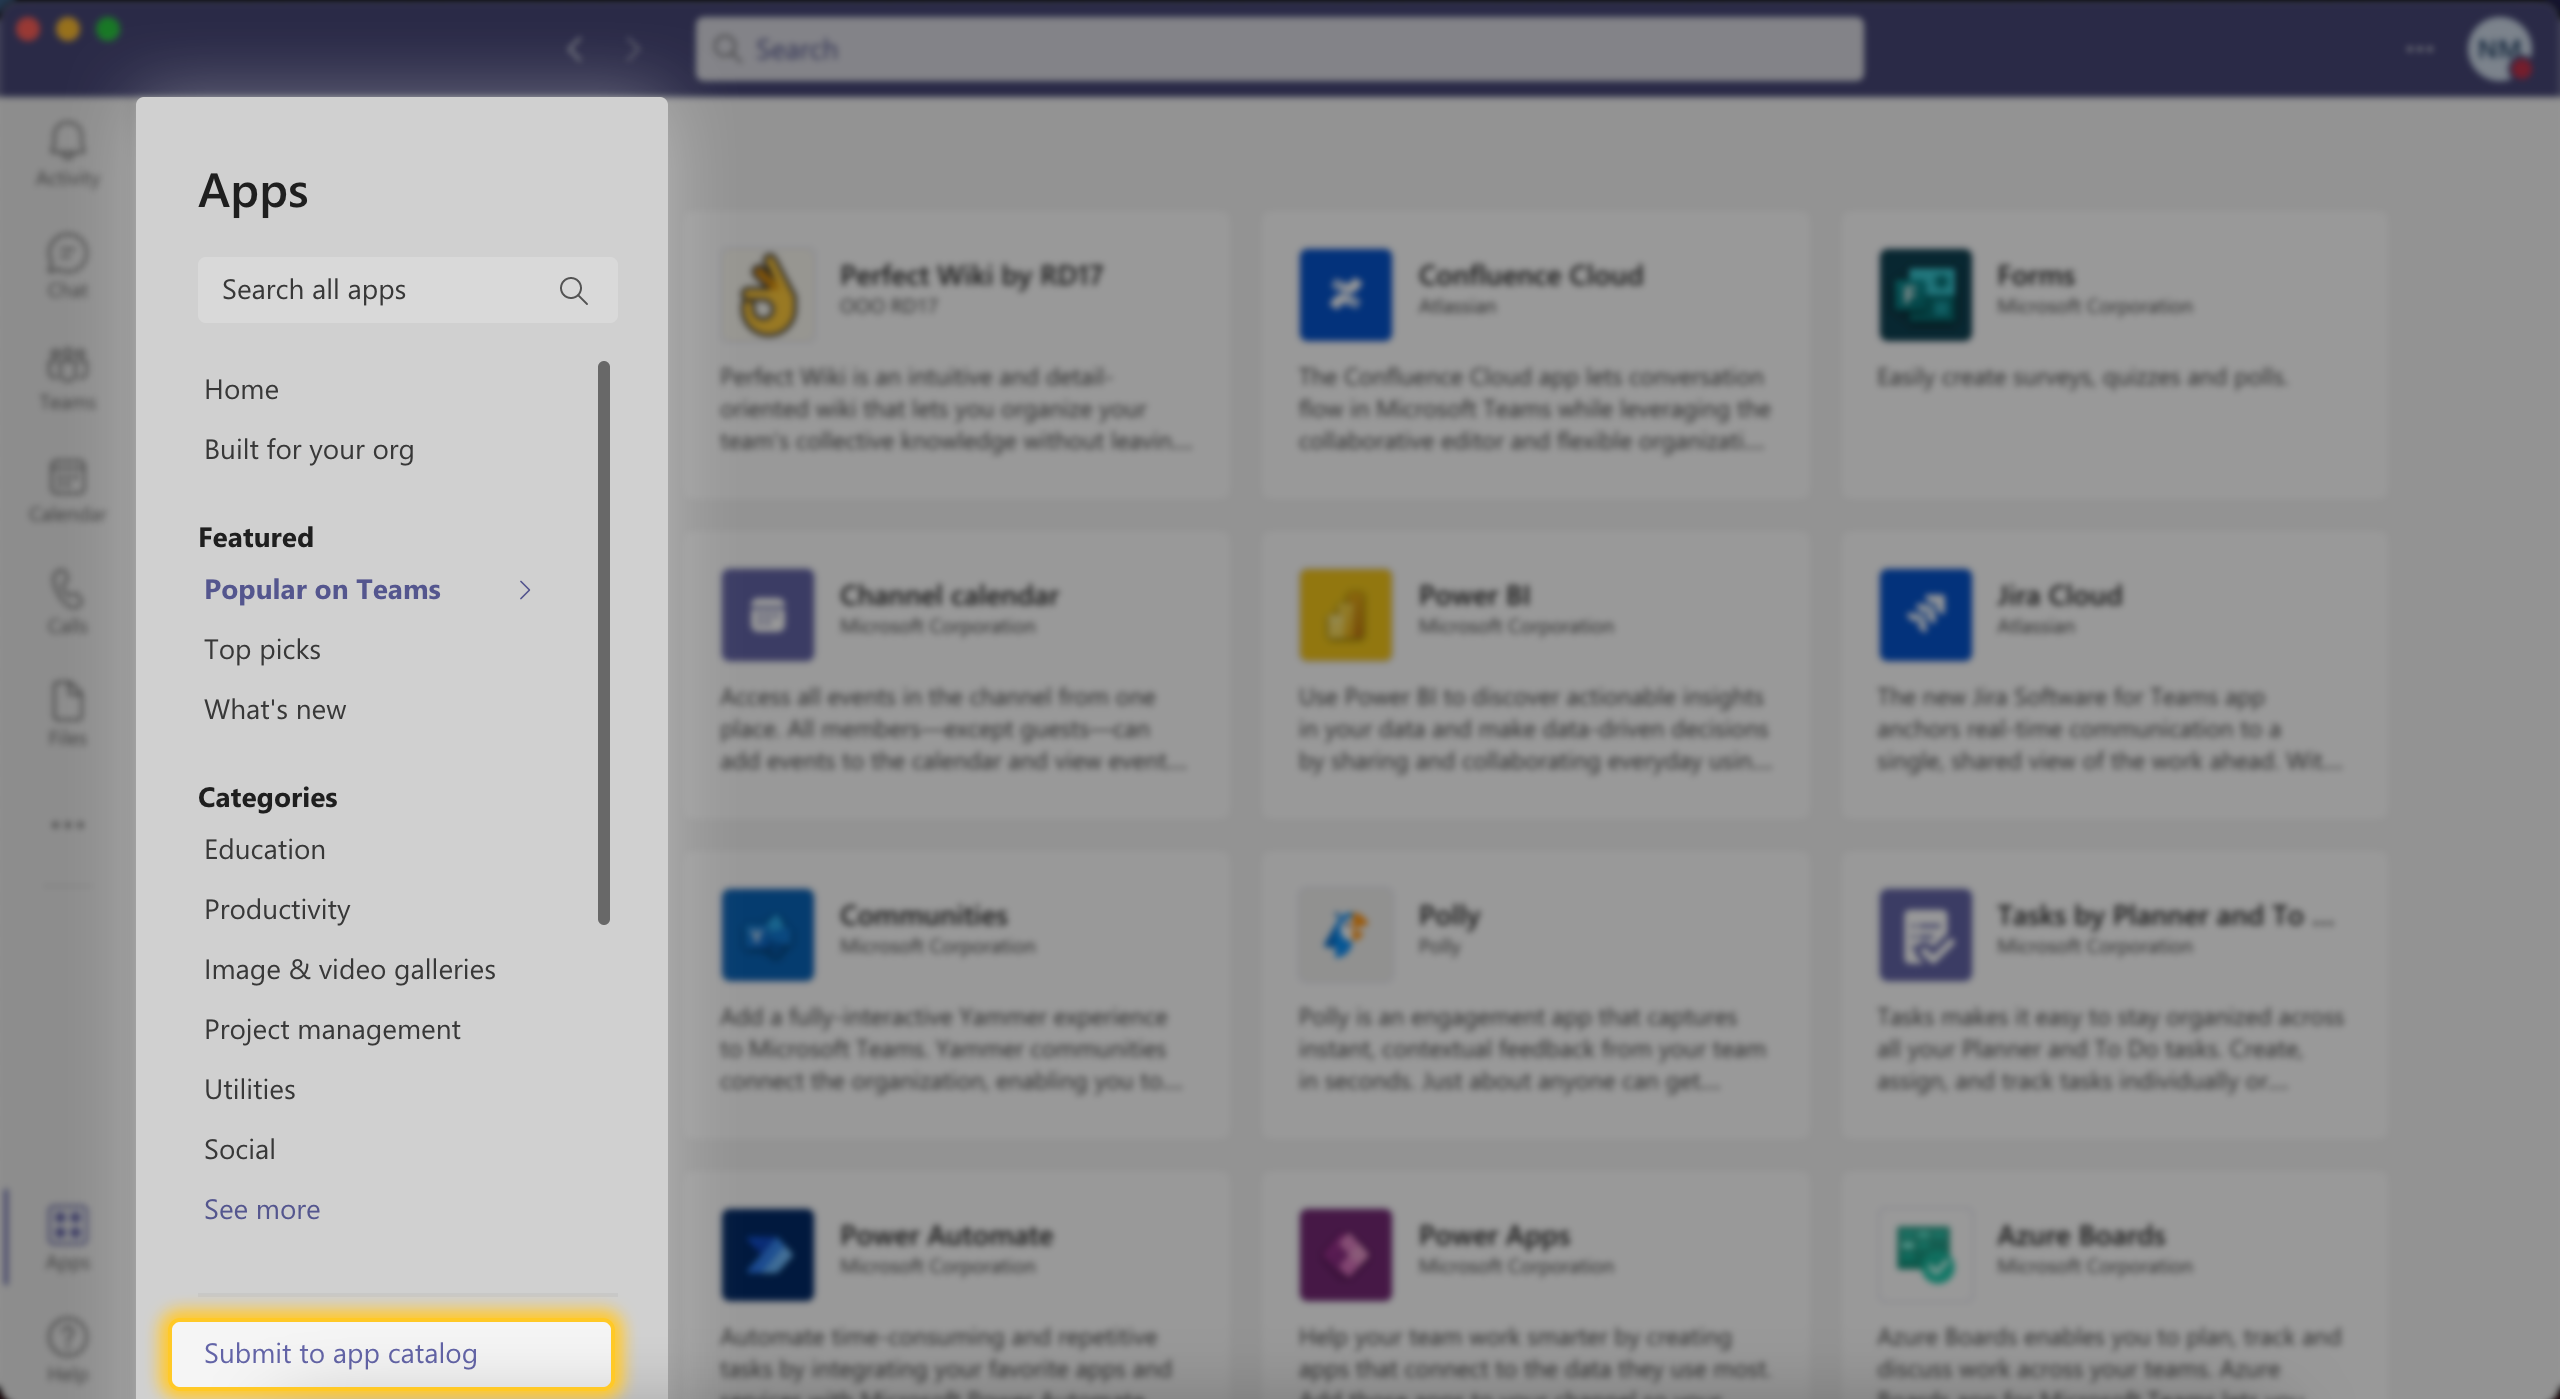
Do you have an app you developed and want to use from the comfort of Microsoft Teams? No problem, you can upload it to the apps database in a few simple steps:
- Hit the “+” sign next to the default tabs
- Click “More apps” at the top
- Go to “Submit to app catalog”
- Upload your app as a .zip file
- Follow the prompts to install it
Once it’s installed, add it to your channel tabs as you would any other app!
Your Channel’s New Knowledge Hub: Perfect Wiki
We believe that the cornerstone of effective teamwork is a shared body of knowledge.That’s why we developed an app that lets you and your channel members create a database of your company’s unique best practices, training guidelines, and customer forms without leaving Microsoft Teams.
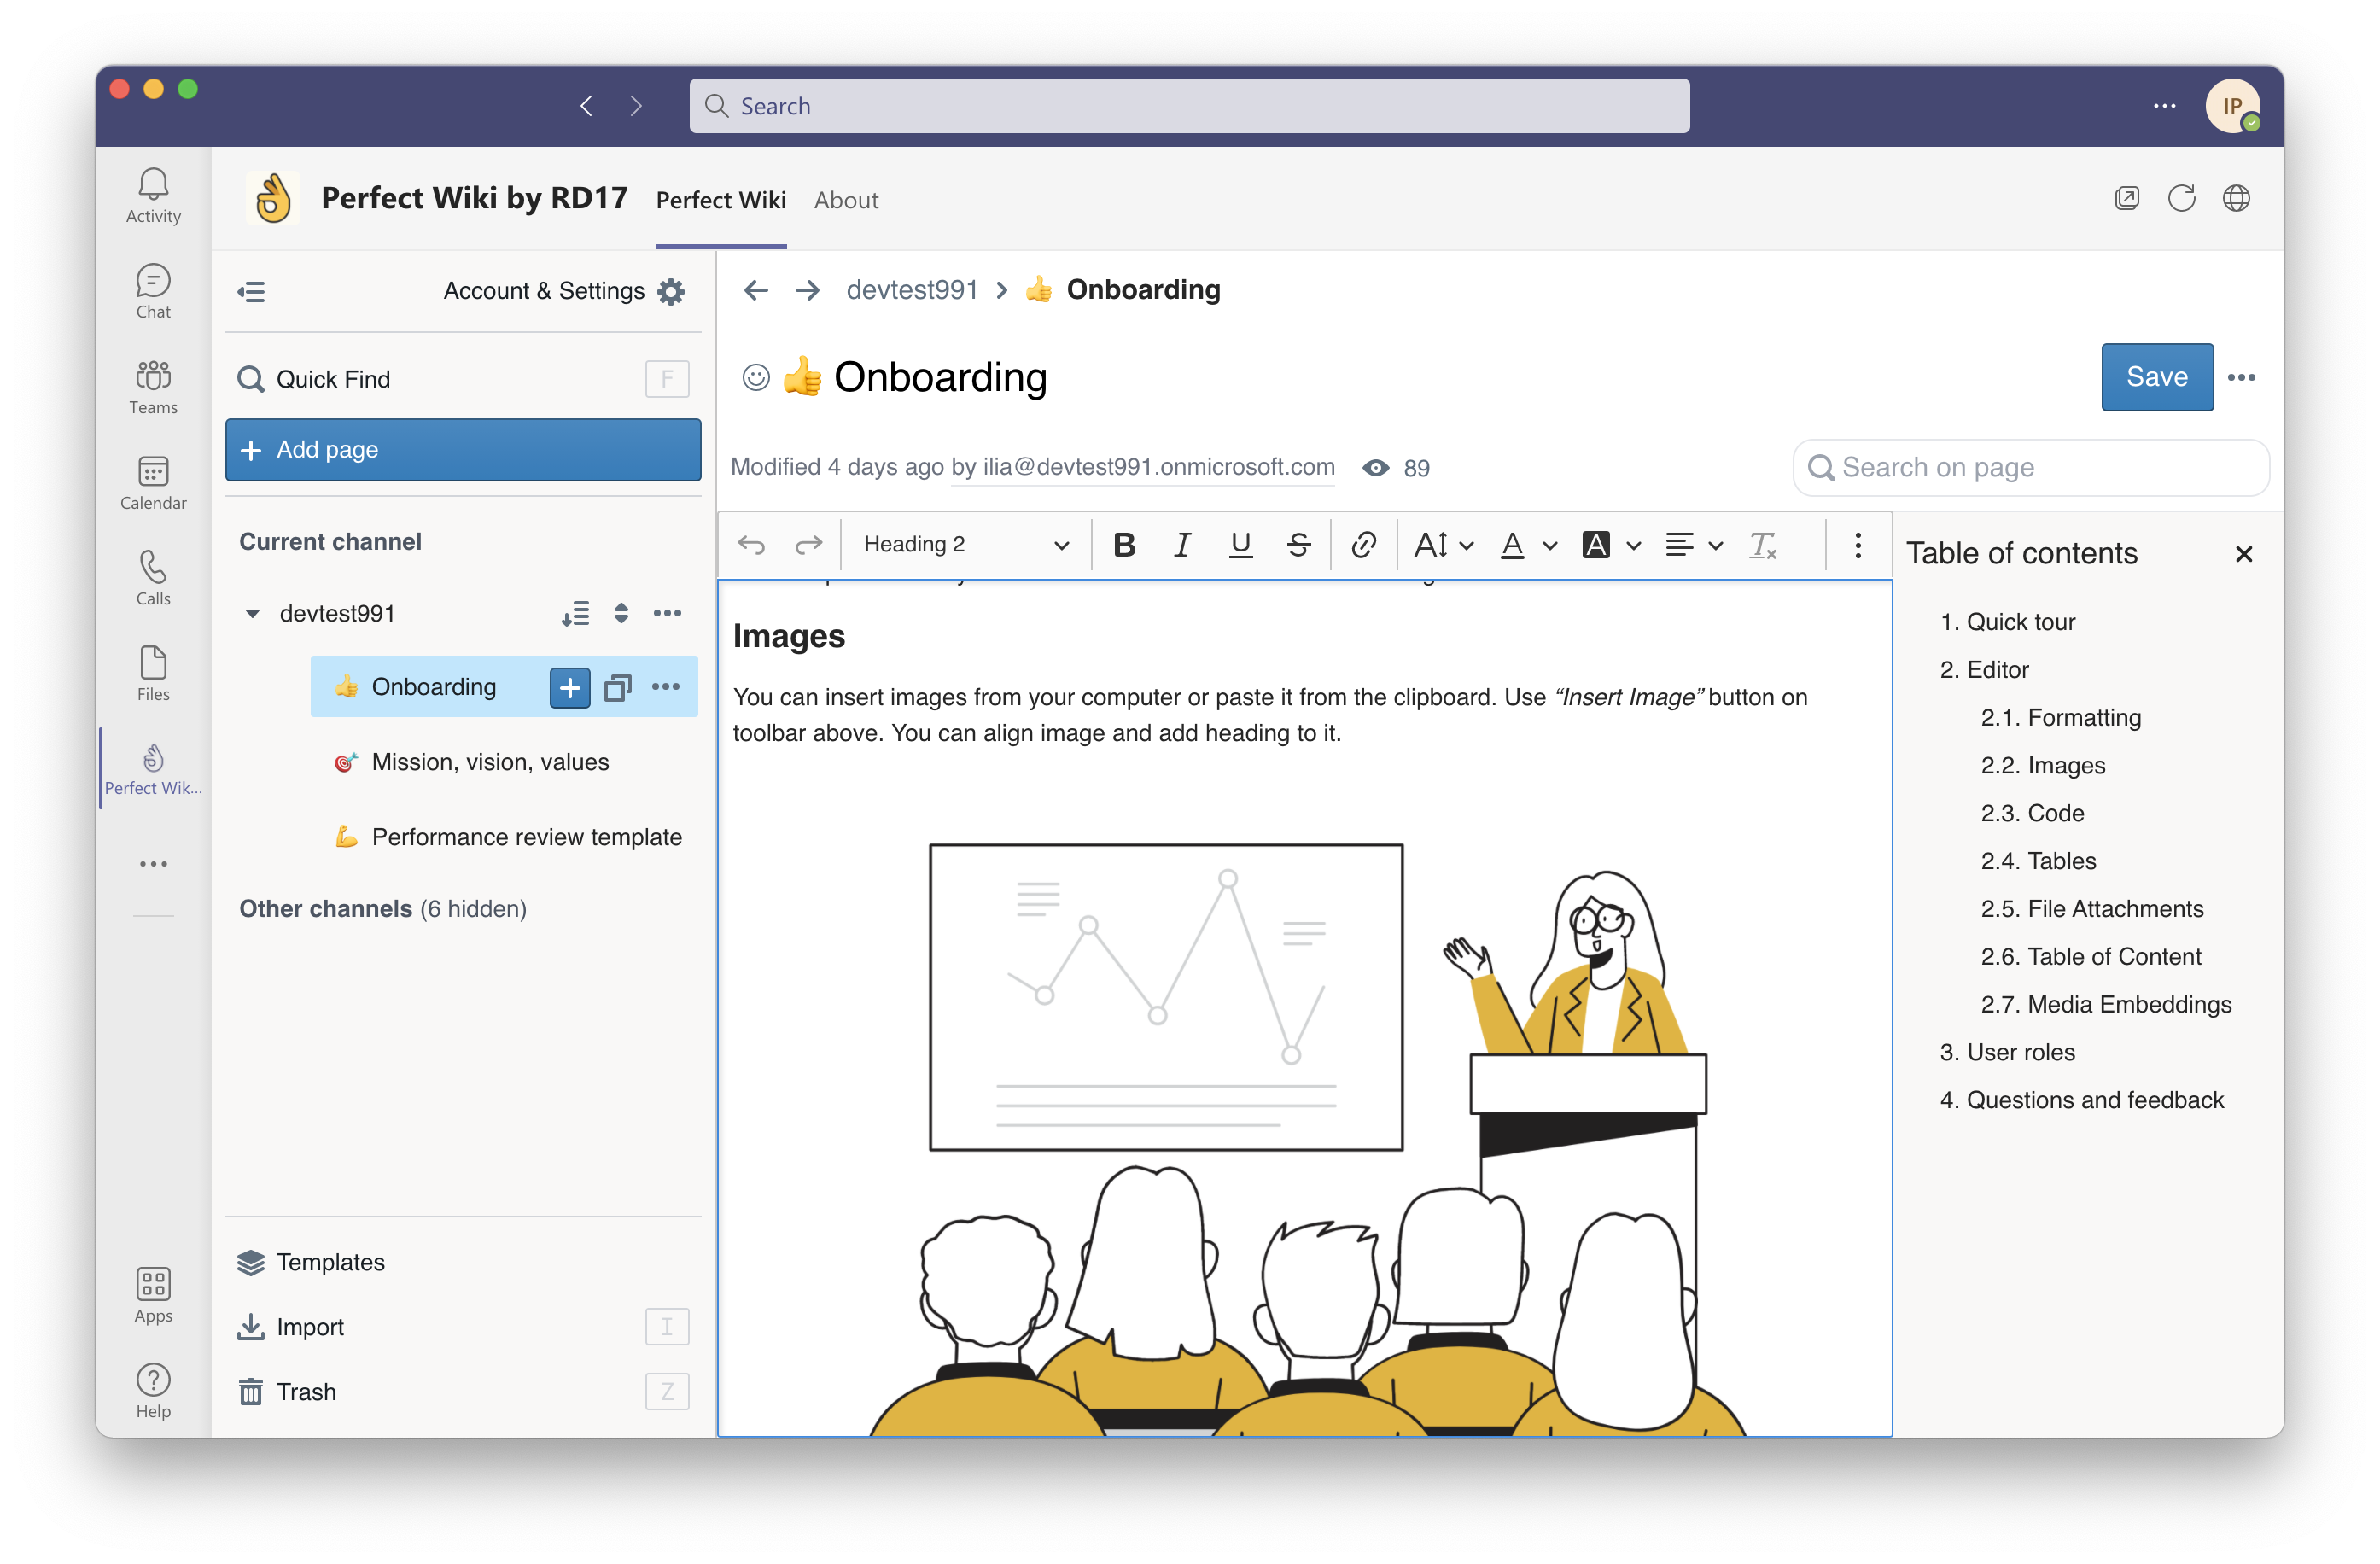
Perfect Wiki is a collaboration tool with a set of thoughtfully crafted features that will make knowledge sharing a delight:
- Seamless Teams integration
- Ready-to-use FREE templates
- Export files as PDF, DOCX, or HTML
- So many more!
Ready to try Perfect Wiki for 14 days in your channels for FREE today? The app installs directly into your Microsoft Teams channels and is ready to use in less than a minute.
5. Final Thoughts
If you read this blog post up to this point, congratulations, you are your company’s new hero (and ours). We hope you learned something new about Microsoft Teams channels, and we’re excited to hear about how you used this guide to support your team’s collaboration and productivity.
Drop us a line at hello@perfectwiki.com with comments, or to let us know what we should write about next!
Share this blog post with others if you found it worth the read on social media, or forward it to a fellow executive so they can make the most of Microsoft Teams channels too!


